- Details
- Written by: Spikes
- Category: Western European Theatre
- Hits: 17
 Â
Â
Â
June 7th, 1944
   The sister ship of the Infamous KMS Bismarck was the KMS Tirpitz. Extra Anti-Aircraft guns and eight torpedo tubes would be the only physical differences between the two but beyond that the biggest difference was that the KMS Tirpitz would never engage an enemy ship in combat. Both ships shared a reputation so bad that when the Tirpitz sailed to sea from July 2nd to 5th 1943, convoy PQ17 scattered and although the Tirpitz never engaged the convoy scores of merchant ships were lost to U-boats simply because she moved berths.
   Ultimately the most ironic trait the Bismarck and the Tirpitz shared was that both would be destroyed by British Air Attack. Countless attempts to sink her from midget submarines to Fleet Air Arm strike aircraft proved unsuccessful although she was damaged several times on different attacks. It wasn't until Bomber command attacked on 12 November 1944 that she would be sunk by Lancaster bombers with Tallboy Bombs.
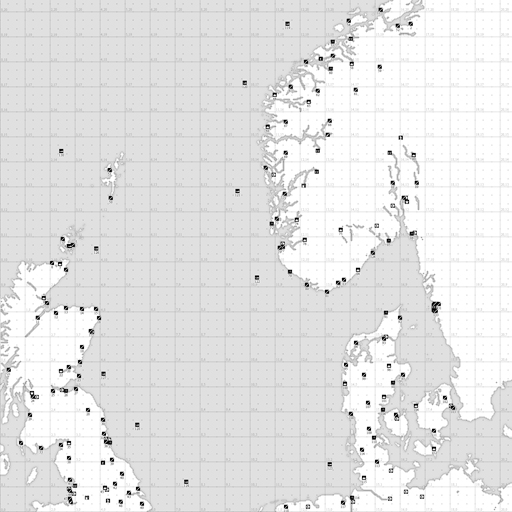
   Historically, the Tirpitz was sunk in Kafjord, Norway but this FSO becomes a hypothetical event when by direct order of a desperate Hitler, the Tirpitz and her Destroyer Escort make a daring attempt to sail Southwest to intercept the Allied Invasion of France in June, 1944. Under the cover of darkness she fled Tromso/Kafjord with destroyer escort and has dissapeared. The Royal Navy's biggest fear has just materialized. After navigating fjord after fjord she approaches Trondhiem, Norway. The most dangerous part of her journey still remains, Cross the North Sea and engage the Allied invasion of Normandy.
Â
AIRCRAFT
|
             Fleet Air Arm/Royal Air Force |
                           Luftwaffe |
|
 F4U-1A |
 BF 109 G-6 |
|
 F6F-5 |
 BF 109 G-14 (Maximum 32) |
|
 FM2 |
 BF 110 G-2 |
|
 Lancaster Mk III (8 Formations) |
 Fw 190 A-5 |
|
 Mosquito Mk VI |
 Fw 190 A-8 |
|
 P-51B (Maximum 32) |
 JU 87 |
|
 TBM-3  |
 JU 88 |
- Six of the Seven Aircraft must be flown every frame!
- Of the Six Aircraft used, you must fly at least 12 of each one.
- A Minimum and Maximum of Eight formations of Lancasters must be flown every frame.
Â
SCORING
Single Engine Aircraft - 2 PointsÂ
Twin Engine Aircraft  - 5 PointsÂ
Multi-Engine Aircraft - 10 Points
Destroyer - 50 Points              Â
Cruiser  - 100 Points
Hangars  - 40 Points
Recce Targets - 20 Points*
Recce Aircraft - 30 Points*
*Optional Objectives - Please read frame objectives carefully.
Â
SCORING PER FRAME
ALLIED
Hangars = 0*
Ships   = 500 (8 Destroyers, 1 Cruiser) (4 TFs)
Enemy Aircraft = 2/5/0
Total   = 500 + Aircraft Kills
AXIS
Hangars = N/A
Ships   = 500 (8 Destroyers, 1 Cruiser) (3 TFs)
Enemy Aircraft = 2/5/10
Total   = 500 + Aircraft Kills
* - Used to Even Scores in Frames 2 and 3 (should it be needed)
 SETTINGS
- Norway Terrain
- Fuel 1.0
- Icons short
- .7 Ack
- Fighter and Bomber warning range 63,360 (12 miles)
- Tower range set to 63,360 (for display only to match the above setting)
- Visibility - 17 Miles
- Radar off
- Friendly collisions off
- Kill shooter off
- Calm winds
- Time: 11 AM
- Formations Enabled
- MA bombing mode
- Ship Hardness X2 Main Arena Standard
Â
 Â
Â
Â
CICs, Please take the time to contact your squads assigned to your side and ask what their choice of rides would be.
You can contact all the squads on your side here.
http://ahevents.org/fso_email/mail_address.html
Please note the updated rules.
Â
Â
- Details
- Written by: James Glazier
- Category: Western European Theatre
- Hits: 23
Feburary 11-12 1942
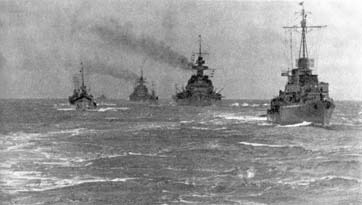
While U-Boats receive much of the recognition for the Kriegsmarine's contribution to the Battle of the North Atlantic, during the early days of the war, even the German surface fleet became a menace to Allied shipping. Two ships, the Scharnhorst and Gneisenau, both cruisers, and their escort ravaged Allied convoys. After a series of operations where they were credited with large tonnages of Allied shipping, both ships returned to Brest, France to make repairs and refit for sea. After some time, a third Kriegsmarine Cruiser, the Prinz Eugen, joined them in Brest. After some consideration by German High Command, the decision was made to reposition them to Kiel, Germany. After a considerable amount of planning was conducted, the orders to execute Operation Cerberus (the three-headed dog of Greek mythology) were issued, and preparations to set sail began. Cerberus depended on an amount of inter-service coordination between the Kriegsmarine and Luftwaffe not seen at any other point in the war. Adolf Galland promised that the 3 German capital ships would sail from start to finish in the shadow of Luftwaffe aircraft and that he would allow no harm to come to them from the Royal Air Force.
Meanwhile, in Great Britain, plans were underway to send all three ships to the bottom of the Atlantic should they attempt to put to sea. British agents worked the docks in Brest, keeping an eye on the ships at anchor. HMS Sea Lion, a British submarine lay in wait just off shore of Brest, monitoring traffic in and out of the harbor. Coastal Command aircraft patrolled the skies using radar to track shipping movement night and day. The British were convinced that the German ships would use the cover of night to make the passage, and had planned to counter their eventual departure. Churchill himself considered the potential for passage through the English Channel an issue of British national honor and put an inordinate amount of pressure on the Royal Navy to block any attempt. The British had the resources in place to counter the passage, and waited patiently for the Kriegsmarine to make their move.
Through the fortunes of war, the 3 ships and their escorting destroyers slipped out of the harbor in Brest during the evening, on a time table that would have them pass through the Straits of Dover during daylight. It wasn't until mid-day on the 12th that the ships were detected, and then merely by a chance visual contact from patrolling fighters. While the British scrambled their resources to attack the German ships, the Kriegsmarine vessels made their way through the Straits unmolested. Only in the early afternoon was the Royal Air Force and Navy able to manage an attack on the ships, only to be continually driven off by the Luftwaffe and bad weather. In increasingly thick fog and high winds, the German ships were able to stave off the British attacks and slipped into Kiel the next evening, relatively undamaged.
This setup is a recreation of these two days. This setup is a modified version of Nefarious's "Channel Dash". I thank him for allowing me some creative liberties with his previous work.
<S> Stoney74
For an excellent synopsis of the actual history, go to http://www.scharnhorst-class.dk/scharnhorst/history/scharncerberus.html
RULES
Arena:
Special Events Arena
Country Percentages:
Allies 45%
Axis 55%
Allied Aircraft:
Spit I
Spit V
Hurri IIC (Limited to 30 per frame)
TBM-3 (Limited to 30 per frame)
B-25C (Formations enabled)
Axis Aircraft:
Bf-109E
Bf-109F
Bf-110C
Ju-87
Ju-88 (Formations enabled)
Notes:
--All plane types used must be flown at a minimum of 24 aircraft (8 formations)
--Allies must fly 3 of 5 aircraft types during Frames 1 and 2
--Allies must fly 4 of 5 aircraft types during Frame 3
--Axis must fly 4 of 5 aircraft each frame
--TBM-3 can only be configured with Torpedoes (no rockets or bombs)
Fields:
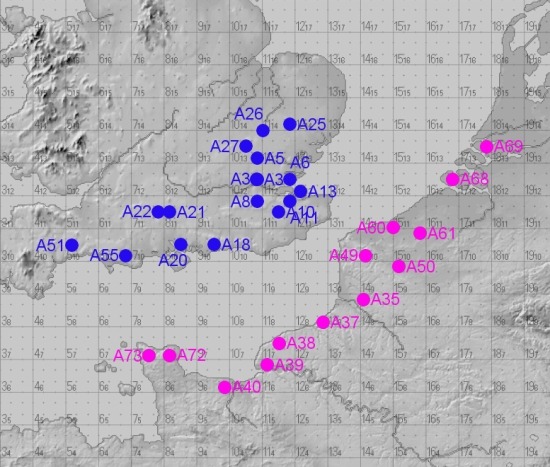
Frame 1 Allied: A51, A55, A22, A21, A18, A20
Frame 1 Axis: A73, A72, A40, A39, A38, A37
Frame 2 Allied: A3, A8, A6, A11, A13
Frame 2 Axis:A35, A49, A50, A60, A61
Frame 3 Allied: A25, A26, A27, A3, A10
Frame 3 Axis: A49, A60, A61, A68, A69
Special Weather Settings:
Frame 1 Visibility:10 miles
Frame 2 Visibility:8 miles
Frame 3 Visibility:6 miles
Winds will be from varying direction each frame. Wind speeds will vary from 5-40 mph depending on altitude. The higher you go, the faster the upper level winds will be.
Victory Conditions:
Aircraft:
Ju-87 3 Points
Spit I 5 Points
109E 5 Points
TBM-3 5 Points
All other fighters are 10 points
All other bombers are 15 points
Objects:
Kriegsmarine Objects:
Gun
Destroyer: 50
Cruisers:100
Ground Objects:
5 Gun
5 Manned Gun
5 Ammo Bunker
5 Fuel Bunker
5 Barracks
5 Radar
30 Vehicle Hangar
30 Fighter Hangar
30 Bomber Hangar
30 Town Building
Scoring: Objects destroyed will be credited to the attacking side. Objects not destroyed will be credited to the defending side. Damage from one frame carries over to the next frames.
Field Order:
Allies-Rook
Axis-Bishop
CM-Knight
Arena Settings:
--BoB Map
--Fuel Burn 1.0
--Icons Short
--.5 Ack
--Ship Hardness X2 (Doubled)
--Fighter and Bomber Warning Range 52,800 (10 miles)
--
--Visibility as listed above
--Radar Off
--Enemy Collisions On
--Friendly Collisions Off
--Killshooter Off
--Formations Enabled
--Downtime multiplier set to max
--Time per Frame objectives
--Bomber auto-calibration (MA Style)
Contact all the squads on your side at:
http://events.hitechcreations.com/squadops/assignments_fri.php
Updated FSO Rules at:
http://www.ahevents.org/index.php?option=com_content&task=view&id=95&Itemid=121
- Details
- Written by: Spikes
- Category: Western European Theatre
- Hits: 19
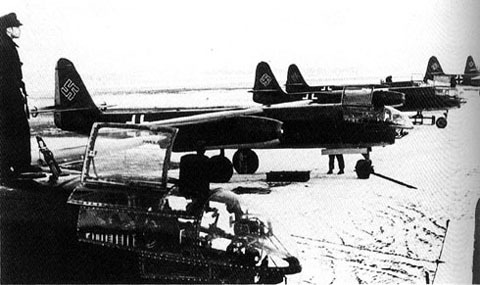
The German Arado 234 was the very first purpose-built jet bomber. While the Ar-234 had very little influence on the outcome of World War II, being much too late and too few in number, it had influence on later aircraft designs.
When operated as a bomber, the Ar-234 could be used in shallow dive attacks, low-level horizontal attacks, or high-altitude horizontal attacks.
► In shallow dive attacks, the pilot would drop from about 5,000 meters to under 1,500 meters (16,400 to 4,920 feet), aiming the bombs through the periscopic sight that stuck up above the cockpit.
► In low-level horizontal attack, used only when the target was obscured, the pilot simply flew level and dropped the bombs when it seemed appropriate.
► High-altitude horizontal attacks were particularly interesting. Since the Ar-234 was a single-seat aircraft, the pilot had to double as the bombardier, and did so with the help of a sophisticated Patin autopilot system. The pilot would fly to within about 30 kilometers (19 miles) of the target, engage the autopilot, swivel the control column out of his way to the right, and then lean over and sight the target through the Lotfe 7K bombsight.
Only one Luftwaffe unit, Kampfgeschwader 76 or KG76, was equipped with Ar 234 bombers before Germany's surrender. As the production of the Ar 234 B-2 increased in tempo during fall 1944, the unit received its first aircraft and began training at Burg bei Magdeburg. The unit flew its first operations during December 1944 in support of the Ardennes Offensive. Typical missions consisted of pinprick attacks conducted by less than 20 aircraft, each carrying a single 500 kg (1,100 lb.) bomb. The unit participated in the desperate attacks against the Allied bridgehead over the Rhine at Remagen during mid-March 1945, but failed to drop the Ludendorff railway bridge and suffered a number of losses to anti-aircraft fire.
The deteriorating war situation, coupled with shortages of fuel and spare parts, prevented KG 76 from flying more than a handful of sorties from late March to the end of the war.
(National Air and Space Museum, Smithsonian Institution - revised on 8/15/00 by T. Dietz and R. E. Lee)
Arena
SEA
Country Percentages: 50% - 50%
Allied Planeset
B-17G
B-24J
P-38J
P-47D-40
P-47N - Only 15 Per Frame
P-51D
Spit IX
Spit XIV
Tempest V - Only 15 Per Frame
Typhoon
Mosquito Mk VI
German Planeset
Bf 109G-14
Bf 109K-4
Bf 110G-2
Fw 190A-5
Fw 190A-8
Fw 190F-8
Fw 190D-9
Ju 88A-4
Ar234 - Only 20 Per Frame
Me262 - Only 10 Per Frame
► Each side must utilize at least 7 different AC types per frame
► Only the German jets and higher end Allied planes will be limited as noted.
► The P-47N is a substitute for the P-47M which saw service at this time of the war.
► Formations will be turned off for Bombers on both sides.
► The number of the Jets and higher end Allied planes available in later Frames will be dependant on the percentage of the associated Airfield and Town destroyed. They won?t be dependant on the number of Aircraft shot down.
► If the Field and Town the Me262 uses to fly from is destroyed by 80% during the first Frame, the German?s will only be able to fly two during the Second Frame.
► The Field and Town will be different for Frame 2, this way the Allies will have to target different areas.
► If the new Field and Town is destroyed during the Second Frame by 70%, the German?s will only be able to fly three Me262's during the Third Frame.
► If the Fields and Towns remain untouched, the German?s will be able to fly ten Me262's during the following Frame.
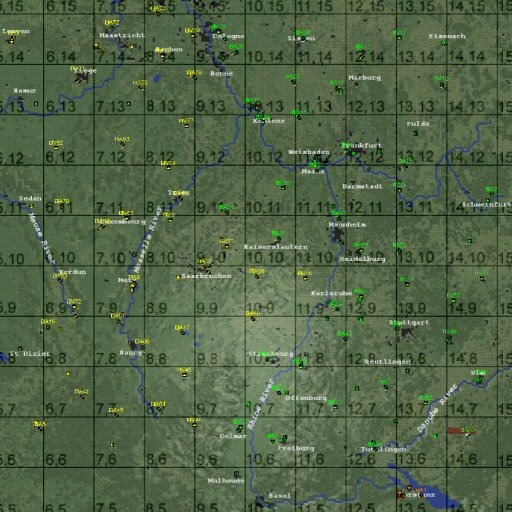
Restrictions
Allied are restricted to take off from designated bases.
(To Be Determined)
Axis are restricted to take off from designated bases.
(To Be Determined)
Victory Conditions
Aircraft
Pts Objects
► 10.0 Fighter Aircraft
► 15.0 2 engine Aircraft
► 20.0 4 engine Aircraft
► 20.0 Jet Aircraft
Ground Targets
Pts Objects
► 00.1 Gun
► 00.1 Mannable Gun
► 03.1 Ammo Bunker
► 03.1 Fuel Bunker
► 03.1 Barracks
► 03.0 Radar
► 27.8 Vehicle Hangar
► 27.8 Fighter Hangar
► 27.8 Bomber Hangar
► 03.1 Town Building
► 03.1 Factory at strategic target
► 00.8 Truck in convoy
► 01.6 Train
Arena Settings:
- Rhine Map
- Field Order
3 - Rook
1 - Bishop
2 - Knight
- Fuel 1.0
- Icons short
- 0.5 Ack
- Fighter and Bomber warning range 42,000 (about 8 miles)
- Tower range set to 42,000 (for display only to match the above setting)
- Haze/fog full visability (17 miles)
- Radar off
- Enemy Collisions On
- Friendly collisions off
- Killshooter off
- Formations disabled
- Downtime Multiplier set to max
- Time: 13:00 ( 1PM ) Game Clock
- No wind
- Bomber calibration: Auto ( MA style )
Designer Notes
My concept on the planeset was to allow for a fairly historical setup, and allow the country CiC?s some leeway for their planning.
The Allied and German Targets which survive attack will determine the number of aircraft available in subsequent Frames.
Designed By
Nomde
CO 56th Fighter Group
- Details
- Written by: Scott Avery
- Category: Western European Theatre
- Hits: 20
Mighty Eighth
|
| ||||||||||
|
Artist Credit: | ||||||||||
|
Background Information February, 1944. The USAAF Daylight bombing raids are continuing. Pushing deeper into Germany, enemy fighters and flak have taken their toll, yet the missions must still be run. Fortress Europe must be destroyed. With the recent introduction of the P-51B, fighters can now escort the bombers all the way to and from the target. However, Goering's Luftwaffe is still a formidable force to face.
This Squadron Operations Event recreates some of the action in early 1944 when escorted B-17s and B-24s became the normal strategy for the Allied daylight raids into the industrial complex within Germany.
Please login and request a side preference and set your squad commitment level here:
Arena Country Percentages
| ||||||||||
| ||||||||||
|
| ||||||||||
|
Victory Conditions Fighters: 10 points Four engined bombers: 20 points.
Each ground target is worth 300 points to either side and scoring is based on the % destroyed for enemy targets and the % undamaged for friendly targets.
Arena Settings - Visibility : Varies per frame - Bomber formations enabled - Calibrated bombsite ( not the MA style )
Designer Notes - Air launches enabled - Bombers will use the manually calibrated bomb-site for frame 1. Refer to manual or AH veterans for help. - Strats in southern portion of map will belong to the wrong country, but since they are away from the center of action, that will just have to be. CM Notes Depending on logistics, bomber pilots may be able to reup airlaunched SINGLE planes for return attacks if they RTB successfully. This feature is under consideration. SIDE COMMUNICATIONS
You can contact all the squads on your side here.
- http://ahevents.org/component/option,com_staticxt/Itemid,168/ FSO Rules
Reminder: All targets must be attacked in first hour
Daddog's Guide to being Frame CO
Design By |
- Details
- Written by: Spikes
- Category: Western European Theatre
- Hits: 18
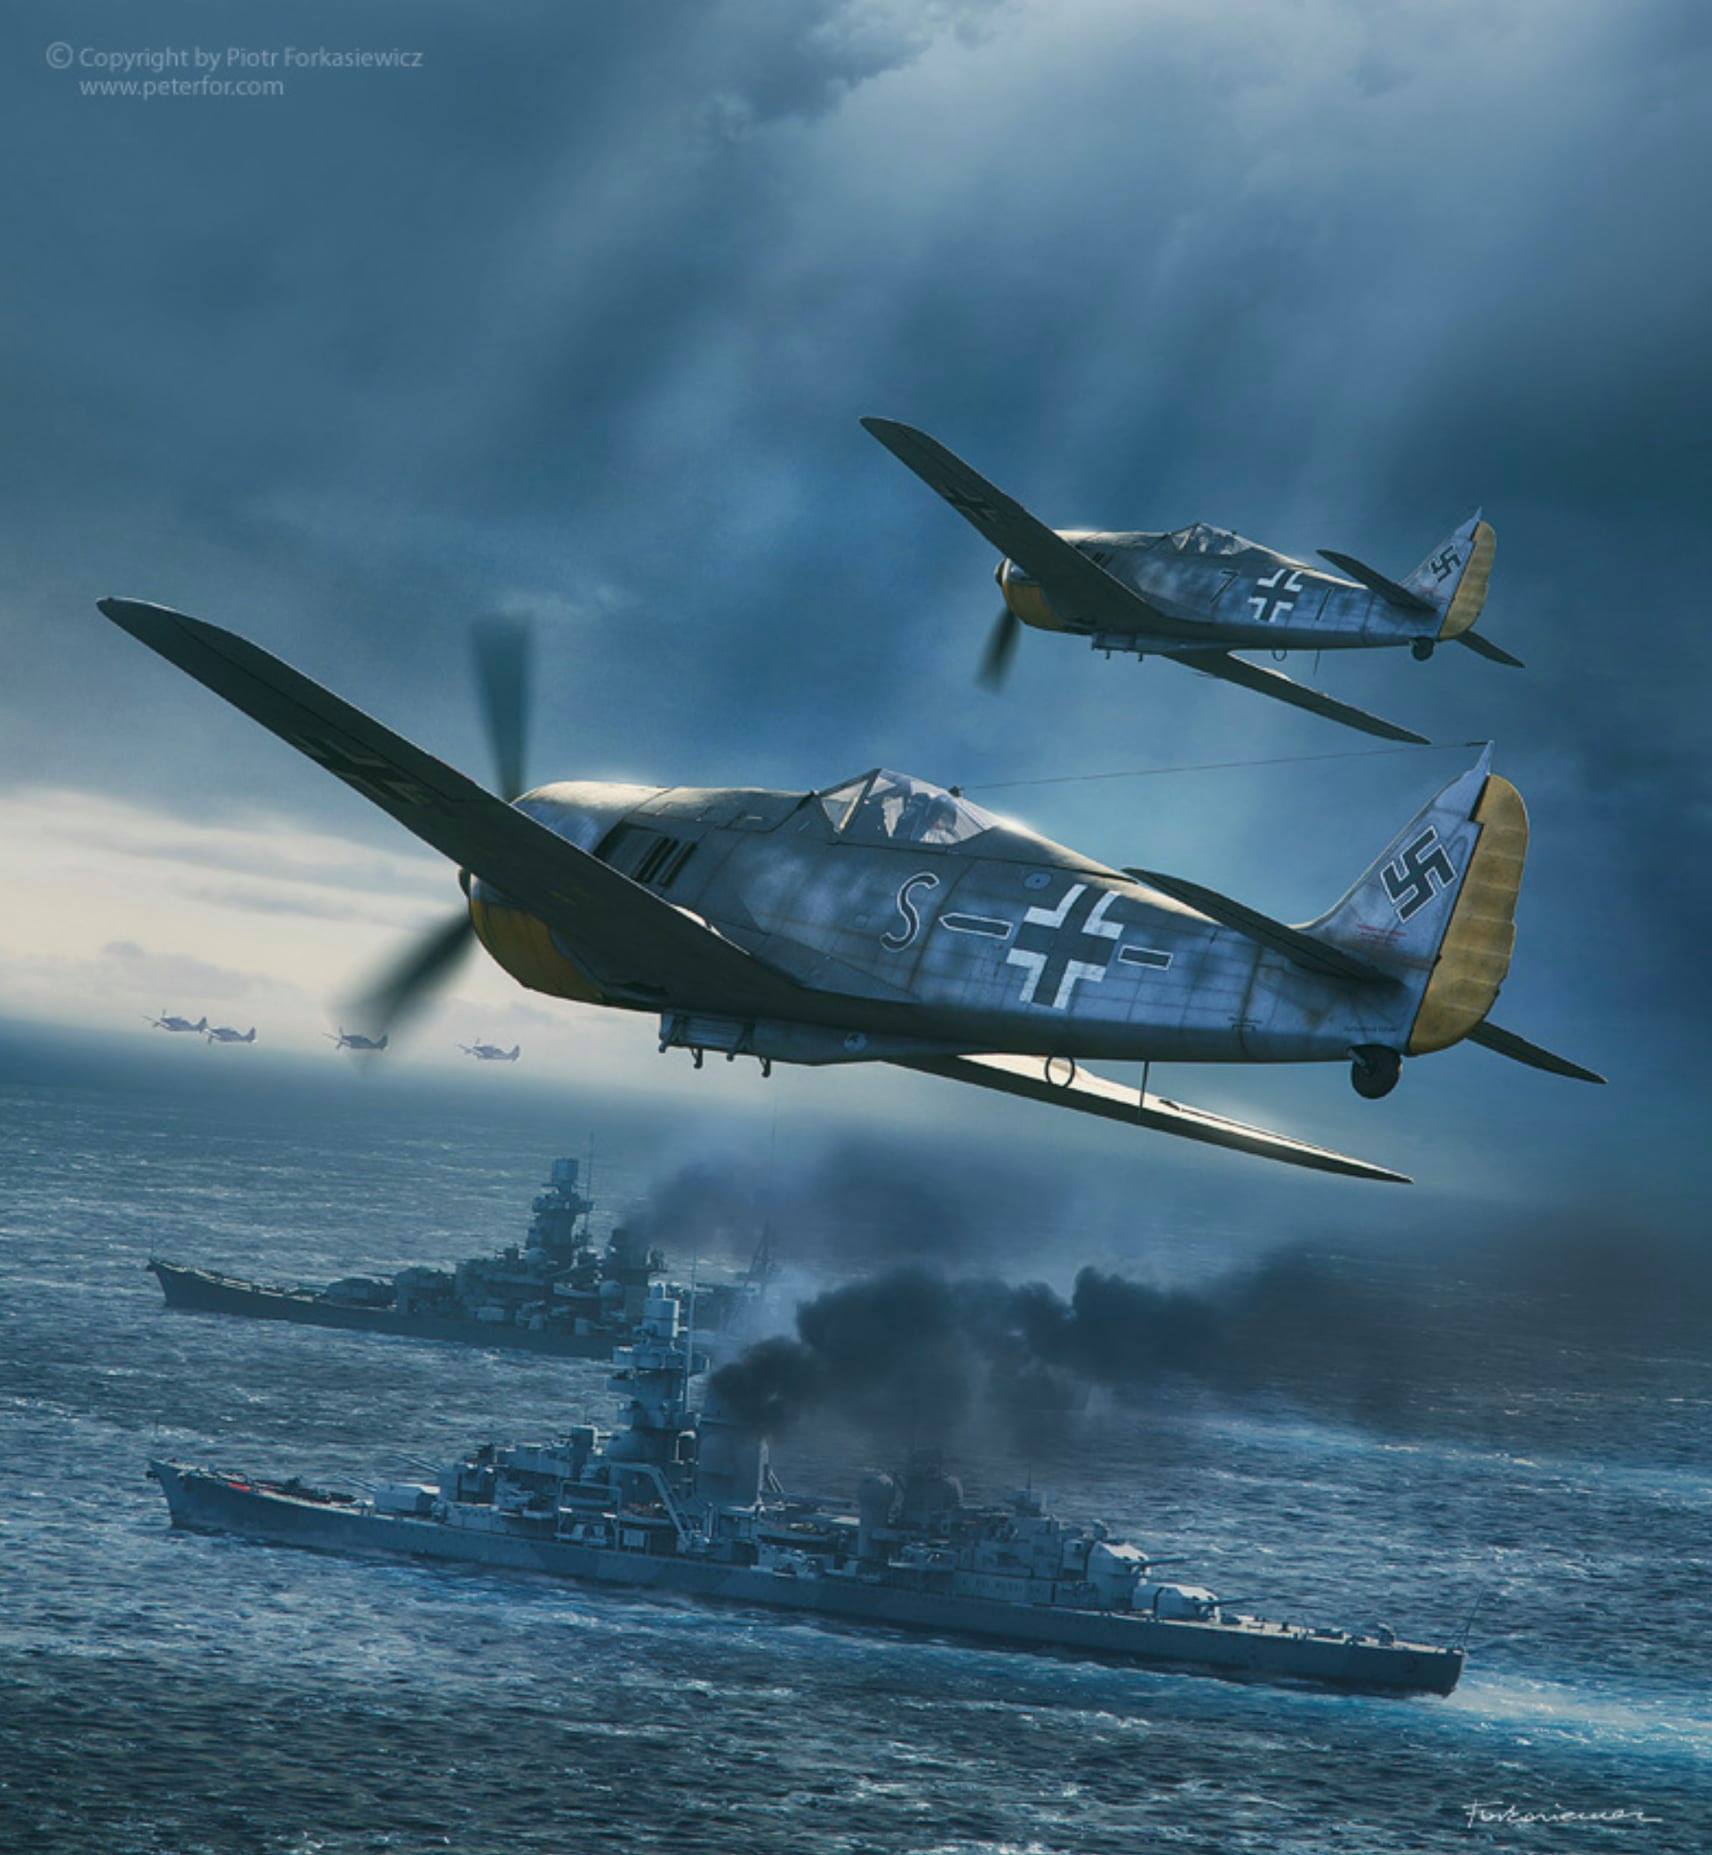
Shortly after Midnight on February 11th 1942, The German Battleships Scharnhorst and Gneisenau, along with the heavy cruiser Prinz Eugen set sail from Brest, France under the cover of darkness and poor weather. Instead of sailing West to stalk the North Atlantic Convoy routes they were ordered to redeploy to Kiel, Germany through the straits of Dover.
Dubbed Operation Cerberus, Hitlers plan would have the three capital ships work in strict coordination with the Luftwaffe to protect them the entire route. On the opposing shore, The RAF and Royal Navy had anticipated a “Channel Dash” and had a complex plan in stopping the German warships that involved secret agents in the port of Brest, Submarine pickets outside of the harbor and RAF and Fleet Air Arm aircraft on constant patrol.
Despite all efforts to monitor the Battleships, the British failed to catch the ships leaving port and wouldn’t find them until 11:30 that morning, already having passed through the straits of Dover. Less than an hour later the first attacks would begin with Swordfish torpedo bombers, followed by Bomber Command Halifaxs, Manchesters, and Stirlings later that afternoon.
Raid after Raid was launched, but all failed to cause serious damage. The RAF lost 42 Aircraft against the German Fleet but It wasn't until the Scharnhorst and the Gneisenau both struck mines that they were even damaged. Scharnhorst would head to Wilhelmshaven with damage that kept her in port for 3 months.
All three German warships would meet different fates by the war’s end. Gneisenau was struck by RAF bombers just 2 weeks later in the drydock at Kiel. During her rebuild it was decided that she would be fitted with six 38 cm guns that she was originally designed for, however this idea was scrapped by Hitler after the loss of the Battle of the Barents Sea. Her guns were removed and used as shore batteries and she was sunk as a block ship as the Russians advanced on her port of Gotenhafen in 1945.
Scharnhorst would remain in drydock until July 1942 and in early 1943 would deploy to Norway with the Battleship Tirpitz. In December 1943 Scharnhorst would lead a task force of 5 destroyers after a Russian bound Convoy. In what would become the Battle of the North Cape, the Scharnhorst was engaged by the HMS Duke of York and sank on December 26th, 1943.
Prinz Eugen would deploy to Norway but would return to Germany after being torpedoed by the British Submarine Trident. As the Russians approached Prinz Eugen would sail for Denmark where she would be decommissioned and taken under control by the Royal Navy. Eventually she would be awarded to the US as war prize and later used in the Atomic Tests in Bikini Atoll. She would survive both Atomic tests, but would sink 6 months later after being towed to Kwajalein Atoll.
PLANE SET:
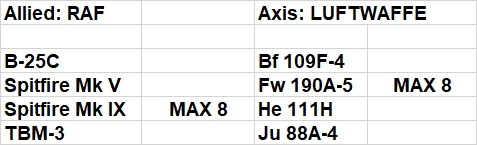
SPECIAL RULES:
20K ALT CAP FIGHTERS - ALL FIGHTERS
14K ALT CAP - ALL BOMBERS
Bombs Disabled - Fw 190A-5
Torpedoes Only - He 111H, TBM-3
Formations Disabled - He 111H
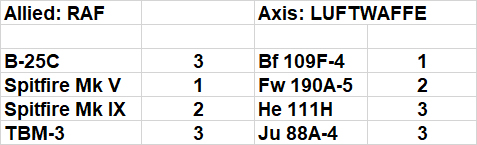
AIRCRAFT SCORING:
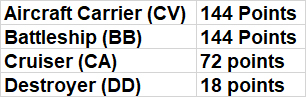
OBJECT SCORING:
ACE MISSIONS
Each side will have one mandatory Ace mission per frame. These frames will represent notable pilots of the time and theater. One pilot from each side will be designated an "Ace" Pilot. They must fly the Aces listed aircraft.
They will be scored as follows.
Ace Pilot = 20 Points
Ace Pilot Kills = 5 Points
So for example if an Ace Pilot is shot down they are worth 20 points to the other side. Likewise, every victory an Ace Pilot lands they will be rewarded 5 points.
ALLIED:
Frame 1 – (RAF) - (SPITFIRE IX) - Stanislaw Skalski - Skalski started claiming victories on the first day of World War 2 and with six victories against the Germans during the invasion of Poland was the first Allied Ace of World War 2. Escaping Poland to Britain, Skalski claimed 4 victories during the Battle of Britain with 501 Squadron. Skalski went on to fight in North Africa and Italy and later back in England and France and would accumulate 22.5 victories during the war. After the war Skalski was arrested for espionage in Poland by communist authorities. He was eventually released and rejoined the Polish Air Force. Skalski passed away in 2004 at the age of 88.
Frame 2 – (RAF) - (SPITFIRE IX) Hugo “Sinker” Throssel - Australian Throssel was commissioned as a Pilot Officer in early part of 1941. Throssels first victory occurred on 21st September 1941 when he shot down a Bf 109E over Le Touquet whilst escorting Blenheims. He then served with 129 and 72 Squadron until July 1942 when he was then posted as commander 611 Squadron. In the meantime his tally had reached 9 kills. In February 1943, Throssel was shot down by FW190s and crashed in the sea off Boulogne. Armstrong was credited with 12 kills during World War 2.
Frame 3 – (RAF) - (SPITFIRE IX) Stanislaw Brzeski - Brzeski started his career with the Polish Air Force and claimed one kill over Poland in 1939 before leaving for Britain. Initially a night fighter pilot he eventually would be placed with 303 Squadron where he would begin his RAF victory claims over France. Brzeski would be shot down and captured in May of 1944, liberated in 1945 and returned to England. He would end the war with 7 victories and 3 shared. Brzeski passed away in 1972 at the age of 54.
AXIS:
Frame 1 – (Luftwaffe) - (Fw 190A-5) - Egon Mayer - Egon Mayer had been a Western Front veteran since the Invasion of France, claiming his first victory on 13th Jun 1940. He often flew as the wingman of Helmut Wick during the Battle of Britain where he would claim 3 more victories before being shot down into the channel. JG 2 was withdrawn from the battle and Mayer would not return to the Channel Front until 1941 where in July he would claim his 19th and 20th victory and be awarded the Knight’s Cross of the Iron Cross. Mayers victory tally was at 102 when he was killed in action on March 2nd 1944 by USAAF Thunderbolts.
Frame 2 – (Luftwaffe) - (Fw 190A-5) - Gerhard Schopfel - Schopfel transferred from the police force to the Luftwaffe in 1936 and became a squadron leader in JG 26 in 1939. He scored his first kill on May 19, 1940 during the battle of France. Schopfel was awarded the Knight’s Cross in September for 20 kills during the Battle of Britain. Schopfel was given command as Geschwaderkommodore of JG 26 in December of 1941. During the Channel Dash he led III/JG 26 into battle intercepting Torpedo attack on the Battleships. Schopfel would be shot down and injured in 1944 then given command of Fighter Leader in Hungary. In 1945 he was captured by Soviet forces and detained until 1949. Schopfel passed away in 2003 at the age of 90.
Frame 3 – (Luftwaffe) - Siegfried Schnell (Fw 190A-5) - Schnell shot down his first enemy aircraft on 14th May during the Invasion of France. He would accumulate 20 victories by November of 1940 and was awarded the Knights Cross. Schnell remained on the Channel Front and during a two day span on July 8th and 9th would shoot down 9 Spitfires bringing his total to 44 victories and the award of Oak Leaves to his Knights Cross. His total would reach 52 during the infamous Channel Dash in February of 1942 and would shoot down 5 Spitfires during the Dieppe battle on August 19th 1942 bringing his total to 71. He would eventually be killed on the Eastern Front on February 25th, 1944 near Leningrad. He was credited with 93 victories.
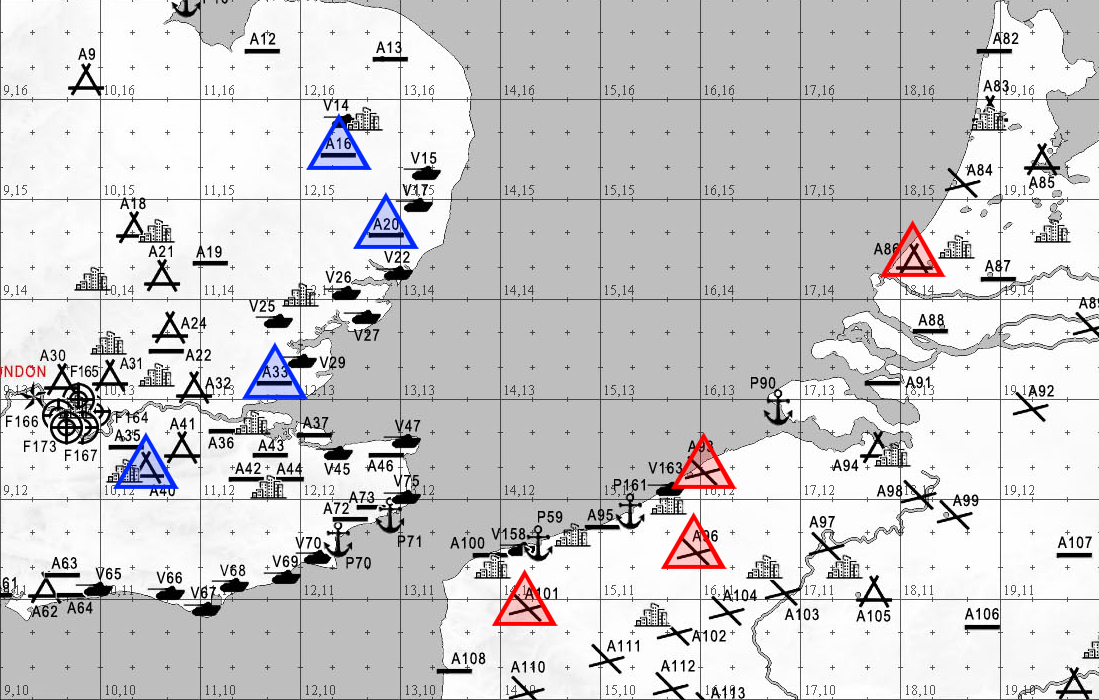
SETTINGS
- BOB40 terrain
- Icon Range – Friendly 3k, Enemy 3k.
- No Radar
- Fighter and Bomber Warning Range - 79200 (15 miles)
- Tower Range – 79,200 (for display to match the above Fighter and Bomber Warning)
- External view for bombers (F3) - On
- Friendly Collisions - Off
- Enemy Collisions - On
- Kill Shooter - Off
- Fuel - 1.0
- Ack - 0.3
- Formations - Enabled
- Bombsite calibration - Main Arena Standard
- Time:
FRAME 1 - 1100
FRAME 2 - 1300
FRAME 3 - 1500
- Object Downtime – full (200)
- Winds - MAX Downdraft 20K
- Clouds - Med5KMed15K
Designed by Nefarious