- Details
- Written by: Spikes
- Category: Pacific Theatre
- Hits: 18
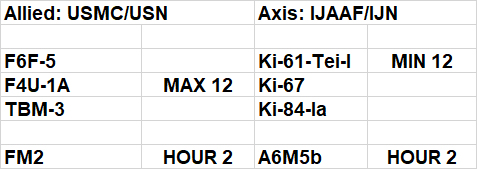
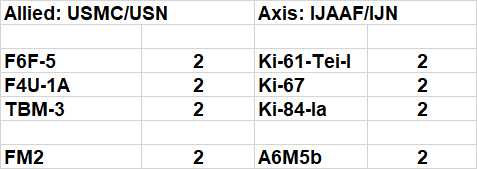
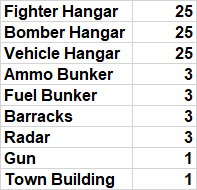
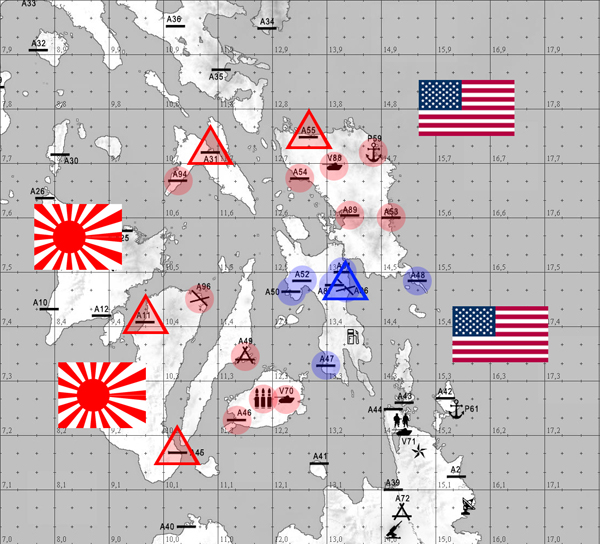
- Luzon Terrain
- No Radar
- Fighter and Bomber Warning Range - 63360 (12 miles)
- Tower Range – 63,360 (for display to match the above Fighter and Bomber Warning)
- External view for bombers (F3) - On
- Friendly Collisions - Off
- Enemy Collisions - On
- Kill Shooter - Off
- Fuel - 1.0
- Ack - 0.3
- Formations - DISABLED
- Bombsite calibration - Main Arena Standard
- Object Downtime – full (200)
- Winds - None
Frame 1: 06:00
Frame 2: 12:00
Frame 3: 16:00
- Details
- Written by: Steven Jackson
- Category: Pacific Theatre
- Hits: 19
Back To Tokyo!
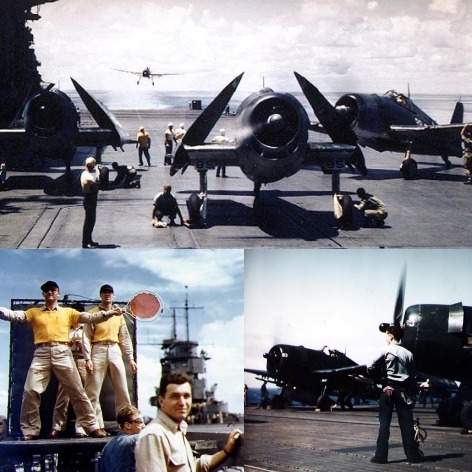
The Doolittle Raid had been a huge moral boost for the United States, during an otherwise gloomy period in the war, following the attack on Pearl Harbor. The US Army Air Force attacked Tokyo again on November 24th, 1944, but no aircraft launched from a carrier had struck the city since Doolittle?s famous raid in 1942. In early 1945, Admiral Spruance planned a series of major attacks on airfields and industrial targets in and around Tokyo. Spruance chose Task Force 58 to conduct the raids, even though they were initially committed to support operations on Iwo Jima. The Marines of the Iwo landing force requested a full 10 days of aerial bombing and naval gunfire, but Spruance only committed TF 58 to three days. Despite the protests of USMC General Howlin? Mad Smith, the fast carriers and the significant firepower of the 8 battleships of TF 58 left the support force of the Iwo Jima landings, and arrived off the coast of Tokyo a few days later, during the second week of February, 1945. Three major attacks were conducted, two on February 16 and one on February 17. More attacks were planned, but worsening weather convinced Spruance to cancel operations, and send Task Force 58 back to Iwo Jima. Overall, the damage inflicted to the airfields and factories was small compared to the destruction of an estimated 400 Japanese aircraft, in the air and on the ground. This FSO will attempt to recreate those three attacks of 16-17 February.
Frame 1: 0600 16 February 1945
Frame 2: 1000 16 February 1945
Frame 3: 0800 17 February 1945
Scoring:
Objective based scoring will be used. 50% of each frame?s score will be for air-to-air kills, with the remaining 50% being divided between 6 objectives each frame with each being worth a total of 10 points. Objective scores will be based on victory criteria that will be published in each frames objectives.
Air-to-air
Air-to-air score will be worth 50 potential points each frame. The total number of aircraft that lift for each side will be tallied and added together using their respective point totals. That number is the total aircraft potential for each side. For example, the USN launches 100 F6F, 50 F4U-1D, and 40 TBM. The total potential for the Japanese would be (100X2) + (50X3) + (40X1) = 390. If they shoot down 30 F6F, 20 F4U-1D, and 20 TBM, they would score (30X2) + (20X3) + (20X1) = 140. Divide 140 / 390 and multiply that percentage (36%) by 50 to compute total air-to-air points (18). Pilots that land successfully will be awarded a 1.5 modifier to their air-to-air kill score. For example, a USN pilot shoots down 3 A6M5, 1 Ki-61, and 1 Ki-84. If he does not land successfully, he would score (3X1) + (1X2) + (1X3) = 8. If he lands successfully, he would score 12 points, as 8 X 1.5 = 12. Theoretically, one side, or both, could actually receive an air-to-air percentage, as detailed above, that exceeds 100% as a result from the survival bonus. In these cases, either side would retain bonus points, and potentially be able to score more than 50 overall air-to-air points as a result.
Air-to-Ground
Air-to-ground score will be worth 50 potential points each frame. Each of the 6 target objectives will be worth 8.3 points to either side. The USN and Japanese will be awarded points based on victory conditions listed in each frame?s objectives. Target objectives will consist of airfields and strategic targets in the Tokyo area.
For example, a USN objective may be to attack an airfield. If they destroy all hangars, they receive 8.3 points for that objective. If they destroy ? of the hangars, they receive 4 points and the Japanese receive 4.3 points. This is merely an example of how the objective based scoring will be used, but ultimately, each of the 6 objectives each frame will be worth 8.3 points. Each objective will have its own victory conditions that will define who receives points, and for what destruction criteria. Both sides will have an equal potential to score the same points for each objective. For the USN, in order to score objective points, a Bomb Damage Assessment (BDA) flight must be conducted for each objective. This BDA will consist of aerial screenshots taken after each attack based on aerial photos of damage inflicted on the objective. These screen shots must be taken from the cockpit (no film screen captures can be used) and submitted to the Admin CM no later than 12 hours after the frame for scoring. Instructions for submitting the BDA photos will be included in the objectives for each frame.
Planeset:
USN
F6F-5 (2 Points) (No restrictions)
F4U-1D (3 Points) (64 maximum)
TBM (1 Point ) (32 minimum)
*USN Ordnance limited to 500lb bombs and rockets only
IJA/IJN
Ki-84 (3 Points) (64 maximum)
N1K2 (3 Points) (64 maximum)
Ki-61 (2 Points) (32 minimum)
A6M5 (1 Point ) (32 minimum)
Victory Conditions:
Both sides will have the same potential score each frame. This ensures that regardless of the number of players on each side, both have the same potential to score the same number of points.
Field Order: (Per the fields set up on the Japan map, included in objectives)
Arena Settings:
--Japan Map
--Fuel Burn 1.0
--Icons Short
--.3 Ack
--Fighter and Bomber Warning Range 52,800 (10 miles)
--Tower Range 52,800 (10 Miles, To Match Warning Range)
--Visibility 17 Miles
--Radar Off
--Enemy Collisions On
--Friendly Collisions Off
--Killshooter Off
--Takeoff time per frame descriptions above
Contact all the squads on your side at:
http://events.hitechcreations.com/squadops/assignments_fri.php
Updated FSO Rules at:
http://www.ahevents.org/index.php?option=com_content&task=view&id=95&Itemid=121
- Details
- Written by: Ken S.
- Category: Pacific Theatre
- Hits: 20
 Â
Â
Â
Â
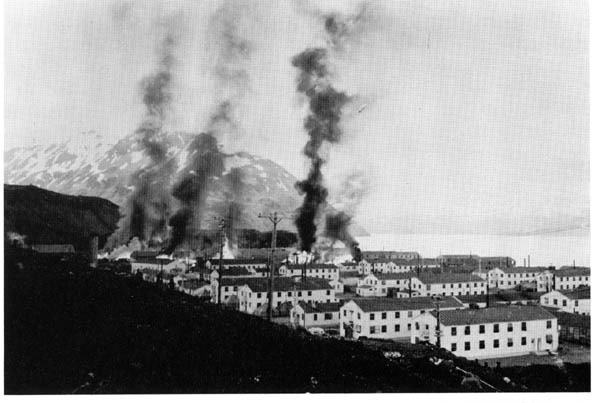
 While the exact objectives of Japan's attack on the Aleutian Islands in 1942 isn't known, there are two main possibilities to ponder. One possibility is that Japan wanted to conquer the Aleutians to obtain access to Canada and America's northwestern states by way of Alaska. Many of Japan's military leaders considered these poorly defended outposts to be the logical route for an invasion of North America. Why Japan clung to its positions in the Aleutians after the battle of Midway is not known, but it is probable that Attu and Kiska were either going to provide the jumping-off places for future invasions of the North American continent, or merely provide advanced eastern observation posts and defenses for the Empire. General Simon Buckner had proposed to attack Japan via a northern route, through the Aleutians, thus giving some credence to Japan's concerns about protecting their northern flank, which formulates the second reason for Japan's wanting to hold on to Kiska and Attu. A line drawn from Kiska through Attu and down to Midway Island would define Japan's eastern line of homeland defense.
   It was clear to the Allied Forces that the Japanese occupation in the Aleutians provided a continuing threat to America's (and possibly Canada's) security. Any plans for Allied Forces to seize the offensive in the Central Pacific would be difficult to execute while Japan maintained flanking positions in the Aleutians. One should also consider that every day Japan's troops remained on American soil was beneficial to Japanese morale (especially after the losses incurred at the Battle of Midway), while it was deleterious to that of the American's. Perhaps this was the primary reason for what became the total blackout of news relating to events in the Aleutians...to keep the American public from becoming too overly concerned about events in Alaska that were perceived by some higher military and government authorities to be of not much importance considering the scope of WWII. Would the American public panic if they knew that Japan had actually occupied American soil at this time? Because of America's commitments elsewhere, the means of quickly resolving these issues were far from adequate.
Country Percentages
48% Allied (rough estimate)
52% Axis (rough estimate)
NOTE: As the event progresses the Admin CM reserves the right to adjust the numbers of each side by reassigning squads to a side to balance the event because of number imbalance, game play imbalance, etc.
Plane Set
USAAF
=====
B25C
P38G (limited numbers)
39D (if available, and then only in limited numbers)
P40B
USN
===
F4F-4 (very limited numbers)
IJN & IJA
======
A6M2
B5N2
D3A1
Ki61 (limited numbers)
Restrictions
- Ki61s and P38Gs will only be available in frame 3, in limited numbers.
- B25Cs can not fly in formation
- B5N2s get a second life
Further restrictions will be delineated in the objective orders for each frame.
Victory Conditions
AIR TO AIR
========
5 pts - Single or dual Engine AC with 1 crew
10 pts - Single or double engine AC with 2 crew
15 pts - Double Engine AC with 3+ crew
GROUND TARGETS
=============
0.062 = Gun
0.062 = Mannable Gun
3.125 = Ammo Bunker
3.125 = Fuel Bunker
3.125 = Barracks
3.125 = Radar
27.812 = Vehicle Hangar
27.812 = Fighter Hangar
27.812 = Bomber Hangar
3.125 = Town Building
3.125 = Factory at strategic target
0.781 = Truck in convoy
1.562 = Train
20 = Destroyer
20 = Cruiser
80 = Carrier
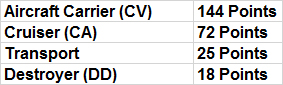
For Example: Total point value of each objective will be supplied in frame objectives. For example a fleet with 1 CV, 1 CA, and 4 DD is worth 180 points; a standard small airbase should be worth 192 points (points rounded).
SPECIAL RULES
1. In Frame 3 the U.S. will get a limited number of P38Gs
2. In Frame 3 the Japanese will get a limited number of Ki61s
3. B5N2 pilots get a second life in an aircraft assigned to them by their CiC (it can be any of the available Japanese plane types).
4. No bomber formations
5. A minimum and maximum number will be assigned to each aircraft type. The CiC of each side must deploy the designated minimum per aircraft type and can not more than the maximum per aircraft type. Outside of that the CiCs can deploy the aircraft types anyway the want (i.e. can have squads fly 2 aircraft types and in split they wish as long as squads are assigned same objective).
6. If both CiCs agree they may have the setup CM end the frame early. This is usually done if one side wipes out the other side (i.e. 60 versus 5).
7. Dead pilots may gun bombers. They may not man the guns of airfields or ships.
8. If ships are used in a frame each side can maneuver the ships as long as they stay in their containment area. Ships must stay in containment area defined in the objective orders. If they go outside of the containment area a penalty will be assessed.
9. All targets must be attacked within the first hour of the event. To make sure this is done the CiC of each side must send the Admin CM their battle plans before the event so that he can verified they actually planned to attack their objectives in force (no sending just one plane to attack an objective before the 60 minute mark).
Arena Settings
- Aleutian terrain
- Fuel 1.25
- Icons short
- .3 Ack
- Fighter and Bomber warning range 52,000 (about 10 miles)
- Tower range set to 52,000 (for display only to match the above setting)
- Clouds / visibility, will be defined per frame but generally foggy
- Radar off
- Friendly collisions off
- Enemy collisions on
- Kill shooter off
- Wind conditions will vary per frame, will be defined in frame objectives
- Time: 11 AM
- Bomber Formations Disabled
- MA bombing mode
- Ship and object hardness, MA standard
- Details
- Written by: Spikes
- Category: Pacific Theatre
- Hits: 20
- Okinawa Terrain
- No Radar
- Fighter and Bomber Warning Range - 63360 (12 miles)
- Tower Range – 63,360 (for display to match the above Fighter and Bomber Warning)
- External view for bombers (F3) - On
- Friendly Collisions - Off
- Enemy Collisions - On
- Kill Shooter - Off
- Fuel - 1.0
- Ack - 0.3
- Formations - DISABLED
- Bombsite calibration - Main Arena Standard
- Object Downtime – full (200)
- Winds - None
- Game Clock:
Frame 1: 06:00
Frame 2: 12:00
Frame 3: 16:00
- Details
- Written by: Scott Avery
- Category: Pacific Theatre
- Hits: 16
During 1943-1944 dry period dawned, both sides were preparing to take the offensive. The New Chinese Army Corp under General Joseph Stilwell and British Fourteenth Army under General Slim, struck first, but only marginally before the Japanese.
The Northern Front: 1944
General Stillwell with 3 Chinese Divisions, Chindits and Merrill?s Marauders struck in the North with a goal of carry the offensive on through to Myitkyinan and Mogaung so that the allies could build the Ledo Road and get supplies overland to China. The Nationalist Chinese army then struck with 12 divisions in April forcing the Japanese to fight Stillwell?s forces in North West and the Nationalist Chinese in the North East. Sapping resources away from the Japanese offensive in Central Burma against the Indian 4th Corps. With the fall of Myitkyina on August 3rd the Northern part of Burma was roughly secured by the allies.The Southern Front: 1944
In Arakan, a British advance began on the XV Corps front. However, a Japanese 55th Division counterattack halted the advance at Sinzewa and threatened to destroy the Indian 7th Infantry Division. Unlike during previous operations, the British forces stood firm, and were supplied from the air in the Battle of the Admin Box from February 5 to the February 23 1944. The siege was lifted when the Japanese were taken from the rear by the Indian 5th Infantry Division advancing over the Ngakyedauk Pass. The resulting Battle of Ngakyedauk Pass saw a heavy defeat handed to the Japanese. Without the possibility of aerial supply, their infiltration tactics, relying on units carrying their own supplies and hoping to capture enemy victuals fatally compromised Japanese operations.The Central Front: 1944
On the central front, IV Corps advanced into Burma, before indications that a major Japanese offensive was building caused it to retreat on Kohima and Imphal. Forward elements of the corps were nearly cut off by Japanese forces, but eventually made it back to India. As they waited for the storm to break, the British forces were not to know that the successful defense of the two cities would be the turning point of the entire campaign in south east Asia. HQ XXXIII Corps was rushed forward to help control matters at the front and the two corps settled down for a long siege.The Japanese threw themselves repeatedly against the defenses of the two strong points, in the battles of Imphal and Kohima, but could not break through. At times the supply situation was perilous, but never totally critical. It came down to a battle of attrition, and the British forces could simply afford to fight that kind of battle for longer. The turning point of the battle at Kohima was the Battle of the Tennis Court. It was the Japanese high water mark on their advance into India and in the end, the Japanese ran out of supplies, and suffered large casualties. They broke and fled back into Burma, pursued by elements of Fourteenth Army.
Burma & Thailand: 1945
'I have been kicked by this enemy in the place where it hurts, and all the way from Rangoon to India where I had to dust off my pants. Now, gentlemen, we are kicking our Japanese neighbours back to Rangoon.- General William Slim to the 11th East African Division, Palel Plain, 1944'
After the successful operations in Northern and Central Burma the allies stand on the brink of retaking Rangoon. The British have halted their drive in November to reorganize their formations replacing the 11th Army Group with the Allied Land Forces of South East Asia with the XV Corps being directly placed under it.
With the reorganization done the Fourteenth Army made the main thrust to destroy Japanese forces in Burma. The Army had IV and XXXIII Corps under its command. The conception of the plan was that XXXIII Corps would reduce Mandalay, and act as a diversion for the main striking force of IV Corps which would take Meiktila and thus cut the Japanese communications. The plan succeeded extremely well, and Japanese forces in Upper Burma were effectively reduced to scattered and unorganised pockets. Slim's men then advanced south towards the Burmese capital.
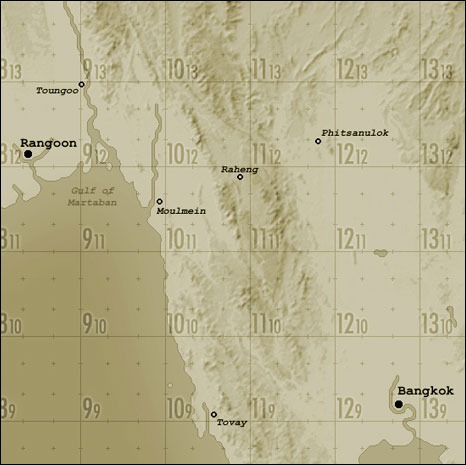
The British RAF and USAAF 10th Air force have expanded the airfield at Magwe into a major (even if primitive) base capable of supporting the American B24J bombers. While the capture of the airstrip at Toungoo has allowed the allies to shift several of their fighter units forward to gain air superiority over Rangoon in prelude to a British assault on the city.
With the fall of Rangoon a foregone conclusion the Lord Mountbatten has already drawn up campaign plans to retake the south of Burma and to push all the way to the Bangkok in Thailand.
The remnants of the Japanese 33rd Army have fallen pulled most of their forces to the south of Rangoon only leaving a token force in place to stall the allied advance to give them time to regroup what units they have left. Under constant pressure in the Pacific from American offensives and with the continuation of their offensive against the Nationalist Chinese no reinforcements can be spared to send to the beleaguered 14th Army. However, the Imperial Command, in the face of the deterioration of their south west flank of their empire and the threat it poses to the vital oil rich areas of the East Indies has scrounged up several air assets to send to Burma to try to stop the allied advance in Burma and save Thailand and Malaya from future invasion by the British.
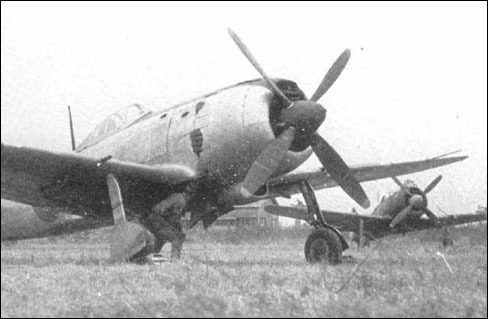
Several fighter squadrons of the Ki61s, Ki84s, and a strange new beast, the N1K2, have been dispatched along with several Ki67 bomber squadrons to Burma and Thailand. The Imperial Command hopes that the use of these more advanced aircraft (replacing the tired Ki43s and Ki27s) will enabled General Masaki Honda to fight the allies to a stand still.
Arena
SEA
Country Percentages
45% Allied55% JAAF
|
|
Allies |
Axis |
|
Units: |
B26B
P38J P47D25 P51B (20 Max) Spit VIII Mossiquito VI |
KI61 KI84 KI67 N1K2 |
|
Restrictions: |
Restrictions on numbers and type of aircraft will be determined for each frame. Allies must use all plane types and the P51B will be restricted in numbers. |
Restrictions on numbers and type of aircraft will be determined for each frame. However, the JAAF/IJN will not be allowed to up all Ki84s or N1K2s |
Victory Conditions
10 pts - Single Engine AC with 1 crew
15 pts - Single or double engine AC with 2 crew
20 pts - Double Engine AC with 3+
05 pts - Per car of a train
03 pts - Per truck in convoy
Airfields and Cities 200 points (based on % destroyed)
Arena Settings
- Rangoon terrain
- Fuel 1.0
- Icons short
- .4 Ack
- Fighter and Bomber warning range 52,000 (about 10 miles)
- Tower range set to 52,000 (for display only to match the above setting)
- Clouds / visibility 17 Miles
- Radar off
- Friendly collisions off
- Kill shooter off
- Calm winds
- Time: 1 PM
Designer Notes
The Burma theatre has always been sort of backwater for allied operations. Resulting in not only not many forces deployed there but also not the latest aircraft. To represent this the Allies have the P38J, P51B, and P47D25 instead of the P38L, P51D, and P47D40 (which were available to other theatres).
By 1945 JAAF air power had basically been destroyed but several hundred aircraft were still left in the region and in Thailand and units had started to recieve driblets of the newer aircraft such as the Ki61 and Ki84. Although the main bulk of the JAAF airforce still consisted of older aircraft like the Ki43. But to balance the scenario the JAAF get the newer aircraft since the A6M5b would be hopelessly outmatched.
CM Notes
This FSO should be a real brawl since there are very few airfields available to each side. Allowing both sides to concentrate their bomber and escort forces to try to win air superiority over specific targets.
Design By
Darren 'Ghost Dancer' Gideon