- Details
- Written by: Spikes
- Category: Pacific Theatre
- Hits: 19
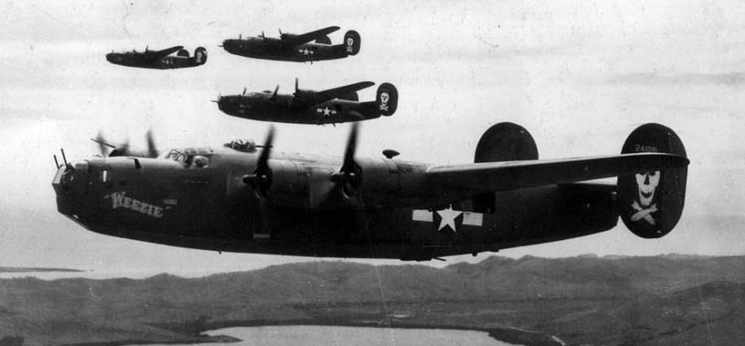
By November of 1944, Leyte was under Allied control and they continued to push out toward other islands. The Allies had control over most of the Island of Panay, but they continued to bombard the northern area of it before taking control of it in mid December. This allowed their attention to be turned to Mindoro, and soon after in January of 1945, Marinduque and southern Luzon.
This FSO aims to re-create the movement of Allied forces throughout the Philippines in late 1944 and early 1945, including various land and shipping targets throughout the course of the moving frontline event.
Allies: 53% / Axis 47%
Order of Battle | Hour 1:
|
USAAF/USMC |
IJAAF |
||
|
P-38L |
Ki-61 |
||
|
P-47D-25 |
N1K2-J |
MAX 20 |
|
|
F4U-1D |
MAX 24 |
Ki-84 |
MAX 20 |
|
B-24J |
MIN 16 |
||
Order of Battle | Hour 2:
|
USAAF/USMC |
IJAAF |
|
P-38L |
Ki-61 |
|
P-47D-25 |
N1K2-J |
|
B-24J |
|
|
B-25H |
Loadout Restrictions:
Fighters – No Bombs
Notes:
16K Alt Cap for Bombers
20K Alt Cap for Fighters
Scoring:
- Hangars – 10
- Ships - 5
- Bombers - 2
- Fighters - 1
Axis will gain 10 for each hangar not destroyed at end of frame. Ships will be considered 'bonus' Hour 2 objectives and the Axis will not gain 5 points for Ships not destroyed.
Arena Settings:
- - Terrain: luzon
- - Fuel Burn: 1.0
- - Clouds: med5kmed15k
- - Icons: 3K Friendly/Enemy
- - Ack: .3
- - Fighter and Bomber warning range: 63360 (about 12 miles)
- - Tower range set to 63360 (for display only to match the above setting)
- - Haze/Fog: 15 miles
- - Radar: Off
- - Enemy collisions: on
- - Friendly collisions: off
- - Killshooter: off
- - Time: 1000 (10AM) Game Clock
- - Formations: On
- - Formation Autopilot: On
- - Bomber calibration: Automatic
- - Wind: 0K-2K NO WIND
- 2K-12K: E TO W - Speed 5
- 12K-20K: SE to NW - Speed 10
- 20K+ - 45mph Downdraft
- Details
- Written by: Will Hyman
- Category: Pacific Theatre
- Hits: 21
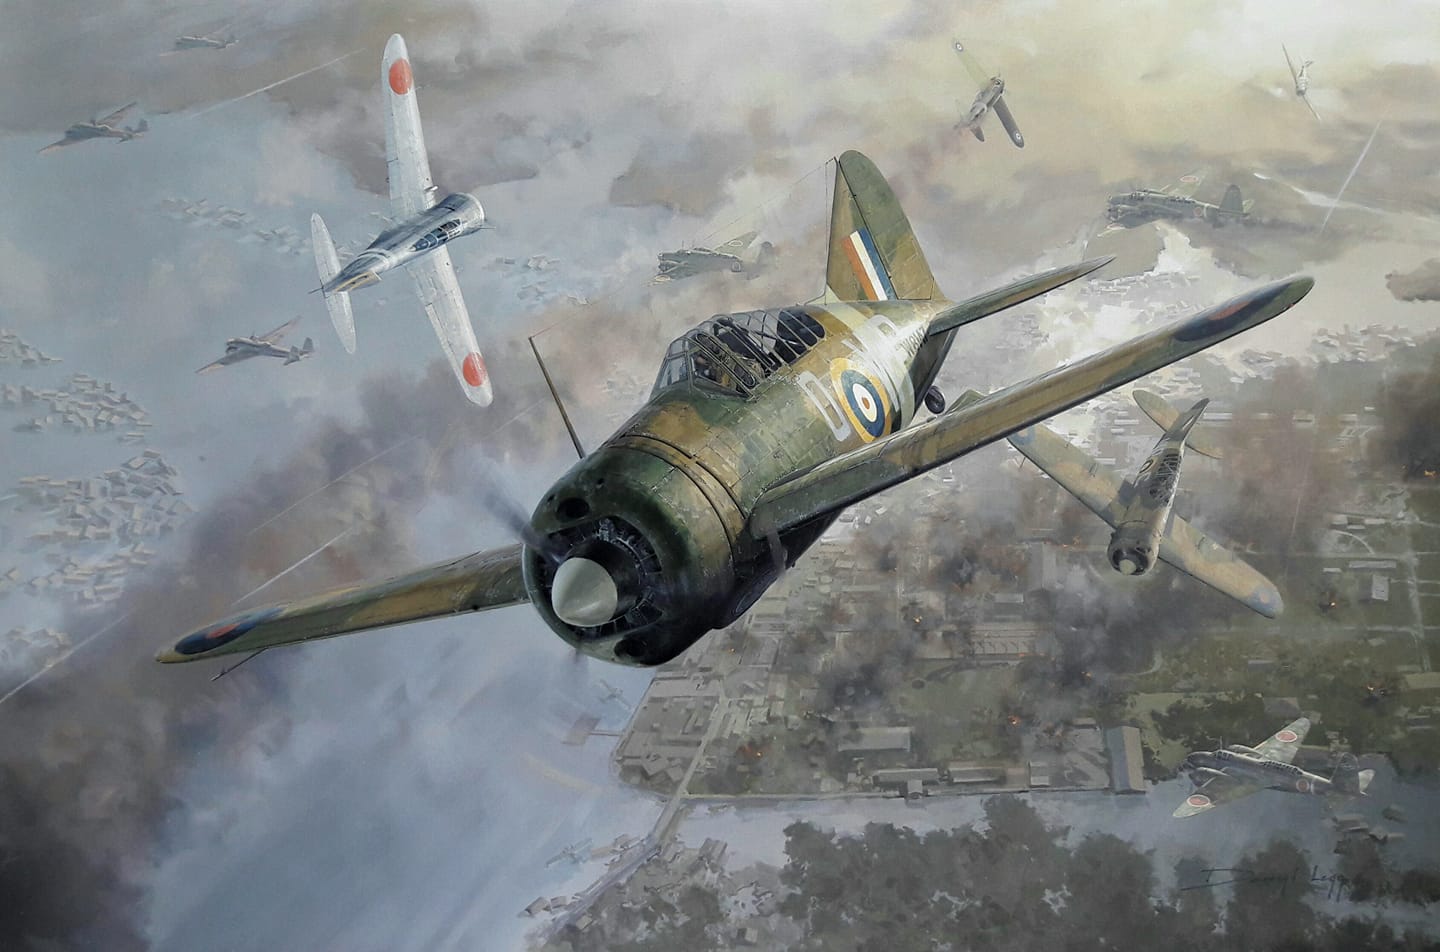
When the Japanese launched their Pacific wide surprise attacks on Australian, British, Dutch and US forces on the 7th and 8th of December 1941, the Malayan Peninsula and its crown jewel on the Southern tip, Singapore, were in the cross hairs of the Japanese Army. At the time of the Japanese invasion, the Allied air forces in Malaya and Singapore consisted of Brewster Buffalos, Bristol Blenheim, Lockheed Hudsons, Vickers Wildebeests and Fairey Albacores. Within a day after the invasion, Japanese aircraft were operating from Northern Malaya and on the 10th of December Japanese bombers sank the HMS Prince of Wales and the HMS Repulse with torpedoes.
With no real Royal Navy presence the Japanese steadily pushed down the Malayan peninsula, forcing the British and Commonwealth forces back to Singapore. The RAF and Commonwealth Air forces tried desperately to lighten the Buffalo by removing the armor, replacing the heavy 50 cal guns with 30 cal and flying with less fuel but they were still no match for the newer and more aerobatic Ki-43 and the A6M2. Help would arrive on January 3rd in the form of 51 Hurricane IIs. All 51 Hurricanes were put together in two days and 21 were ready for operations in three. 48 more Hurricanes would fly in from HMS Indomitable on January 27th to bolster the Singapore defenses but the writing was on the wall for the Allied forces in Singapore.
On January 31st the last Allied forces left Malaya and destroyed the last causeway that linked Johore to Singapore. The Japanese would invade Singapore on February 7th, and it would finally fall on February 15th. The RAF and Commonwealth forces would flee to Sumatra and Java, where they would fight on, eventually having to flee Java to Australia after the capture of those islands by the Japanese. The capture of Singapore was a disastrous loss for the Allies and over 130,000 Indian, British, Australian and Dutch personnel were captured. This FSO depicts the situation in Malaya and Singapore in the months of January and February 1942.
PLANE SET:
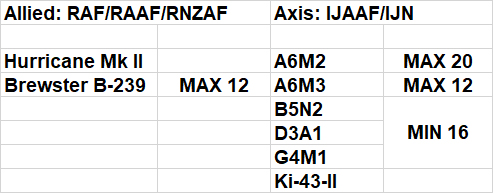
SPECIAL RULES:
Hurricane Mk II - 8x 303 - ONLY
Bombers MAX ALT 14K
Fighters MAX ALT 20K
AIRCRAFT SCORING:
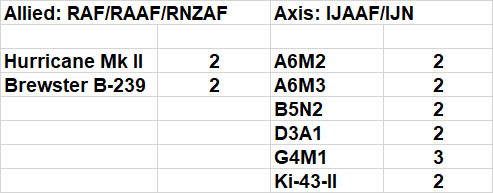
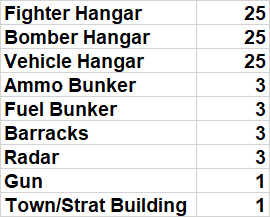
OBJECT SCORING:
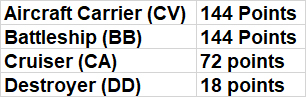
SHIP SCORING:
ACE MISSIONS:
Each side will have one mandatory Ace mission per frame. These frames will represent notable pilots of the time and theater. One pilot from each side will be designated an "Ace" Pilot. They must fly the Aces listed aircraft. They will be scored as follows.
Ace Pilot = 20 Points
Ace Pilot Kills = 5 Points
So for example if an Ace Pilot is shot down they are worth 20 points to the other side. Likewise, every victory an Ace Pilot lands they will be rewarded 5 points.
ALLIED:
Ricky Wright - Hurricane II – Wright was a Battle of Britain veteran with 605 Squadron credited with 6 victories and awarded the DFM before the end of 1940. Wright was transferred to India and later flew off the HMS Indomitable to bolster the defense of Singapore with new Hurricanes. Within days his squadron CO was killed and Wright was promoted to CO of No 232 Squadron. He would evacuate to Sumatra and then Java before he was captured and spent the remainder of the war as a POW. He was awarded the DFC after the wars end. Wright passed away in 2007.
Geoffrey Fisken – Brewster Buffalo – Fisken was a farmer from New Zealand who learned to fly privately in the 1930s. Fisken joined the RNZAF as a Pilot Sergeant in 1941 and was stationed in Singapore when the Japanese attacked on December 8th. He would claim at least 9 enemy aircraft during the defense of Singapore before being wounded February 6th and then evacuated before Singapore fell. He would return to service flying P-40s at Guadalcanal. He would finish the war with 11 credited victories and be awarded the Distinguished Flying Cross. Fisken passed away in 2011.
Edwin Taylor - Hurricane II – Taylor was an instructor pilot with 136 Squadron before getting orders to the Middle East. Instead Taylor would be sent to Singapore and joined 232 Squadron. Taylor was the highest scoring pilot on the Island before 232 squadron was evacuated to Sumatra. Taylor was killed in combat on February 8th 1942. Despite being outnumbered by Ki-43s he was credited with a 6th victory in his final combat. Taylor was posthumously awarded the DFC in August 1942.
AXIS:
Sadaaki Akamatsu – A6M2 – Akamatsu was already an 11 victory ace in China when the Pacific War broke out. He participated in the initial attacks on Clark Field and claimed several damaged and shared aircraft in the Philippines campaign. From there he would fight in the Dutch East Indies scoring victories over Surabaya. He also participated in the raid on Darwin. Akamatsu would go on fighting all the way to the end in the defense of Japan. He was credited with 27 victories at wars end. Akamatsu passed away in 1980.
Hiroshi Onozaki – Ki-43-II – Onozaki was a veteran of the Manchurian campaign but failed to see combat. He was then transferred to South East Asia for the start of the Pacific war where he would see his first action and his first kill over Malaya in December of 1941. He was the top ace of the 59th Sentai and claimed 8 Hurricanes and a Bristol Blenheim over Java. Onozaki would serve in New Guinea and be evacuated due to illness. He survived the war as an instructor in with a total of 14 kills.
Junichi Sasai – A6M2 – Sasai was part of the infamous Tainan Air Group and saw action first in the Philippines on the raid to Luzon but was forced to abort due to engine troubles. The Tainan AG then headed to Java where Sasai saw considerable action claiming a Buffalo and P-40E of the 17th PS. Sasai would not become an ace until May of 1942 while fighting in the Solomons. Sasai would be recognized for 27 aerial victories although he personally claimed 54. Sasai was killed on August 26, 1942 on a mission to attack Guadalcanal.
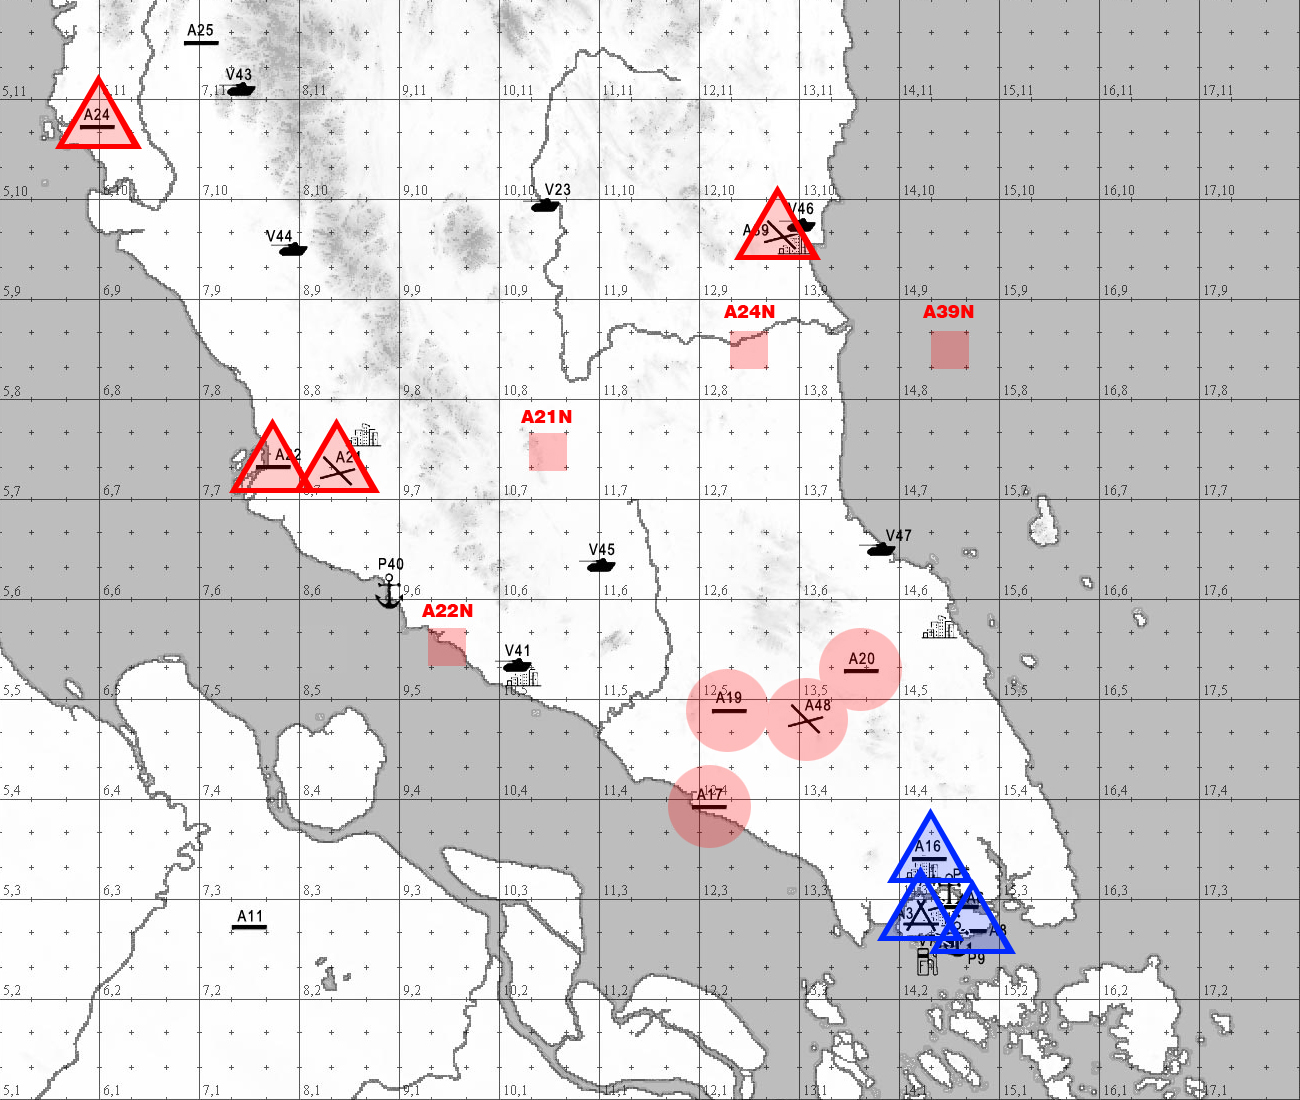
SETTINGS
- Malaysia terrain
- Icon Range – Friendly 3k, Enemy 3k.
- No Radar
- Fighter and Bomber Warning Range - 79200 (15 miles)
- Tower Range – 79,200 (for display to match the above Fighter and Bomber Warning)
- External view for bombers (F3) - On
- Friendly Collisions - Off
- Enemy Collisions - On
- Kill Shooter - Off
- Fuel - 1.0
- Ack - 0.3
- Formations - Enabled
- Bombsite calibration - Main Arena Standard
- Time:
FRAME 1 - 0900
FRAME 2 - 1200
FRAME 3 - 1500
- Object Downtime – full (200)
- Winds - MAX Downdraft 20K
- Clouds - Light - 5K
Designed by Nefarious
- Details
- Written by: Spikes
- Category: Pacific Theatre
- Hits: 18
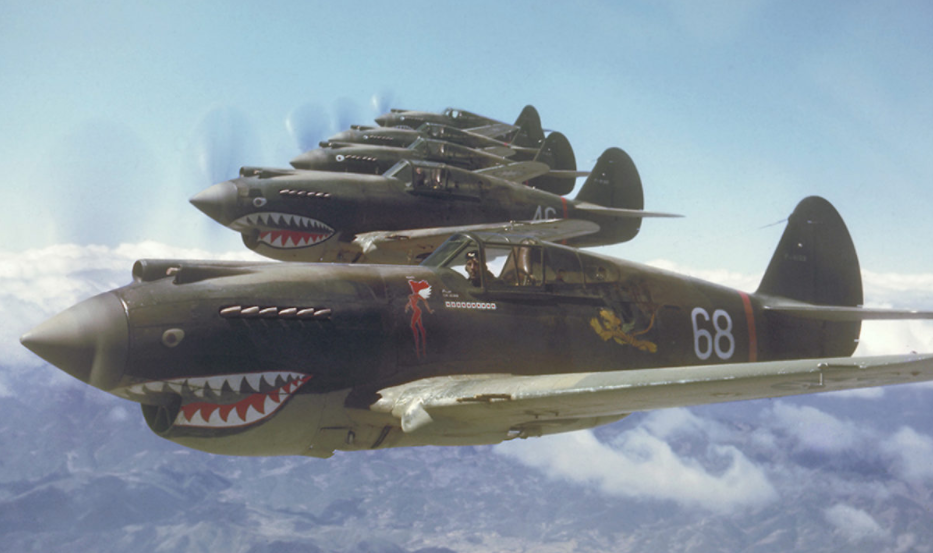
In late 1941, Japan invaded British-controlled Burma. After Rangoon fell, the British army started their retreat from Burma, which sparked the longest geographical retreat in British history. The retreat was conducted under horrible circumstances as they struggled to fall back to India. All the while, the Japanese were pressing the British and Chinese troops as they attempted to cut off their routes.
The AVG was involved in assisting the British in terms of air cover with P-40s, along with the RAF’s Hurricanes. Meanwhile, the Japanese Army Air Force and Navy continued to press the retreat, creating the air battles over Burma.
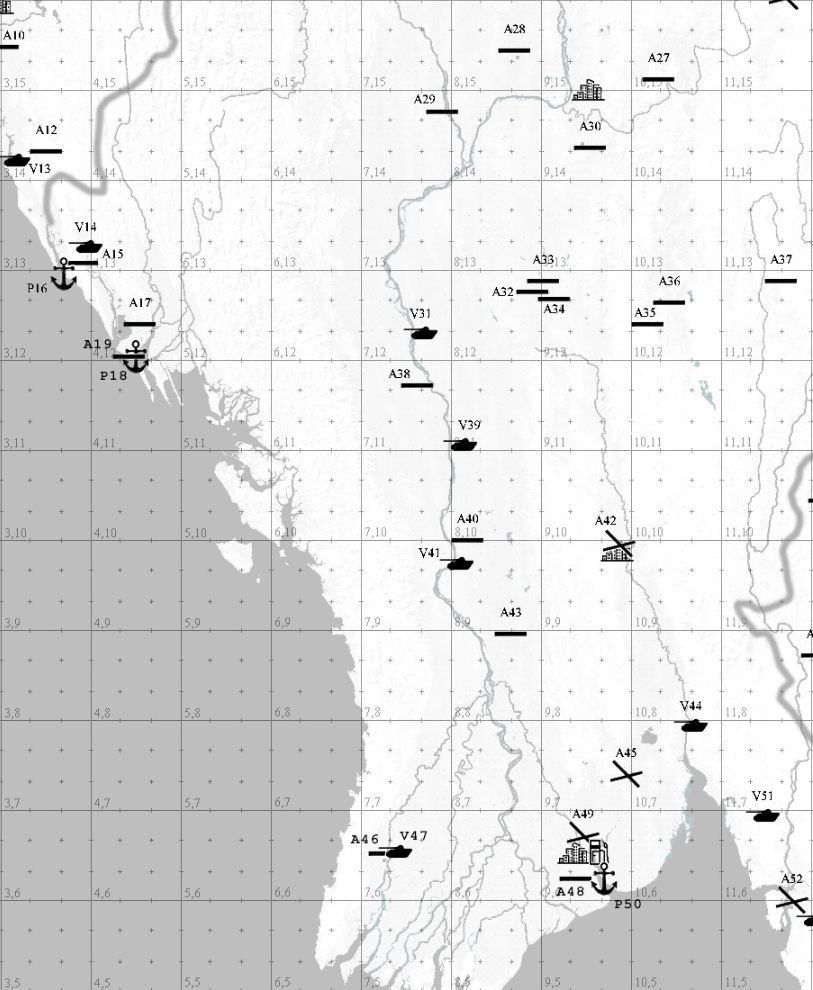
This FSO aims to re-create the British withdrawl from Burma after Japan’s initial invasion.
Allies: 48% / Axis 52%
Order of Battle:
|
AVG/RAF |
IJAAF/IJN |
||
|
P-40C |
- |
A6M2 |
- |
|
Hurricane Mk I |
MIN 20 |
Ki-43 |
MIN 10 |
|
G4M1 |
MIN 16 |
||
Loadout Restrictions:
- P-40C – No Droptank
- Bombs are disabled for fighters (P-40C/A6M2/Ki-43)
Notes:
- Fighter alt cap is 20K
- Bomber alt cap is 16K
Scoring:
- Fighters – 2
- Bombers - 1
- Hangars – 5
- City Buildings – 3 points per successful pilot drop (1 building), +2 bonus if bomber pilot destroys 10+ buildings (5 total points per pilot)
Arena Settings:
- - Terrain: burma
- - Fuel Burn: 1.0
- - Clouds: med5kmed15k
- - Icons: 3K Friendly/Enemy
- - Ack: .3
- - Fighter and Bomber warning range: 63360 (about 12 miles)
- - Tower range set to 63360 (for display only to match the above setting)
- - Haze/Fog: 15 miles
- - Radar: Off
- - Enemy collisions: on
- - Friendly collisions: off
- - Killshooter: off
- - Time: 1000 (10AM) Game Clock
- - Formations: On
- - Formation Autopilot: On
- - Bomber calibration: Automatic
- - Wind: 0K-2K NO WIND
- 2K-8K: NE TO SW - Speed 5
- 8K-14K: SE to NW - Speed 10
- 14K-20K: S to N - Speed 15
Area of Operations:
- Details
- Written by: perdweeb
- Category: Pacific Theatre
- Hits: 18
Operation Cherryblossom: Bougainville 1943

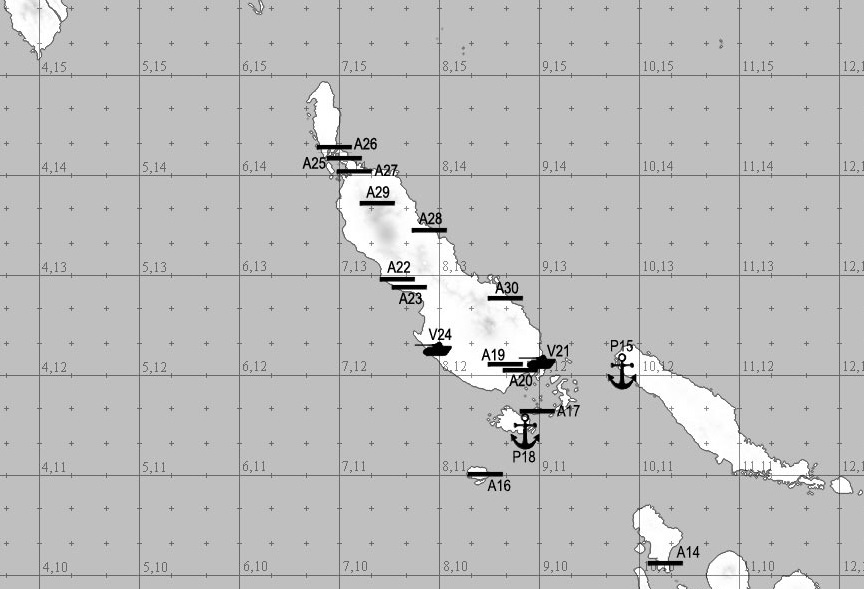
As a part of the major Operation Cartwheel, Operation Cherryblossom was the panned attack and capture of the island of Bougainville in the Solomon Islands. This operation began on November 1, 1943. It began with the preparation of the Torokina Bay area for invasion by Marines. Once the beachhead was secured days later, the IJN hastily reinforced the area with A6M fighters from Truk to the area.
There was hard fighting on the island for a long period of time as the Japanese maintained control of the Northern Solomons and even the small island to the north of Bougainville, Buka. The months of November and December 1943 saw aerial action over the island, which this FSO attemnpts to recreate.
Allies: 50% / Axis 50%
Order of Battle:
|
Allies |
Japan |
||
|
F4U-1 |
MAX 16 |
Ki-61 |
MAX 24 |
|
P-38G |
MIN 10 |
A6M5b |
MIN 10 |
|
P-39Q |
MIN 10 |
Bf 110C (Ki-45) | MAX 12 |
|
B-25C |
MIN 12 |
G4M1 | MIN 12 |
Loadout Restrictions:
Fighters may not carry bombs.
Notes:
- Bomber Alt Cap is 14K.
- Fighter Alt Cap is 18K.
- G4M1 available from A26 only.
Scoring:
- Aircraft - 2
- Hangars - 6
- Ships - 8
Arena Settings:
- - Terrain: solomons
- - Clouds: med15kmed5k
- - Fuel Burn: 1.0
- - Icons: 3K Friendly/Enemy
- - Ack: .3
- - Fighter and Bomber warning range: 63360 (about 12 miles)
- - Tower range set to 63360 (for display only to match the above setting)
- - Haze/Fog: 15 miles
- - Radar: Off
- - Enemy collisions: on
- - Friendly collisions: off
- - Killshooter: off
- - Time: 1000 (10AM) Game Clock
- - Formations: On
- - Formation Autopilot: On
- - Bomber calibration: Automatic
- - Wind: 0K-6K NO WIND
- 6K-14K: E TO W - Speed 5
- 14K-18K: SE to NW - Speed 10
- 18K+: 45MPH Downdraft
Area of Operations:
- Details
- Written by: Will Hyman
- Category: Pacific Theatre
- Hits: 17
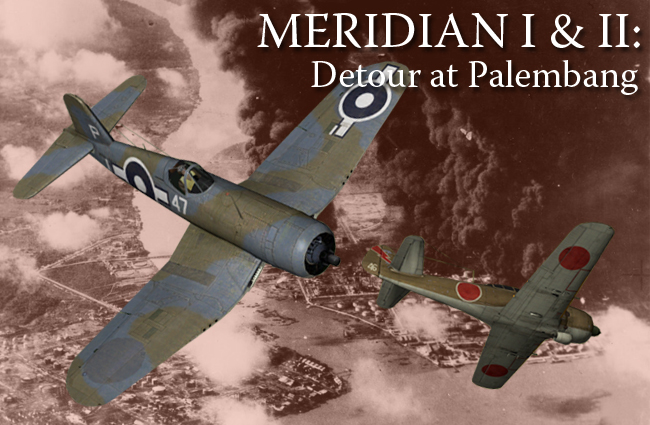
In early January 1945, the British Pacific Fleet in Ceylon (Sri Lanka) was moving to Sydney, Australia in an effort to support the United States against the Japanese in the Pacific, but exactly where and how had not been determined.
Admiral Fraser of the British Pacific Fleet flew to Hawaii and met with Admiral Nimitz to plan for different possibilities of how best to use the fleet as quickly as possible. Both Admirals agreed to sail Task Force 63 and its 4 fleet carriers to Sumatra where they would strike the major Japanese refinery at Palembang. Headquarters of the Japanese Occupation forces of Sumatra, Palembang was also a major road, rail, and river transport hub. It was surrounded by thick anti-aircraft defenses and several airfields of the Japanese Army Air Force.
Operation Meridian I began on January 24th, when the Fleet Air Arm attacked the Pladjoe Refinery. It was reported that 30% of the refinery was destroyed for the loss of 6 Corsairs, 2 Avengers, and 1 Hellcat. 5 days later on January 29th, they attacked again, this time across the river at the Songei Gerong refinery. Estimates of the bomb damage weren't immediately clear but fire and smoke poured from the target and a large Tanker was sunk. 6 Avengers, 1 Firefly, and 2 Corsairs were lost in return.
The Fleet Air Arm claimed 30 enemy aircraft destroyed in the air and another 38 on the ground in both missions, as well as a Japanse counter-attack on Task Force 63. The overall success of the Meridian attacks weren’t the knockout blow the Allies had wished for and only really moved major production efforts elsewhere, but it proved the Fleet Air Arm was more than capable of attacking strategic targets with its carrier force.
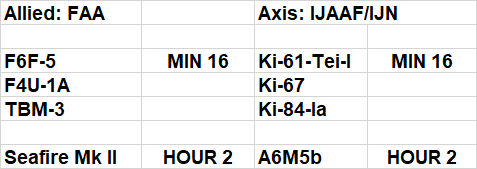
PLANE SET:
SPECIAL RULES:
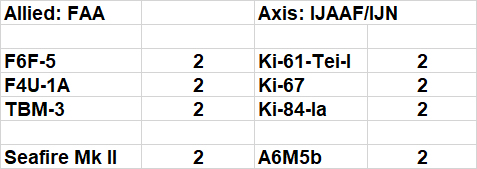
2ND HOUR AIRCRAFT - A6M5B, KI-67, SEAFIRE MK II, TBM-3
24K ALT CAP FIGHTERS - ALL FIGHTERS
15K ALT CAP - Ki-67, TBM-3
F4U-1A - 1,000lb Bomb Disabled
F6F-5 - 1,000lb Bombs Disabled, Rockets Disabled
TBM-3 - 2,000lb Bomb Disabled
AIRCRAFT SCORING:
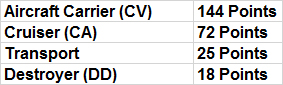
OBJECT SCORING:
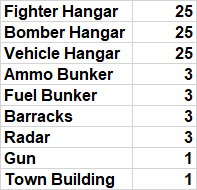
FUEL REFINERY OBJECT - 1.84 points per object.
AMMO FACTORY OBJECT - 2.82 points per object.
ACE MISSIONS
Each side will have one mandatory Ace mission per frame. These frames will represent notable pilots of the time and theater. One pilot from each side will be designated an "Ace" Pilot. They must fly the Aces listed aircraft.
They will be scored as follows.
Ace Pilot = 20 Points
Ace Pilot Kills = 20 Points
So for example if an Ace Pilot is shot down they are worth 20 points to the other side. Likewise, every victory an Ace Pilot lands they will be rewarded 20 points.
ALLIED:
Frame 1 – (FAA) - (F4U-1A) Lt Don Sheppard - Lt Don Sheppard was the only Fleet Air Arm Corsair Ace and one of only two Canadian Aces of the Royal Navy. From Toronto, Sheppard joined the FAA in 1942 and learned to fly lend-lease Navy aircraft in the US. Sheppard took part in Operation Tungsten, the attack on the KMS Tirpitz, in April of 1944 and scored his first victories on the other side of the world in January of 1945. Sheppard scored one kill in Meridian I and shared two others in Meridian II and would bring his total to 5 before war’s end. Sheppard passed away in 2018.
Frame 2 – (FAA) - (F6F-5) Sub Lt Bill Foster - Foster began his scoring during the Meridian Strikes by sharing an Oscar over the Sumatra refineries. He continued his scoring during the attacks on Formosa and later and the strikes on Okinawa in April of 1945 where he would claim another 4 enemy destroyed. 1844 Squadron would be the highest scoring British Pacific Fleet Squadron with 32.5 victories. Foster would be awarded the DFC in September of 1945.
Frame 3 – (FAA) - (F4U-1A) Lt Col Ronald Hay - Ronnie Hay was the only Royal Marine Ace of the Fleet Air Arm. Hays first victory was over Norway in 1940 while flying a Blackburn Skua. Hays would serve at the evacuation of Dunkirk and in the Mediterranean where he would score another victory while flying a Fairey Fulmar. In 1944 Hays was given command of the 47th Naval Fighter Wing which flew two squadrons of Corsairs. During the raid on Palembang Hays claimed two enemy fighters destroyed in the action. Hays passed away in 2001.
AXIS:
Frame 1 – (IJAAF) - (KI-84-IA) Master Seargeant Satoshi Anabuki – Anabuki fought in the 1941 invasion of the Philippines and then in Burma. In October 1943 he shot down three B-24s and 2 P-38 escorts. He downed one of the B-24s by ramming it, wounding himself. He would later ferry Ki-84 fighters from Formosa to the Philippines where he would shoot down 6 F6F Hellcats. He would survive the war claiming 59 victories but was officially credited with 39.
Frame 2 – (IJAAF) - (Ki-61) Lt Hideaki Inayama - Inayama was at Palembang flying Ki-44s when the Royal Navy launched their strikes on the refineries. Inayama destroyed one Avenger bomber during the attack and damaged another. Inayama went on to fly the Ki-100 in the defense of mainland Japan and survived the war to become a Major in the Japanese Air Self-Defense Force.
Frame 3 – (IJAAF) (KI-84-IA) – Katsuaki Kira – Kira flew in nearly every JAAF campaign, Manchuria, Dutch East Indies, New Guinea and the Philippines. Kira would encounter the famed US P-38 Ace Dick Bong and do battle with the elite 49 FG. His unit was destroyed in the Philippines and he would withdraw to Formosa. Kira would last see combat in the skies over Okinawa. He survived the war with 21 kills.
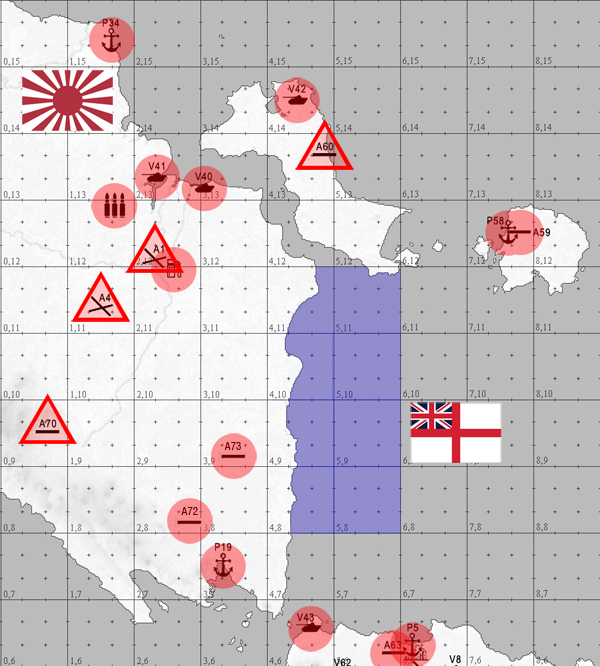
SETTINGS
- Java42 terrain
- Icon Range – Friendly 3k, Enemy 3k.
- No Radar
- Fighter and Bomber Warning Range - 79200 (15 miles)
- Tower Range – 79,200 (for display to match the above Fighter and Bomber Warning)
- External view for bombers (F3) - On
- Friendly Collisions - Off
- Enemy Collisions - On
- Kill Shooter - Off
- Fuel - 1.0
- Ack - 0.3
- Formations - DISABLED
- Bombsite calibration - Main Arena Standard
- Time:
FRAME 1 - 0800
FRAME 2 - 1200
FRAME 3 - 1600
- Object Downtime – full (200)
- Winds - MAX Downdraft 24K
Designed by Nefarious