- Details
- Written by: perdweeb
- Category: Pacific Theatre
- Hits: 23
Formosa Air Battle
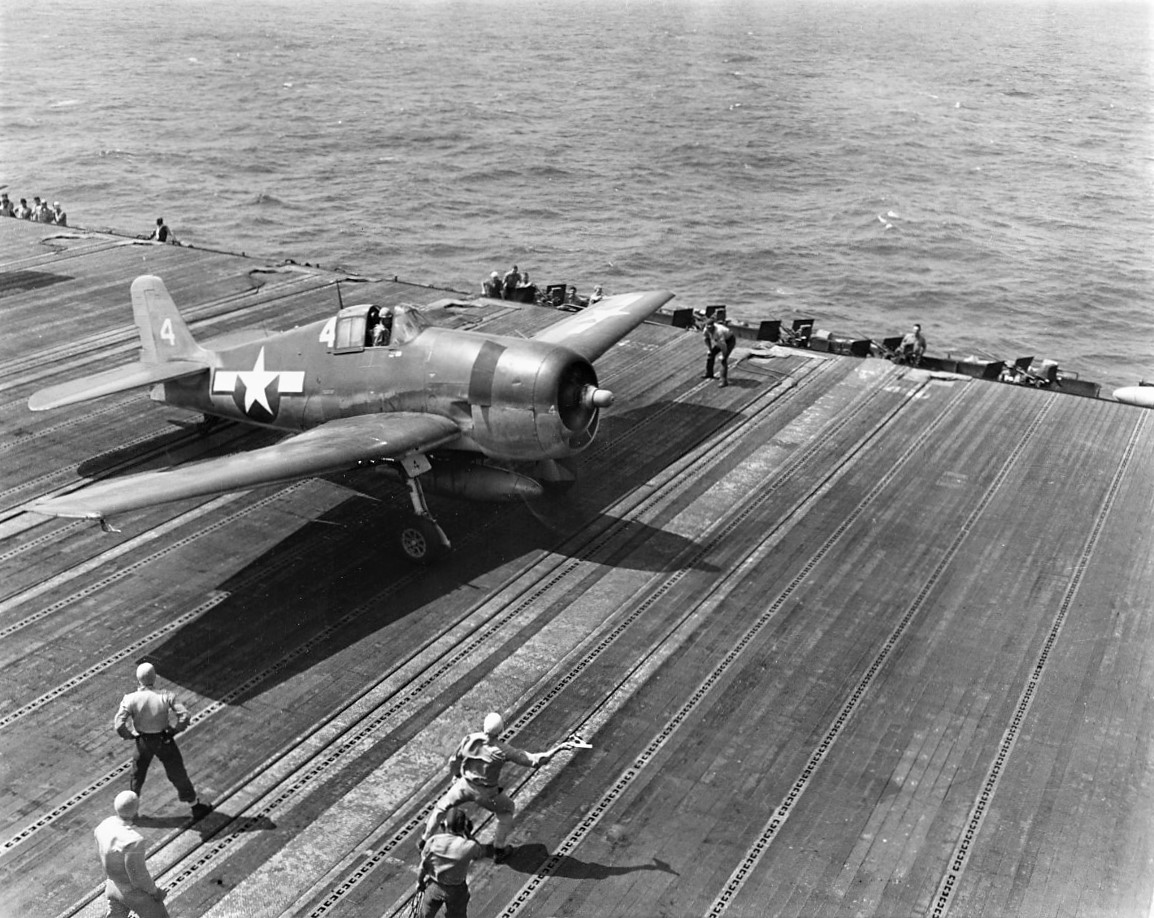
In the summer of 1944, the Imperial Japanese high command altered its strategy for dealing with the oncoming and ever-present United States Navy. With a smaller and weaker fleet, the Japanese focused more on stealthy attacks with submarines as well as an emphasis on aerial attacks. In this new strategy, the T Attack Force was born. Before it could be put to use in October of 1944, the Americans were on the offensive in Formosa and Ryukyu Islands.
Before Japanese plans could be carried out, the Americans successfully engaged the IJN and IJAAF in Formosa in early October, 1944. Japanese command were aware of impending large scale landings in the Phillipines but were not absolutely sure where. As aerial attacks and task group presence increased in Formosa, the Japanese command correctly predicted that the landings would take place elsewhere but still chose to engage the Fast Carriers. What occurred from October 12-16, 1944 in the Taiwan Sea became known as the Formosa Air Battle.
Side Split: 50% Allies/50% Axis
|
USN |
IJAAF/IJN |
||
|
F6F |
Ki-61 |
||
|
FM-2 |
MIN 8 |
A6M5 |
|
|
TBM |
MIN 10 | Ki-67 |
MIN 10 |
Special Rules:
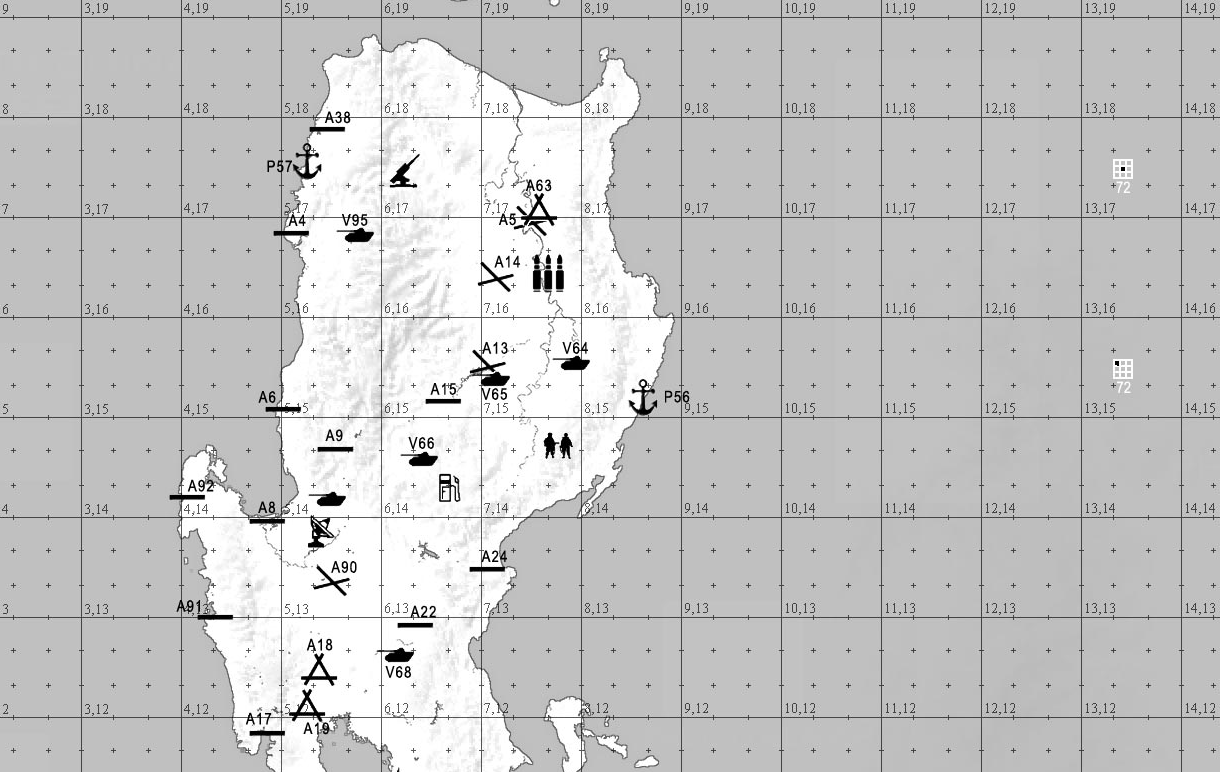
Because there is no Formosa map, we will use Luzon as the geography is similar.
All aircraft have a 20K altitude cap.
Ordnance carrying aircraft alt cap is 14K.
Objects destroyed by fighters will not be scored or counted towars objectives.
Hour 1 targets will not be scored past T+60.
Scoring:
-
Fighter - 1
Bomber - 1
Hangar - 5
Bunker - 1
CV - 16
CA/DD - 4
Hour 2 Scoring:
Frame 1: Destroy 4 Hangars and 8 Bunkers. If achieved, Allies receive 30 points. If not achieved, Axis receive 30 points. Fighters and Bombers are worth 0.5 points after T+60.
Frames 2 and 3: Destroy CV and two escort ships. If achieved, Axis receive 25 points. If not achieved, Allies receive 25 points. Fighters and Bombers are worth 0.5 points after T+60.
- Arena Settings:
-
- Terrain: luzon
- Clouds: med5kmed15k
- Fuel Burn: 1.0
- Icons: 3K Friendly/Enemy
- Ack: .3
- Fighter and Bomber warning range: 52800 (about 10 miles)
- Tower range set to 52800 (for display only to match the above setting)
- Haze/Fog: 15 miles
- Radar: Off
- Enemy collisions: on
- Friendly collisions: off
- Killshooter: off
- Time: 1000 (10AM) Game Clock
- Formations: On
- Formation Autopilot: On
- Bomber calibration: Automatic
- Wind:
0K-2K NO WIND
2K-8K: S TO N - Speed 5
8K-14K: SW TO NE - Speed 10
14K-20K: SW to NE - Speed 15
20K+: 45 MPH Downwind
Area of Operations:
- Details
- Written by: Spikes
- Category: Pacific Theatre
- Hits: 22
Introduction
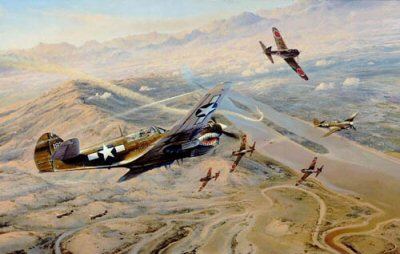
The Imperial Japanese onslaught of northeastern, eastern, southern, and Indo-China continued from 1942 into 1943. The Chinese people were losing hope for their survival. The Japanese blocked all routes of supply into China save one, “The Hump”, where the US sent aerial transports and combat resources to fly needed supplies from India, over Burma, and into southern China. These USAAF and CAF (Chinese Air Force) pilots protected the airfields around the western “terminus” of the Hump and the halfway mark emergency airfield Ft. Hertz thus allowing the Chinese to maintain their sovereignty through the much-needed supplies flowing in from over the "Hump". This battle represents the clash of enemy air forces in circa 1943-44 CBI theater action defending and attacking the western “Terminus” of the Hump. Join the FSO community for this high-action thriller.
Country Percentage
50% - Axis
50% - Allies
Planeset
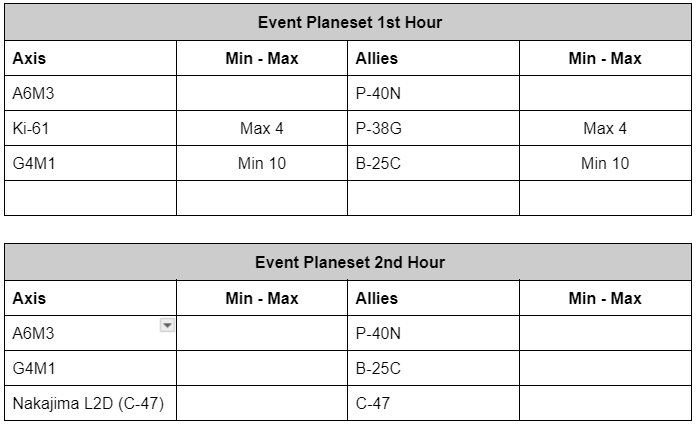
Note: The C-47s will be enabled at all bases in the 2nd hour.
Ordnance
Axis
G4M1 - 4× 250 kg
Allies
B-25C - 8x 250 lb
All fighters will have ordnance disabled.
Map
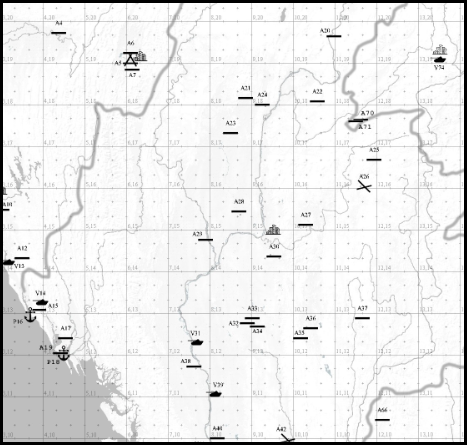
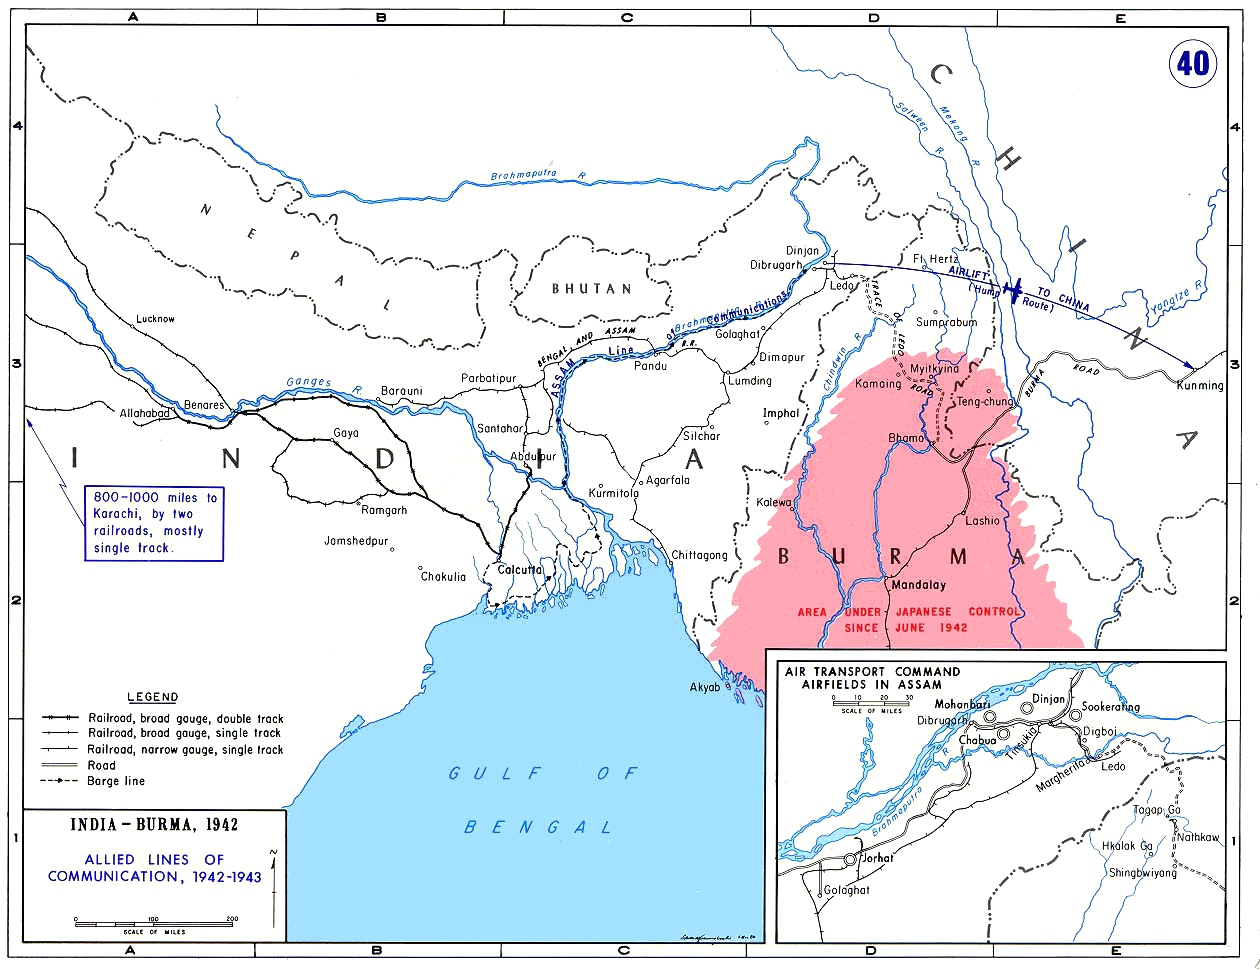
Victory Conditions
1st Hour:
Destroy as many hangars at the target base as possible. The victory goes to the side with the highest number of hangars destroyed. If both sides destroy the same number of hangars a tie will occur.
2nd Hour:
Capture the target base to be captured from the air. White flag the town and capture the map room with airborne troops.
Special Event Rules
- This is a multi-life event. Pilots may re-plane in 2nd-hour aircraft once they become available in the hangar.
- Ordnance for each aircraft will be set by the setup CM in the hangar.
- All targeted objects will retain their normal MA destruction weight.
- The attackers will have up to T+60 to make their initial attack.
- Fighters are allowed to attack ground targets.
- Second-hour targets may not be attacked in the first hour.
- The bomber alt cap will be 14K.
- The fighter alt cap will be 18k.
- A base capture will require 20 troops.
- Destroyed targets are down for the remainder of the frame.
- All CiCs are required to comply with the stated number of aircraft allocations per frame.
Arena Settings
Terrain map: Burma
Fuel burn rate: 1.0
Anti-aircraft gun strength: 0.3
Bombsight calibration: AUTOMATIC (MA standard)
Icons: 3.0K yards (9,000 feet)
Sector Radar ("bar dar"): OFF
Dot Radar: OFF
Fighter and Bomber warning range: 105,600 feet (20 miles)
Tower range set to 79,200 feet (for display only, to match the above setting)
Haze range: 12 miles
Friendlycollisions: OFF
Enemy collisions: ON
Kill shooter: OFF
Stall Limiter: Set ON (Players may disable)
Weather:
Light5kmed15k.awa
Strong UP winds at 20k. +> 100 Mph
- Details
- Written by: Devil5O5
- Category: Pacific Theatre
- Hits: 27
Reduction of Rabaul: Dec. 1943 - Feb. 1944
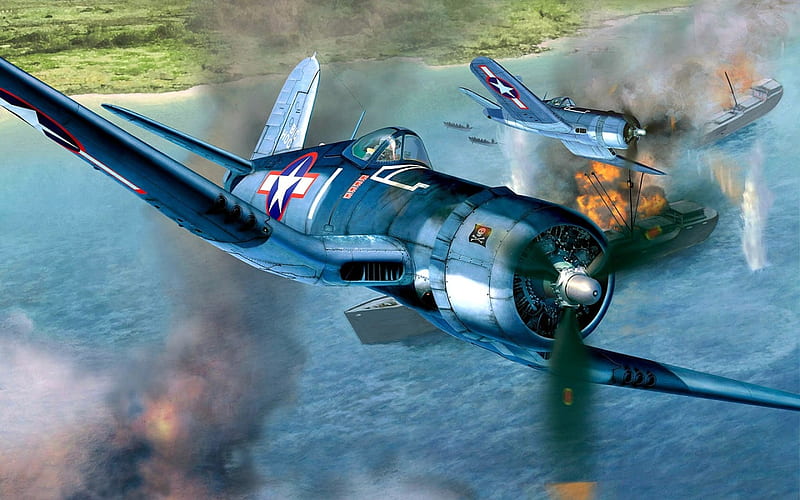
The port of Rabaul, New Guinea, was captured by the Japanese in February 1942. Located on the northeast corner of the island of New Britain, its large natural harbor made it the ideal hub for all Japanese traffic into the combat zones of the South Pacific. As the combat in New Guinea and Guadalcanal progressed, Rabaul’s infrastructure was expanded, including several airfields and dense anti-aircraft batteries. It had become the most heavily defended piece of Japanese occupied territory. Naturally, such a concentration of ships, aircraft, and other material made Rabaul a target of supreme importance for Allied forces.
With the Allied capture of Bougainville and Buka islands in the Solomons in the fall of 1943, Rabaul was within range of single engine Allied aircraft. Under the command of General Twining, the all-out air offensive against Rabaul would be conducted by combined units of the 13th Air Force USAAF, US Navy, US Marine Corps, and the Royal New Zealand Air Force.
Side Split: 50/50
"Lunch Special" Aircraft Selection
This FSO features an aircraft selection format that allows for the Allied CiC to choose between a selection of matched pairs of a top-grade fighter and an attack aircraft. The remainder of the Allied force will be filled by mid-grade fighters. This format will replicate the wide range of Allied aircraft types that participated in the Rabaul raids. The selected pairings provide the Allied CiC with the dilemma of choosing between stacking strength in fighters or attackers. It will also prevent the Axis CiC from knowing what to expect.
Allied Mid-grade Fighters (Available with all groupings)
|
P-38G |
No Min / No Max |
|
P-40N |
Min 8 |
Allied Top-grade Fighter and Attacker Groupings
|
A |
8x F4U-1A plus Min 20x SBD-5 |
Launch A98/A99 |
|
|
B |
8x F4U-1A plus Min 16x B-25C |
Launch A98/A99 |
|
|
C |
8x P-38J plus Min 16x B-24J |
Launch A100/A101 |
|
|
D |
8x P-38J plus Min 20x B-25H |
Launch A100/A101 |
|
|
E |
8x P-38J plus Min 20x P-39 (D and/or Q) |
Launch A100/A101 |
|
|
F |
8x F6F-5 plus Min 16x Boston III |
Launch A102/A103 |
|
|
G |
8x F6F-5 plus Min 20x TBM-3 |
Launch A102/A103 |
|
Rabaul Air Force
|
Ki-61 |
Max 32 |
|
A6M5 |
No Min or Max |
|
A6M3 and/or Ki-43 |
Min 8 in total |
Ordnance Restrictions
- All ordnance disabled on F4U-1A, F6F-5, P-38G, P-39J, P-40N, Ki-61, A6M5, A6M3, and Ki-43.
- HVAR’s disabled on TBM-3.
- Straffer packages disabled on the B-25C.
Twin Missions
This FSO will feature a complete second hour mission. Aircraft assignments for Hour 1 will carry over into the Hour 2 mission. The targets in Hour 2 will be different from Hour 1.To facilitate a reset for the Hour 2 mission, the maximum time until bombs on target will be T+45 instead of the usual T+60. 10K Air spawns will be utilized for both sides and the distance from the target area for attackers will be an approximately 30 minute direct flight for the slowest aircraft. This allows for at least 15 minutes for egress/post attack combat in each mission. Hour 2 mission will launch at T+60 with bombs out no later than T+105.
Other Rules and Clarifications
Hour 1 targets become invalid targets after T+60.
Each pilot has one life per mission.
Alt Cap is 16K for all fighters, 12K for bombers and solo attackers.
Only bombers and solo attackers will receive points for destroying target objects.
P-39’s are considered a solo attacker and will receive a X2 points bonus destroying Ships and Hangars.
All players must take a new aircraft in Hour 2 even if their Hour 1 plane is undamaged. This is for scoring purposes.
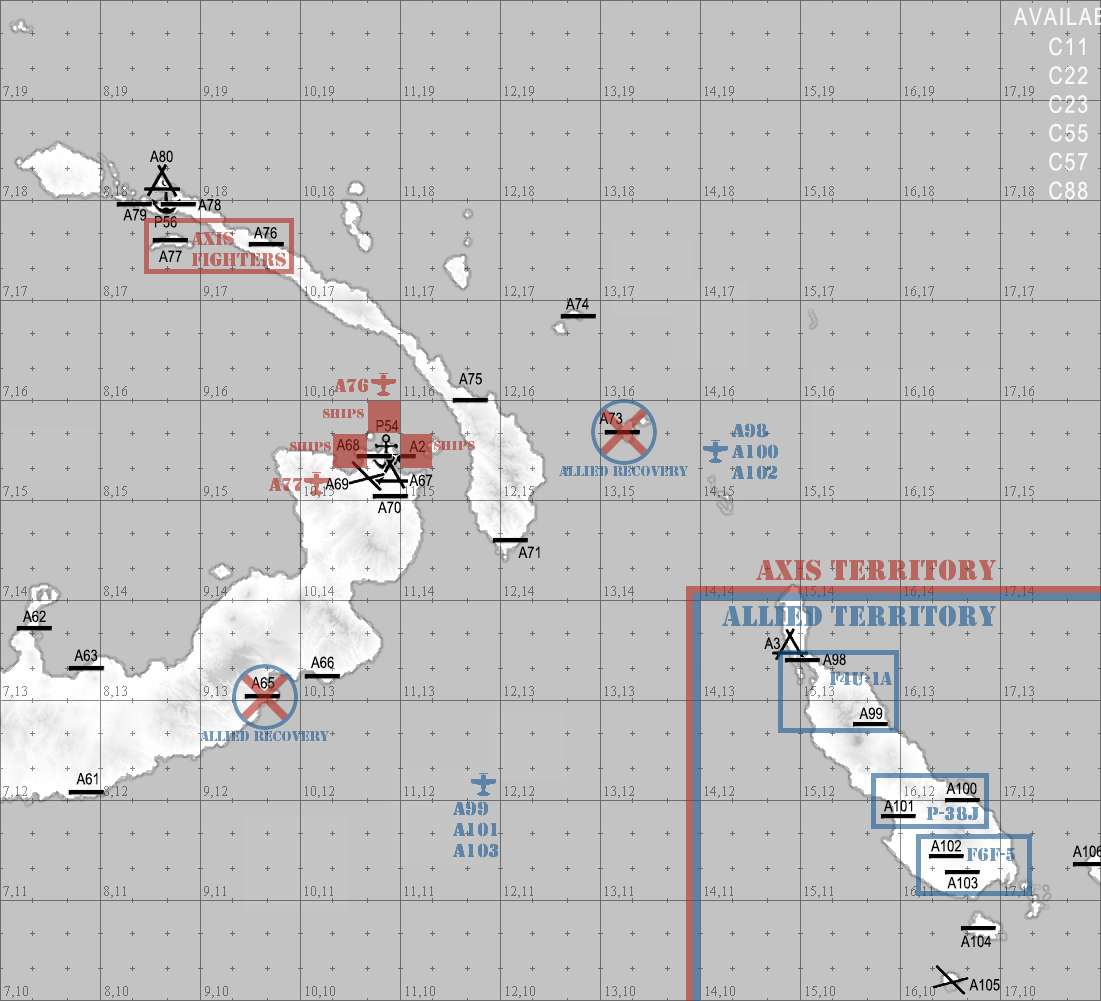
Allied air spawns are placed in the following locations:
-
14,15,4 for A98N (F4U-1A groupings), A100N (P-38J groupings), and A102N (F6F-5 groupings)
11,12,3 for A99N (F4U-1A groupings), A101N (P-38J groupings), and A103N (F6F-5 groupings)
- Axis air spawns are placed in the following locations for all Axis fighters: 10,16,3 and 10,15,1
- These spawn bases were selected to avoid any possible instance of disabling flight by killing fighter hangars.
-
- Axis fleets will be placed in the following locations. The Axis CiC may set the route for the ships to travel in their respective location, but they must stay inside their designated key pad. Fleets will consist of one cruiser and four destroyers. At least one fleet will be a target in each frame.
- 10,15,5
- 10,15,9
- 11,15,4
Top Fighter and Attacker groupings are removed after they are used in a frame. The Allied CiC may change pairings between Hours 1 and 2 at the cost of using up both selections for the remainder of the month. If the CIC plans to change groupings mid-frame, squads must remain in their original roles. For example, a squad assigned F4U’s in Hour 1 can be switched to P-38J’s or F6F’s in Hour 2 but not to mid-grade fighters, bombers or solo attackers. Bomber squads can switch to solo attackers, and vice versa. In an instance of swapping between solo attackers to trios of bombers, it is ok to move surplus attack pilots into a mid-grade fighter, as long as the attacker minimum is met. Pilots from mid-grade fighters can also move into bomber/solo attacker planes in Hour 2 to supplement lost players.
Allied CiC must state in the orders which Top Fighter and Attacker grouping is chosen. Any change in grouping for Hour 2 must also be stated in the orders. A decision to change groupings cannot be made during the frame.
A credible attack force must be at least 6 fighters with 6 formations(B-25C, B-24J or BostonIII) or 8 solo attackers(B-25H, P-39, SBD-5, or TBM-3) for each target.
Credible defense force must be at least 16 fighters assigned to each target.
Safe zones at airfields A65 and A73 will be provided for the Allies to recover their aircraft after they attack. Axis fighters may not cross the dar rings (base will start flashing at this point) for these bases after T+45 for Hour 1 and T+105 for Hour 2. A penalty will be assessed if the Axis flashes these bases(not just the towns). Any Allied plane that enters the dar ring during these periods must land immediately since they have committed to leaving the combat area. A penalty will be assessed if an Allied player enters the safe zone and later exits to continue fighting. Rearming at the recovery fields is also prohibited.
Allied aircraft will show sector counters (Bar Dar) for the Axis when they are within 30 miles of an Axis base. There will be a 30 second delay on position updates.
Scoring
|
Fighters |
1 Point |
|
Bombers / Solo Attackers |
3 Points |
|
Hangars |
8 points |
|
Bunkers (Ord / Fuel / Barracks/ Radar) |
3 points |
|
Ships |
15 points |
Arena Settings
- - Terrain: newbrit
- - Fuel Burn: 1.0
- - Icons: 3K Friendly/Enemy
- - Ack: .3
- - Fighter and Bomber warning range: 42240 (about 8 miles)
- - Tower range set to 42240 (for display only to match the above setting)
- - Sector Counter (Bar Dar) range 158400 (about 30 miles)
- - Sector Counter Alt: 0
- - Radar Mode Bishops: Value 48
- - Radar Mode Knights: Value 464
- - Radar Update Rate: 30 seconds
- - Haze/Fog: 15 miles
- - Radar: Off
- - Enemy collisions: on
- - Friendly collisions: off
- - Killshooter: off
- - Time: 1100 (11AM) Game Clock
- - Clouds: light5kmed15k
- - Wind: 0K-2K NO WIND
- 2K-12K: W TO E - Speed 5
- 12K-18K: W TO E - Speed 10
- 18K+: 45MPH downdraft
Area of Operations
- Details
- Written by: perdweeb
- Category: Pacific Theatre
- Hits: 20
The Last Hop: Okinawa 1945
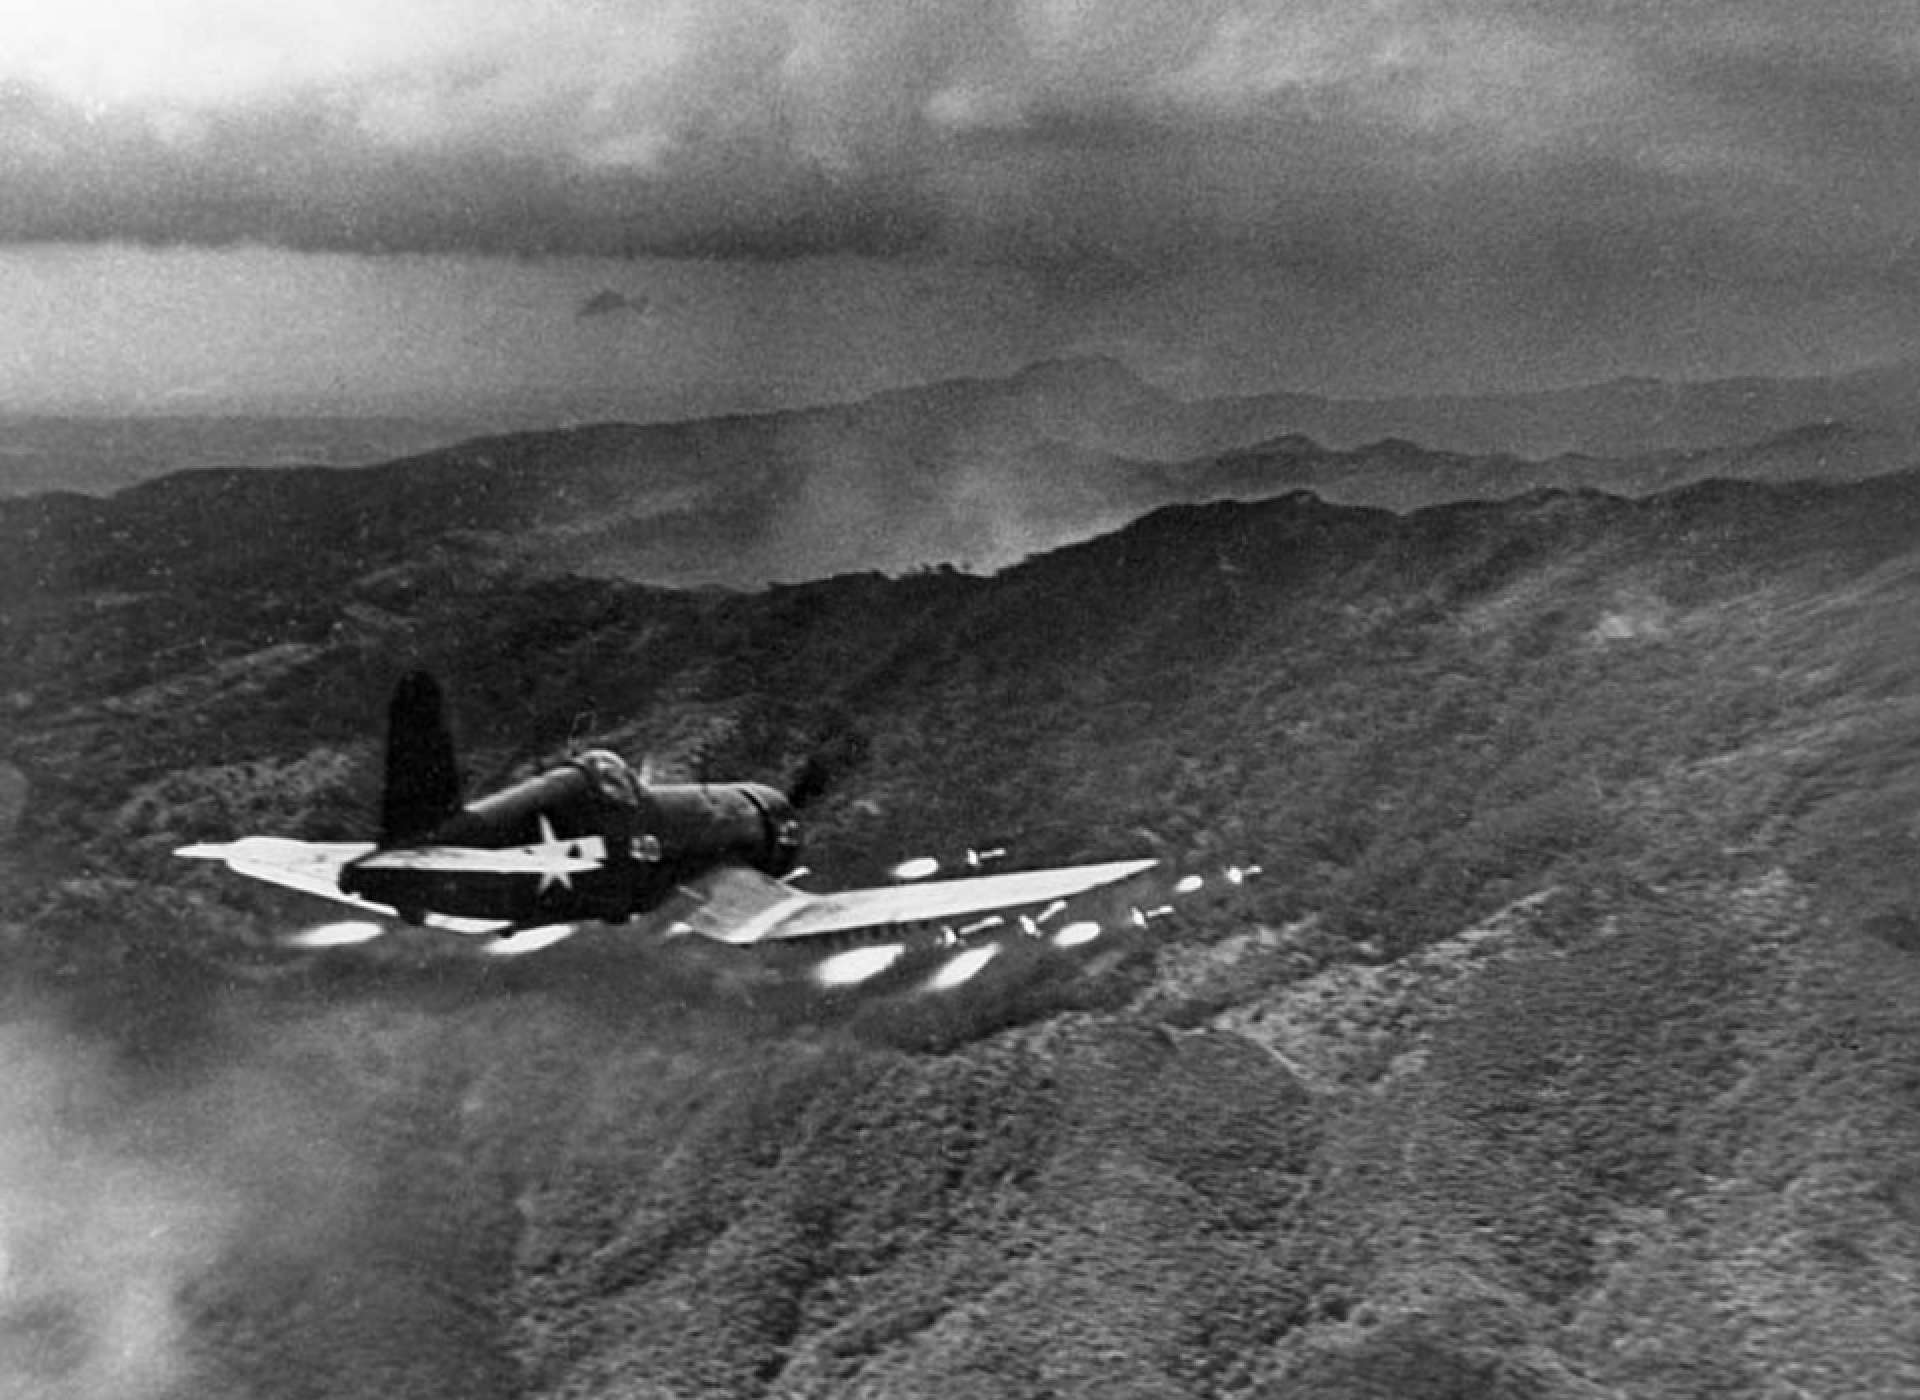
By the Spring of 1945, the American strategy of island hopping had been so successful that essentially all Japanese holdings outside of Japan had been captured. The Americans now set their sights on Japan itself. But, in order to bombard and potentially launch a massive invasion force, it needed the Okinawa Prefecture which included the larger island of Okinawa as well as smaller islands surrounding it. From here, the Allies could launch bombing raids into the heart of the Japanese industrial complex.
The invasion begain on April 1, 1945 and within a week, two major airfields had been captured, repurposed, and made available to Marine fighter pilots. For the next month and a half, Marines would fight for the island and the surrounding islands while being protected by their fighter pilots in Corsairs, courtesy of Marine Air Group 31 and others. Waves of kamikaze pilots streamed in through the battle and many ships were lost despite the significant kill count of the USMC Corsair pilots. Bombing raids were conducted by the USAAF contingent assigned to the Tactical Air Force, Tenth Army.
This FSO is set before and during the Battle of Okinawa. USMC Corsairs along with USAAF bombers and escorts will prepare the island and provide close escort in the way of ground attack as the battle for Japanese territory progresses.
Side Split: 52% Allies/48% Axis
|
USMC/USAAF |
IJAAF |
||
|
F4U-1C |
MAX 8, Hour 1 ONLY |
Ki-84 |
NO MIN/MAX |
|
F4U-1D |
N1K2 |
NO MIN/MAX |
|
|
P-47N |
|
||
|
B-24 |
MIN 12 |
||
Special Rules:
F4U-1C MUST carry bombs and rockets to target. These are dedicated ground attack aircraft.
All aircraft have a 18K altitude cap.
Ordnance carrying aircraft alt cap is 14K.
Ordnance disabled on P-47N.
1000 lbs. bombs disabled fro F4U1-C and F4U-1D.
Scoring:
- Allies must destroy 8 Hangars (11 possible) AND 20 Bunkers (Radar, Fuel, Barracks, Ammo - 30 possible) to win the frame.
- Recommended Accurate Skins List:
-
F4U-1C: VMF-311 by Greebo
F4U-1D: VMF-312/611 by Tex01
VMF-312/584 by Tex01
P-47N: 507FG/463FS by Greebo
413FG/34FS by Greebo
507FG/465FS by Greebo
318FG/19FS by Greebo
318FG/333FS by Greebo
B-24: 11BG/431BS by Greebo
-
Arena Settings:
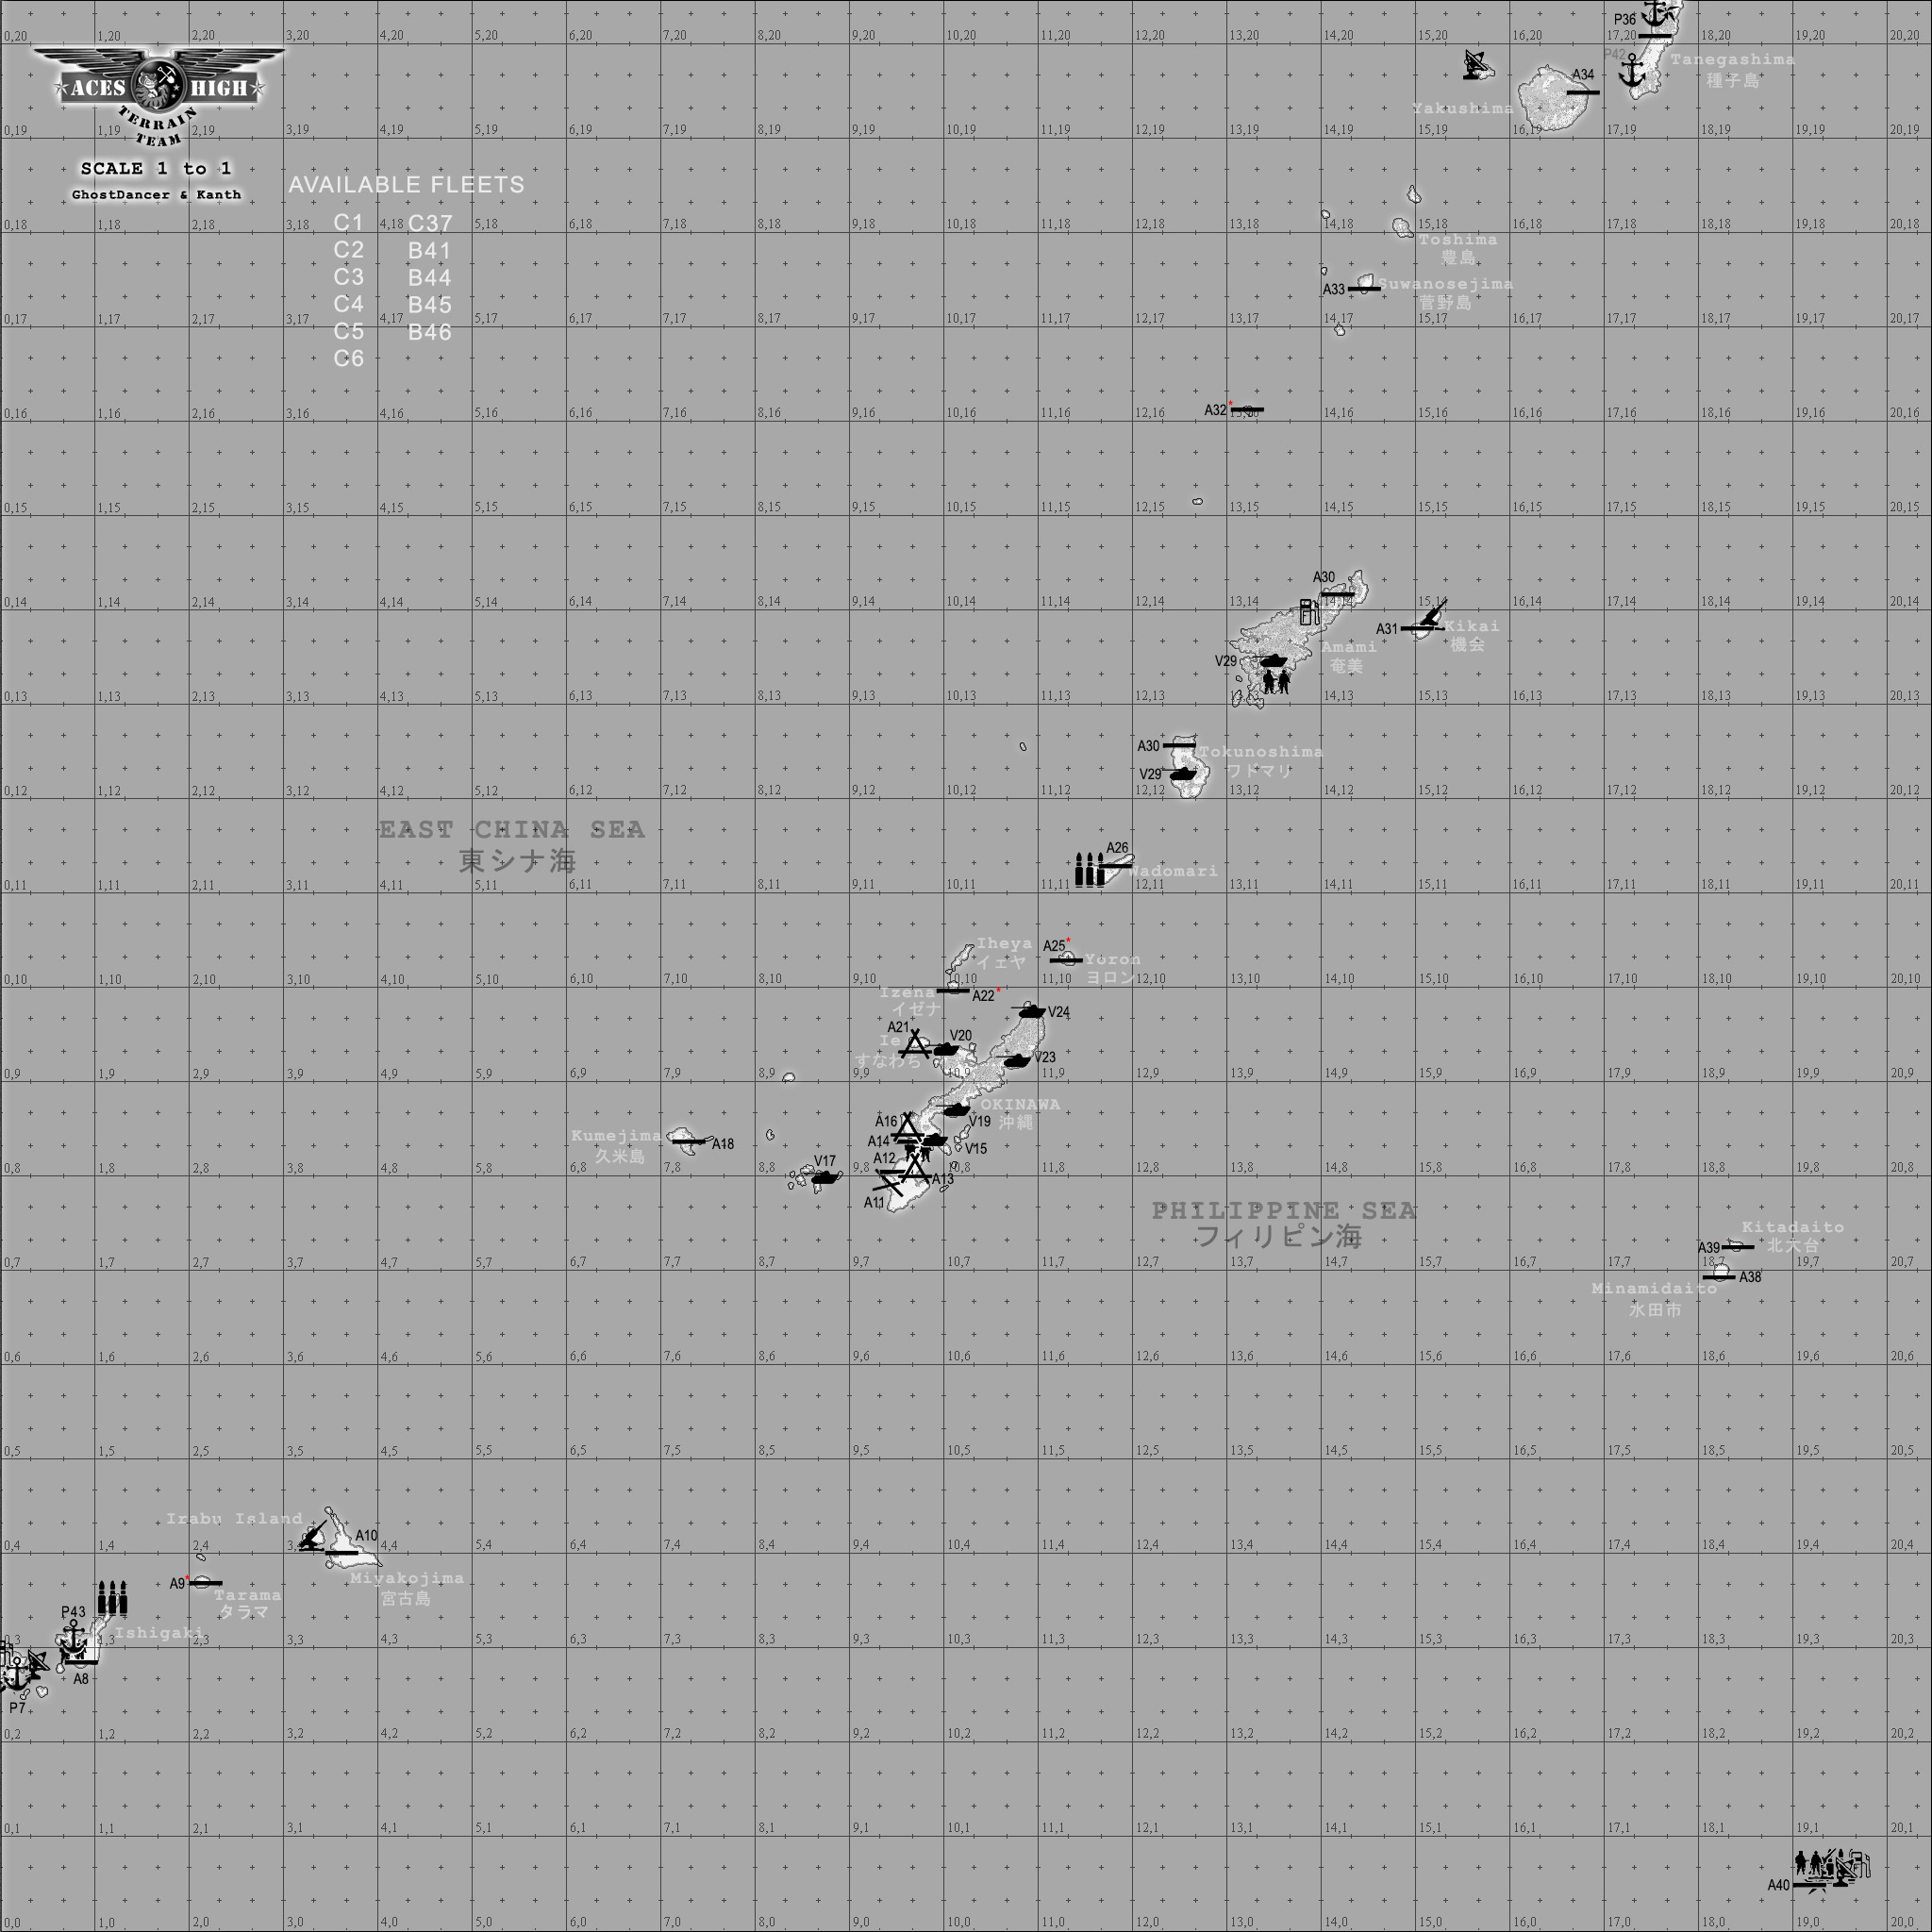
- Terrain: okinawa
- Clouds: med5kmed15k
- Fuel Burn: 1.0
- Icons: 3K Friendly/Enemy
- Ack: .3
- Fighter and Bomber warning range: 52800 (about 10 miles)
- Tower range set to 52800 (for display only to match the above setting)
- Haze/Fog: 15 miles
- Radar: Off
- Enemy collisions: on
- Friendly collisions: off
- Killshooter: off
- Time: 1000 (10AM) Game Clock
- Formations: Off
- Formation Autopilot: On
- Bomber calibration: Automatic
- Wind:
0K-2K NO WIND
2K-8K: S TO N - Speed 5
8K-14K: SW TO NE - Speed 10
14K-18K: SW to NE - Speed 10
20K+: 45 MPH Downwind
Area of Operations:
- Details
- Written by: Will Hyman
- Category: Pacific Theatre
- Hits: 15
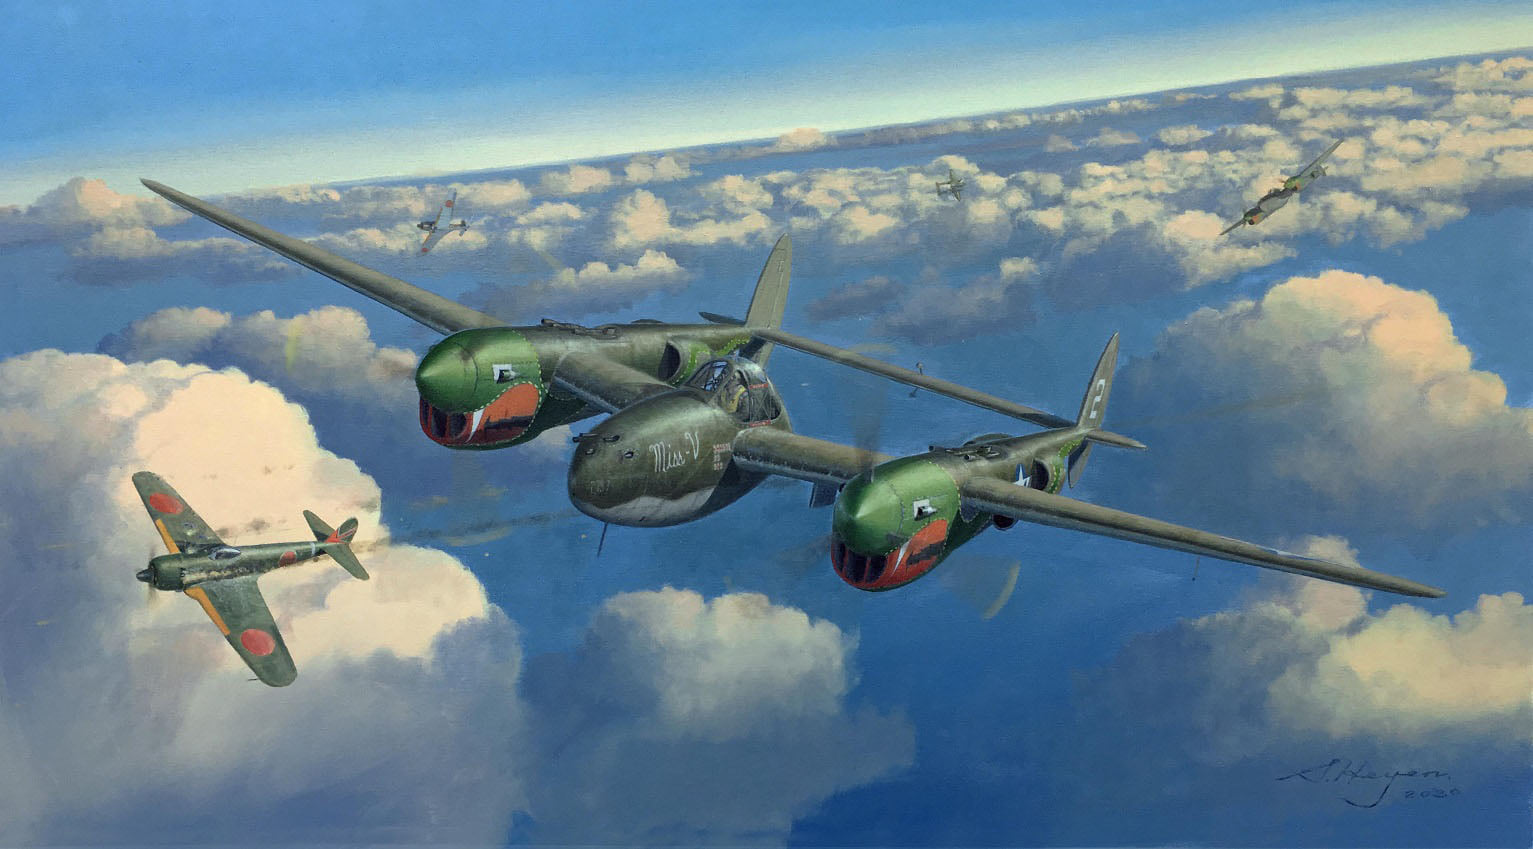
As the British and Allied forces slogged down the Arakan coast of Burma, the Japanese opened a major offensive on February 4th, 1944 designed to throw the British back on all fronts and invade northern India.
The Japanese attack surrounded British ground forces at Sinzweya and Instead of retreating, the British army dug in and was re-supplied from the air in two separate battles. The Allied Air Forces provided ground attack air support missions to release Japanese pressure on the defenders using Hurricane II’s and P-40s. In northern and central Burma, P-51s and B-25Hs were supporting Chindit and Wingates Raiders special operations deep behind enemy lines.
In March of 1944, P-38s of the US 459th FS began operating from present-day Bangladesh under the control of the RAF 224 Group. With orders to destroy Japanese aircraft in the air and on the ground at their airfields in Burma, they quickly went to work along with newly delivered Spitfire Mk VIII’s of No 81 and No 152 Squadrons.
With the failure of their offensive in all areas the Japanese were left with no alternative but to retreat. By July 1944 British troops had reached the Chindwin river. In the Autumn a renewed offensive combined with Chinese forces pushing down from northern Burma began. This FSO loosely represents the forgotten front of Burma in early to mid 1944.
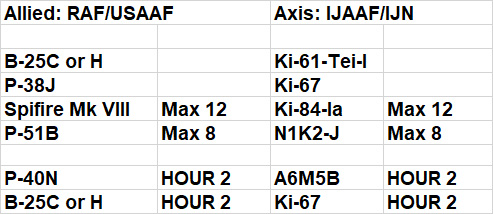
PLANE SET:
SPECIAL RULES:
FIGHTER ALT CAP - 20K
BOMBER ALT CAP - 14K
- B-25C AND H - 1,000 BOMBS DISABLED
- P-38J - 1,000LB BOMBS DISABLED
- FORMATIONS DISABLED DURING HOUR 2
AIRCRAFT SCORING:
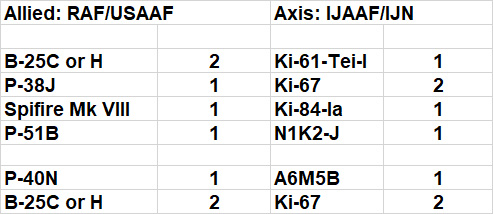
OBJECT SCORING:
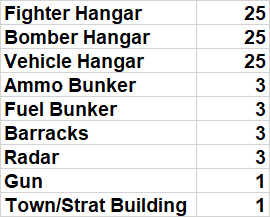
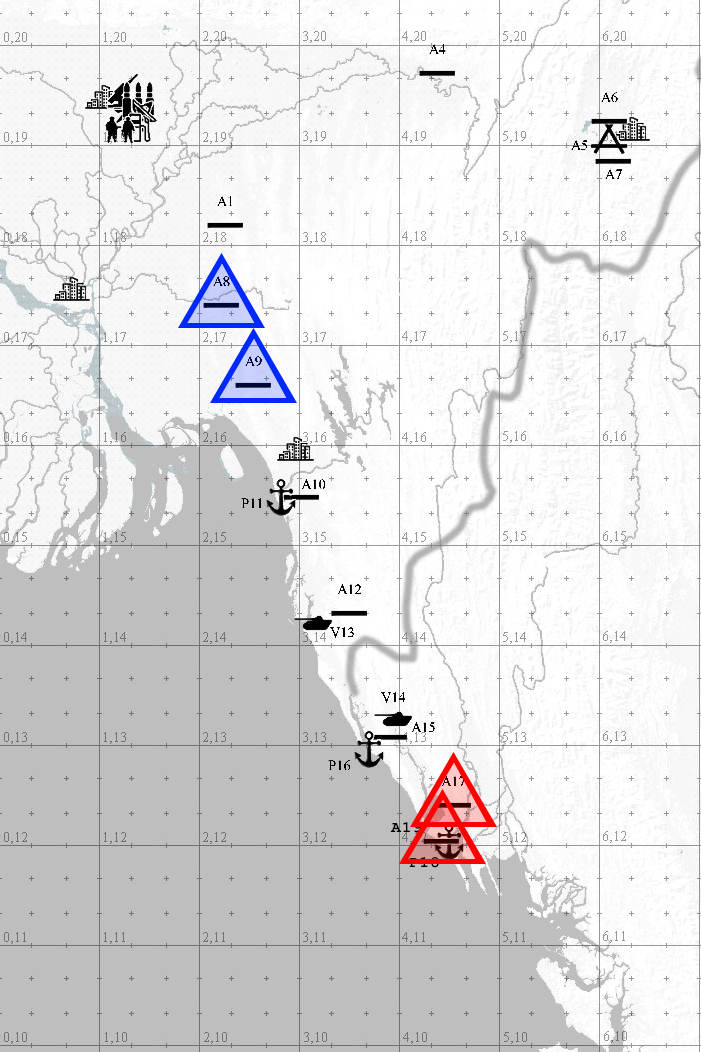
SETTINGS
- Burma terrain
- Icon Range – Friendly 3k, Enemy 3k.
- No Radar
- Fighter and Bomber Warning Range - 63360 (12 miles)
- Tower Range – 63,360 (for display to match the above Fighter and Bomber Warning)
- External view for bombers (F3) - On
- Friendly Collisions - Off
- Enemy Collisions - On
- Kill Shooter - Off
- Fuel - 1.0
- Ack - 0.3
- Formations - Enabled
- Bombsite calibration - Main Arena Standard
- Time:
FRAME 1 - 0900
FRAME 2 - 1200
FRAME 3 - 1500
- Object Downtime – full (200)
- Winds - MAX Downdraft 20K
- Clouds - Med5KMed15K.awa
Designed by Nefarious