Test site The live site is still ahevents.net — sign-ups and log uploads there are the real ones. Please poke at everything here: nothing is permanent, and if it gets into a mess we can roll it back. Problems to Steely07 on the Aces High BBS.
- Details
- Written by: Snoopy Bell
- Category: Race Tracks
- Hits: 14
 Season 31 Race 1
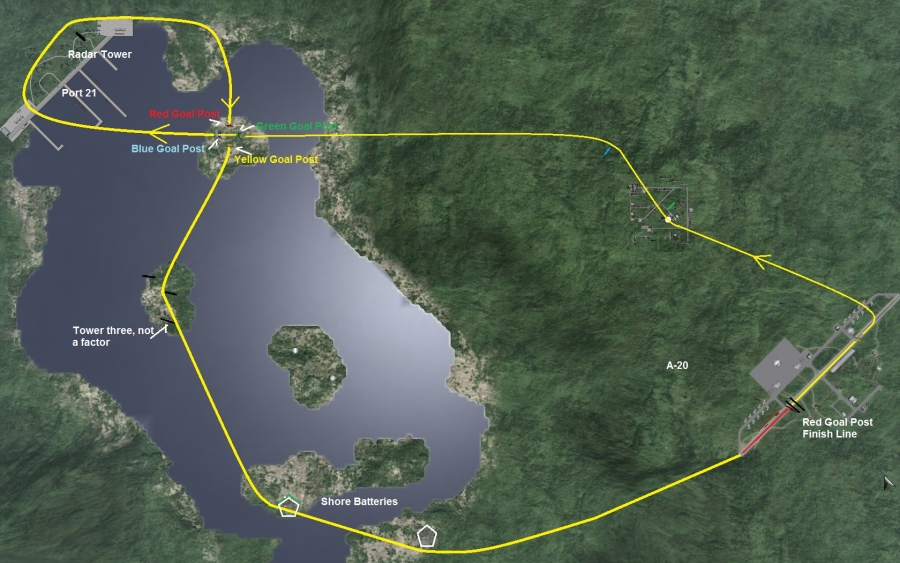
Fast Black Out 400
Tuesday 18 June, 2013
7:00 Pacific 10:00 Eastern
Â
Settings:
Hosting CM: HB555
Track Designed by: HB555
Terrain: Race10
Fast Black Out 400
Tuesday 18 June, 2013
7:00 Pacific 10:00 Eastern
Â
Settings:
Hosting CM: HB555
Track Designed by: HB555
Terrain: Race10
Previously Run: Never
Field: A-20
Country: Bishop
Aircraft: Me262A-1
Aircraft pick by: Biggamer
Field: A-20
Country: Bishop
Aircraft: Me262A-1
Aircraft pick by: Biggamer
Take Off: North East
Time: 14:00
Fuel Burn: 1.63
Fuel Load: As always, Pilots Choice
Views: F1, F3, CMEye
Start: Tower Start
Finish: 5th Time Through Yellow Runway Goal Post
Laps: 4
Time: 14:00
Fuel Burn: 1.63
Fuel Load: As always, Pilots Choice
Views: F1, F3, CMEye
Start: Tower Start
Finish: 5th Time Through Yellow Runway Goal Post
Laps: 4
Course Description:
1) Take off North East.
2) Fly through lower section Red Goal Post.
3) Fly through lower section Yellow Goal Post.
4) Hard Left to Town.
5) Pass Green Pylon on your Right.
6) Pass Blue Pylon on your Left.
7) Slight Left and down to Goal Post Island.
8) Fly through lower section of Green, then Blue,
Goal Posts.
9) Make a death defying Right turn around Port
Radar Tower.
10) Continue right through lower sections of Red,
then Yellow, Goal Posts.
11) Right to Radar Island.
12) Fly between Center and Right side Towers
13) Pass both shore batteries on the Right
14) Back to A -20 and rejoin the course at 2) above.
End of Lap/Race is Red Goal Post.
Â
- Details
- Written by: Brandon
- Category: Race Tracks
- Hits: 15
Aces High Extreme Air Racing
Season 30 Race 12: Fudge Factor 400
Tuesday,4 June, 2013
10:00 Eastern 7:00 Pacific
***READ MOTD***
 Â
Settings:
Aircraft: P38G (Surf35)
***READ MOTD***
 Â
Settings:
Aircraft: P38G (Surf35)
Terrain: Race10
Hosting CM: BMathis
Track designed by: BMathis
Field: A-27 (Pens)
Hosting CM: BMathis
Track designed by: BMathis
Field: A-27 (Pens)
Country: Bishop
Takeoff: South East
Takeoff: South East
Fuel Burn: .1
Fuel load: Pilot's Choice (100% will get you through the race)
Views: F1, F3, and CM eye (Gods Eye)
Start: Gullgutz COLD Start
Finish: Double Bomber Hanger Pass
Laps: 4 (5th time through Double Hanger Pass)
Fuel load: Pilot's Choice (100% will get you through the race)
Views: F1, F3, and CM eye (Gods Eye)
Start: Gullgutz COLD Start
Finish: Double Bomber Hanger Pass
Laps: 4 (5th time through Double Hanger Pass)
Â
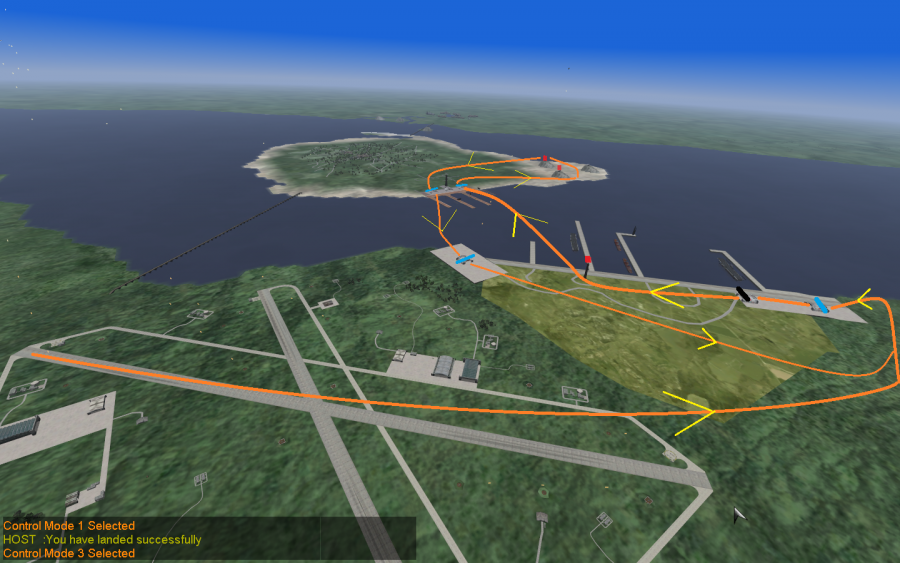
1. Take Off South East
2. Left 180 Fly through Double bomber Hanger
3. Right Around Radar Tower, dock hanger area
4. Fly though far Right Hanger
5. Right Turn to Shore Batteries
5. Right Turn to Shore Batteries
6. Left Around 1st Shore Battery
7. Fly Left Between next Shore batteries
7. Fly Left Between next Shore batteries
8. Fly though Right Most Hanger at docks
9. Right and back to left - Fly through Hanger
9. Right and back to left - Fly through Hanger
10.Easy Left to 180 back into Double Bomber Hangers
Â
This Ends LAP 1, & Finishes race after 4 LAPS
Â
Â
- Details
- Written by: Snoopy Bell
- Category: Race Tracks
- Hits: 13
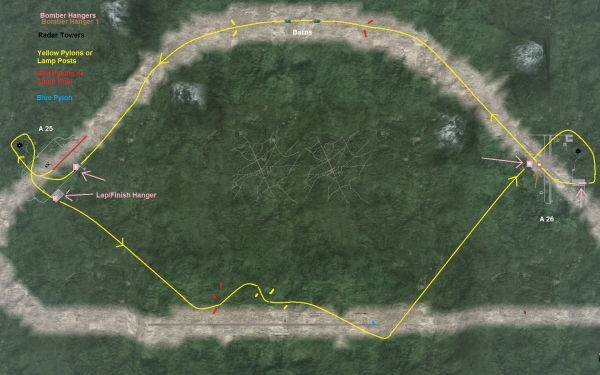
 Season 30 Race 9 – Tri-Oval Try-Fecta 300
Event will run Tuesday 14 May, 2013
Race Info:
Previous Runnings: none
Location: SEA #1
Designed by: HB555Â Â
Hosted by: HB555
Terrain: "Race10" (the racing terrain)
Communications: VOX 200 and TEXT 200
Country: Bishop
Start Field: A-25 The Tri-Oval
Aircraft: Spitfire XIV
Plane Choice: wash, Winner of Race 7
FuelBurn: 1.5
Fuel Load: Pilot's Choice -Â 100% is guaranteed to be enough
Takeoff: SW Runway - GullGutz type of start
Laps: 3
Heats: 3 (best of all 3 heats wins the race)
Views Enabled:F1-Normal, F3-external, F5-CM Eye
Finish: Flying Finish at the A25 Bomber Hanger
Course Description:
1. Take off south west runway, A-25.
2. After lift off, circle Right around Radar Tower
3. Turn Left and fly through Bomber Hanger, heading south east.
4. Head up the hill and pass 2 Red Pylons on your Left, 1 on your Right.
5. Slight chicane through Yellow Lamp Posts.
6. Slight right between grand stands, keeping Blue Pylon to your Left.
7. Left to A-26.
8. Fly through left most Bomber Hanger.
9. Circle Right around Radar Tower.
10. Fly through Bomber Hanger.
11. Continue Right turn and fly through Bomber Hanger marked "1"
12. Up the hill and pass between 2 Red Lamp Posts.
13. Straight through upper or lower of both barns.
14. Pass between 2 Yellow Lamp Posts.
15. Left to A 25
16. Fly through Bomber Hanger on the Left.
17. Rejoin course by making right circle around Radar Tower and repeating from 3.
18. #3 instruction Bomber Hanger is Lap/Finish.
Designer Notes: Stay below the tops of all Radar Towers, Posts and Lamp Posts.
Event will run Tuesday 14 May, 2013
Race Info:
Previous Runnings: none
Location: SEA #1
Designed by: HB555Â Â
Hosted by: HB555
Terrain: "Race10" (the racing terrain)
Communications: VOX 200 and TEXT 200
Country: Bishop
Start Field: A-25 The Tri-Oval
Aircraft: Spitfire XIV
Plane Choice: wash, Winner of Race 7
FuelBurn: 1.5
Fuel Load: Pilot's Choice -Â 100% is guaranteed to be enough
Takeoff: SW Runway - GullGutz type of start
Laps: 3
Heats: 3 (best of all 3 heats wins the race)
Views Enabled:F1-Normal, F3-external, F5-CM Eye
Finish: Flying Finish at the A25 Bomber Hanger
Course Description:
1. Take off south west runway, A-25.
2. After lift off, circle Right around Radar Tower
3. Turn Left and fly through Bomber Hanger, heading south east.
4. Head up the hill and pass 2 Red Pylons on your Left, 1 on your Right.
5. Slight chicane through Yellow Lamp Posts.
6. Slight right between grand stands, keeping Blue Pylon to your Left.
7. Left to A-26.
8. Fly through left most Bomber Hanger.
9. Circle Right around Radar Tower.
10. Fly through Bomber Hanger.
11. Continue Right turn and fly through Bomber Hanger marked "1"
12. Up the hill and pass between 2 Red Lamp Posts.
13. Straight through upper or lower of both barns.
14. Pass between 2 Yellow Lamp Posts.
15. Left to A 25
16. Fly through Bomber Hanger on the Left.
17. Rejoin course by making right circle around Radar Tower and repeating from 3.
18. #3 instruction Bomber Hanger is Lap/Finish.
Designer Notes: Stay below the tops of all Radar Towers, Posts and Lamp Posts.
Â
Â
Â
- Details
- Written by: Spikes
- Category: Race Tracks
- Hits: 16
  Aces High Xtreme Racing League is proud to Present
Â
Modified Bad Moon Rising 500 in Yak MinorÂ
Â
Race info:
Â
Previous runnings: 6th Annual 68KO CupÂ
Track design: 4440
Host: Â JVNotchÂ
Location: SEA #1Â
Communications: VOX 200, Text 200
Terrain: Race10
Country: KnightÂ
Start field: A29 (Airfield 29)
Plane choice: Yak9-U Via BearDawg(AGAIN)Â
Fuel burn: 2.0Â
Loadout: Pilots choice, 100% will guarantee a finishÂ
Takeoff: N
Type of Start: Â Gull GutzÂ
Number of laps: 5
Time: Â 1900 hours (night run)
Â
Views Enabled – F1 ( Normal ), F3 (external),Â
F5 (CM Eye)
Â
Â
Flying Finish: Â Middle Opening of the Green Goal Post
Â
Â
Â
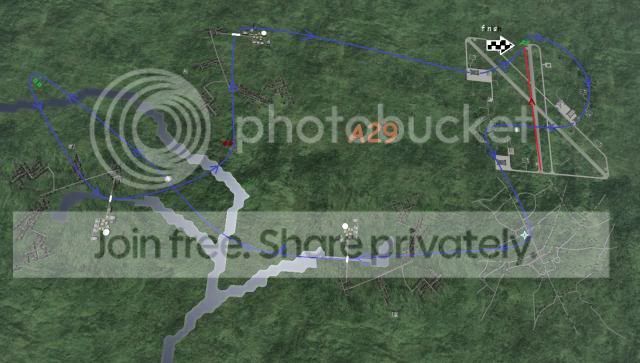
1. Â Take off N & fly through Bottom of the Green Goal Post.Â
2. Â Turn right, in any fashion, to fly through the Offset Bomber Hangar.
3. Â Jink right to setup a left turn around the Radar Tower.
4. Â Fly to and execute a right turn around the Town Flag.
5. Â Proceed to the Blue Pylon City Bridge and pass under it.
6. Â After the City Bridge, stay to the left of the pair of Blue Pylons.
8. Â Ingress and Egress out of lone Hangar in the middle of the Pylon Cities.
9. Â Fly to & turn left at the pair of Green Pylons.
10. Â Continue to & under the City Bridge of these Green Pylons.
11. Â Navigate to the pair of Red Pylons & execute a left turn.
12. Â Pass under the City Bridge of The Red Pylons City.
13. Â Turn right and pour on the speed to fly through the Bomber Hangar on the NE pad.
14. Â Maneuver left to Finish the lap/race through Middle opening of the Green Goal Post.
15. Â Rejoin the course with a right turn.
Â
Night running of this as original. Special colors too.
Â
Altitude restrictions are all towers.
Â
Any part of the plane must be below the Town Flag.
Â
Six times through the Start/Finish gate are aÂ
qualifying race.
Â
Â
  Â
Â
This was the course that branded BMathis a Champion of
Year 6 of the AHXARL's history.
Â
Come on out & see if you could have beat him that night!!!
Â
Â
Â
 ~S~
Â
- Details
- Written by: Snoopy Bell
- Category: Race Tracks
- Hits: 15
Â
Course Description:
1) Take off North West.
2) Fly through lower section Red Goal Post
3) Fly through middle section Yellow Goal Post
4) Left around Yellow Pylon
5) Left through middle section double Green Goal Post
6) Straight through lower section Red Goal Post
7) Straight through middle section of double Green Goal Post
8) Slight left aroound Yellow PylonÂ
9) Slight Right through Port 30 Pad Fighter Hanger
10) Hard Left around Port Radar Tower
11) Right through Left Side (NE) Pad Bomber Hanger
12) Slight Right around Water Tower
13) Right Around Town Flag
14) Repeat from 2
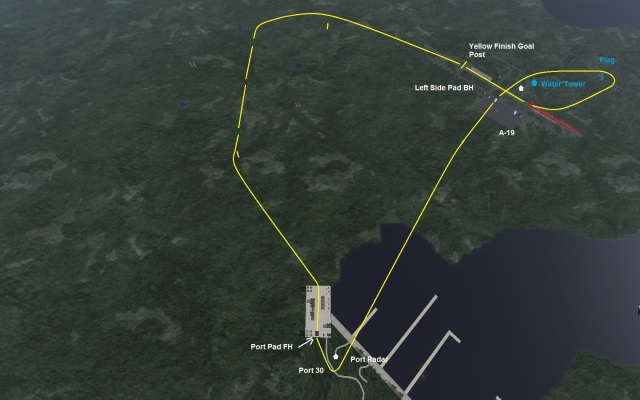
Season 30 Race 5
The Hayabusa 500
Tuesday 16 April, 2013
7:00 Pacific 10:00 Eastern
Â
Settings:
Aircraft: Ki-43-II Hayabusa (Oscar)
Aircraft pick by: 1MADDOG1
Terrain: Race10
Hosting CM: HB555
Track Designed by: HB555
Previously Run: Never
Field: A-19
Country: Knights
Take Off: North West
Time: 08:00
Fuel Burn: 2.17
Fuel Load: As always, Pilots Choice
Views: F1, F3, CMEye
Start: Gullgutz
Finish: 6th Time Through Yellow Runway Goal Post
Laps: 5
The Hayabusa 500
Tuesday 16 April, 2013
7:00 Pacific 10:00 Eastern
Â
Settings:
Aircraft: Ki-43-II Hayabusa (Oscar)
Aircraft pick by: 1MADDOG1
Terrain: Race10
Hosting CM: HB555
Track Designed by: HB555
Previously Run: Never
Field: A-19
Country: Knights
Take Off: North West
Time: 08:00
Fuel Burn: 2.17
Fuel Load: As always, Pilots Choice
Views: F1, F3, CMEye
Start: Gullgutz
Finish: 6th Time Through Yellow Runway Goal Post
Laps: 5
Course Description:
1) Take off North West.
2) Fly through lower section Red Goal Post
3) Fly through middle section Yellow Goal Post
4) Left around Yellow Pylon
5) Left through middle section double Green Goal Post
6) Straight through lower section Red Goal Post
7) Straight through middle section of double Green Goal Post
8) Slight left aroound Yellow PylonÂ
9) Slight Right through Port 30 Pad Fighter Hanger
10) Hard Left around Port Radar Tower
11) Right through Left Side (NE) Pad Bomber Hanger
12) Slight Right around Water Tower
13) Right Around Town Flag
14) Repeat from 2
Alt restrictions: Yellow Pylons, Water Tower, Town Flag,
and Radar Towers.
and Radar Towers.
Â