- Details
- Written by: Spikes
- Category: Race Tracks
- Hits: 17
Da Modified "Cargo of Love" Run 300
Event will run Tuesday Oct 22,2013
7PM PAC, 10PM EST
SEA #1Â
Â
Pre-registration not required, but reading the MOTD is
Please review the arena message before asking questions
on the race.Â
Aircraft: A-20G (Winstone)
Terrain: Race10
Hosting CM: JVNotch
Original track designed by: EvlBunnyÂ
Previous running’s: Season 26 Race1Â
Field: A-39 (map 7,13,9)
Country: Rook
Vox/Text = 200
Race time of day: Noon
Takeoff: NE
Fuel Burn: 1.0
Fuel load: Pilot's Choice (100% will get you throughÂ
the race)
Views: F1, F3 and CM eye (Gods Eye)Â
Start: Gullgutz
Finish: Right Side Bomber Hanger
Laps: 3 (4 Passes through Hanger)
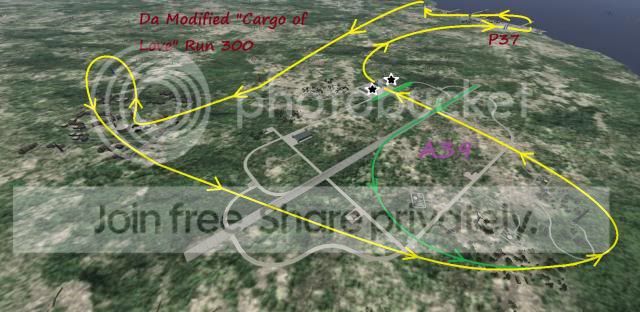
Only the markers in this MOTD matter. We will beÂ
using the 25% rule on height (you must get at leastÂ
half a wing below the top of the marker).
Course description:
 1. Take off NE.
 2. Circle left around the Radar Tower on A39.
 3. Fly through the Big Pad Bomber Hangar.
 4. Navigate to P37 & fly through the gate created by theÂ
   Blue Pylons closest to A39.
 5. Veer left to fly through the Green Pylon Gate
 6. Continue the left turn to fly through the Blue Pylon
   Gate on the Port docks.
 7. Staying to the left of all the Triple Yellow Pylons,
   turn to the right around them.
 8. Pass through the middle of the Blue Quad
  Pylons(2 on each side :-)Â
 9. Turn left( in any manner) to head to & stay left of the
   Red Pylon on the outskirts of A39's Town.
10. Slip to the right & make a right turn at the Green
    Pylon in Town.
11. Execute a left 180° around the Blue Pylon in Town.
12. Exit Town through the gate created by the 2 Radar Towers.
13. Continue on to the Radar Tower at A39 to rejoin theÂ
    Course.Â
14. Fly through the Big Pad Bomber Hangar to End the Lap
 4 passes through the hanger ends the race
Notes:
All flat turns at P37 & A39's Town
Must have at least a wingtip under the
top of all markers
Must fly through the Big Pad Bomber onÂ
the last lap to complete the race
Â
- Details
- Written by: Spikes
- Category: Race Tracks
- Hits: 16
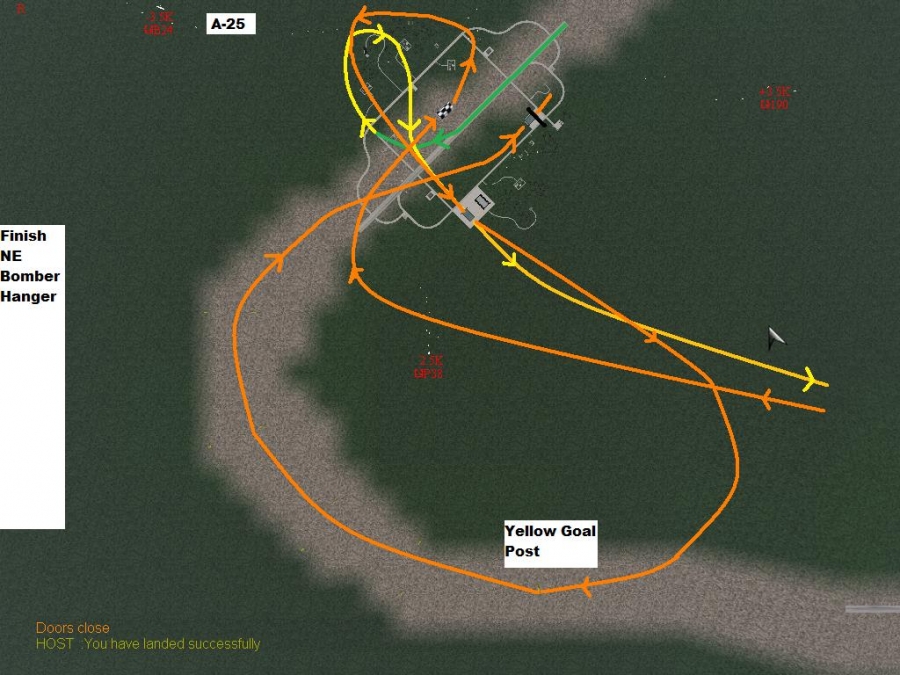
Season 32 Race 4 - "The CARGO 100"
10:00 Eastern 7:00 Pacific
Settings:
Aircraft: C-47AÂ
Terrian: Race 10
Hosting CM: Beardawg
Track designed by: Beardawg
Field: A-25
Country: Bishop
Takeoff: Southwest
Fuel Burn: 1
Fuel Load: Pilots Choice (100% gets you through the
race)
Views:Â F1, F3,and CM eye
Start: Gullgutz start
Finish: Checkerboard Hanger
Laps: 1 (First pass through Checkerboard Hanger@ A25)
Heats: 3 Opt.4th
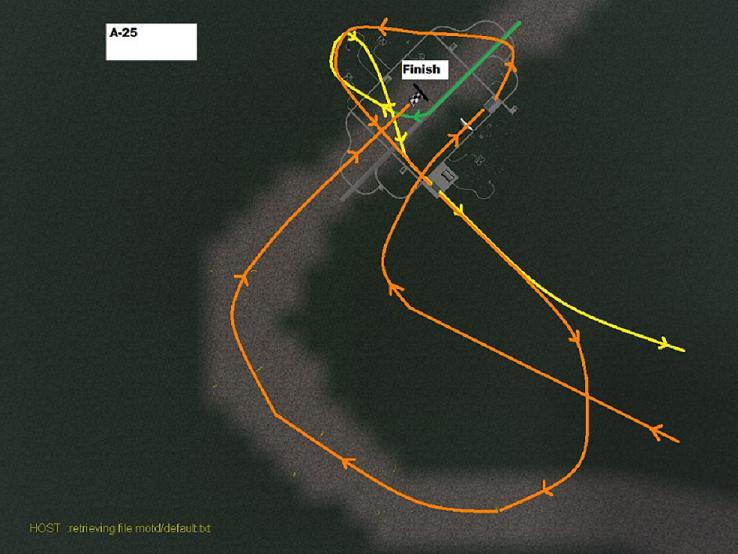
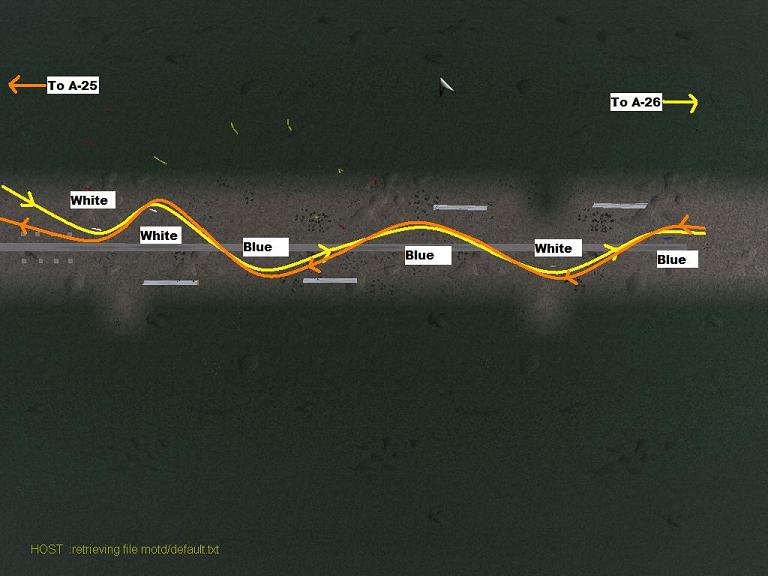
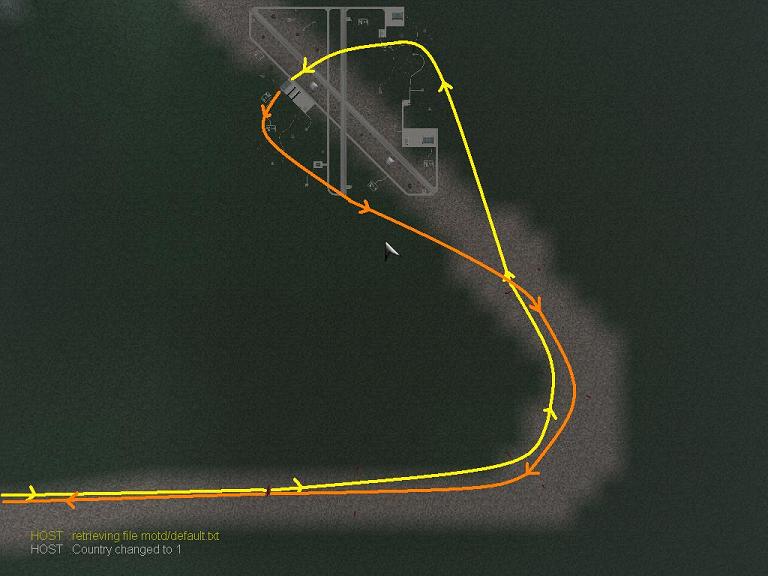
2. Right turn around Radar Tower
3. Continue SE through SE Bomber Hanger
4. Climb the hill to the White pylon staying on
  Right side.
5. Left around 1st White pylon & continue to the Left
  side of the 2nd White pylon.
6. Right around 2nd White pylon & continue to the
  right side of 1st Blue pylon.
7. Left around 1st Blue pylon & continue to Left side
  of the 2nd Blue pylon.
8. Right around 2nd Blue pylon & continue to Right
  side of the 3rd White pylon.
9. Left around 3rd White pylon & continue to Left
  side of the 3rd Blue pylon.
10.Right around the 3rd Blue pylon and on to the
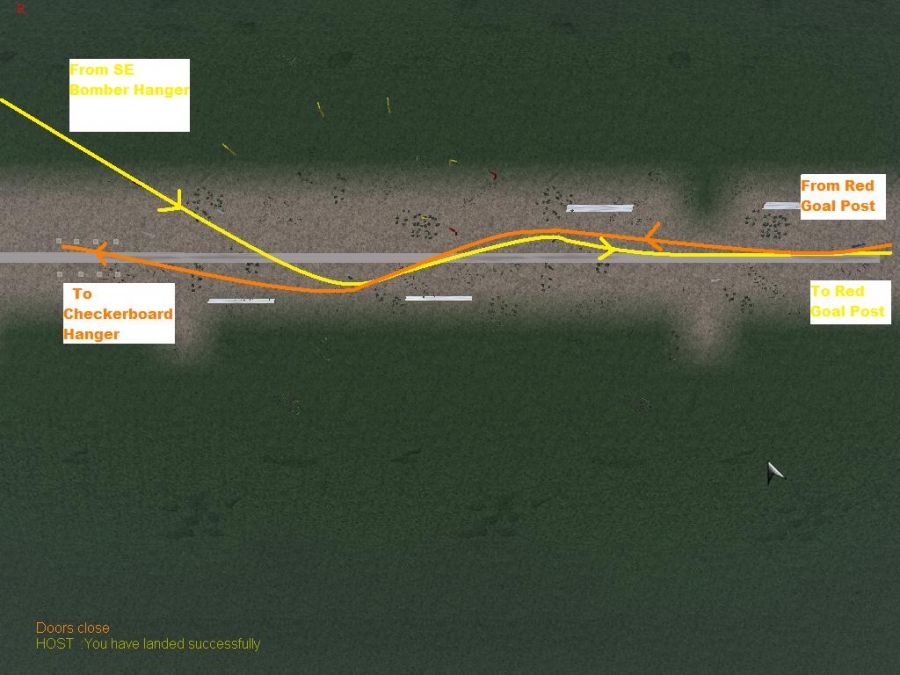
  Red Goal Post.
11. Continue through the Red Goal Post
12. Continue a sweeping left turn staying between
  the Red Lamp Posts.
13. Exit the Red Lamps Post with a slight Right to
  the Radar Tower.
14.Left turn around Radar Tower
15.Through the NW Bomer Hanger at A26
16.Left turn back to the Red Lamp Post
17.Continue between the Red Lamp Post to the
  Red Goal Post.
18.Through the Red Goal Post climb the hill to the
  Right side of the 1st Blue pylon.
19.Left turn around 1st Blue pylon continue to
  the Left side of the 1st White pylon.
20.Right turn around 1st White pylon & continue
  to the Right side of 2nd Blue pylon.
21.Left around 2nd Blue pylon & continue to the Left
  side of the 3rd Blue pylon.
22.Right around 3rd Blue pylon & continue to the
  Right side of the 2nd White pylon.
23.Left around the 2nd White pylon & continue to the
  Left side of the 3rd White pylon.
24.Right around the 3rd White pylon.(You may drop troops at any time at this point)
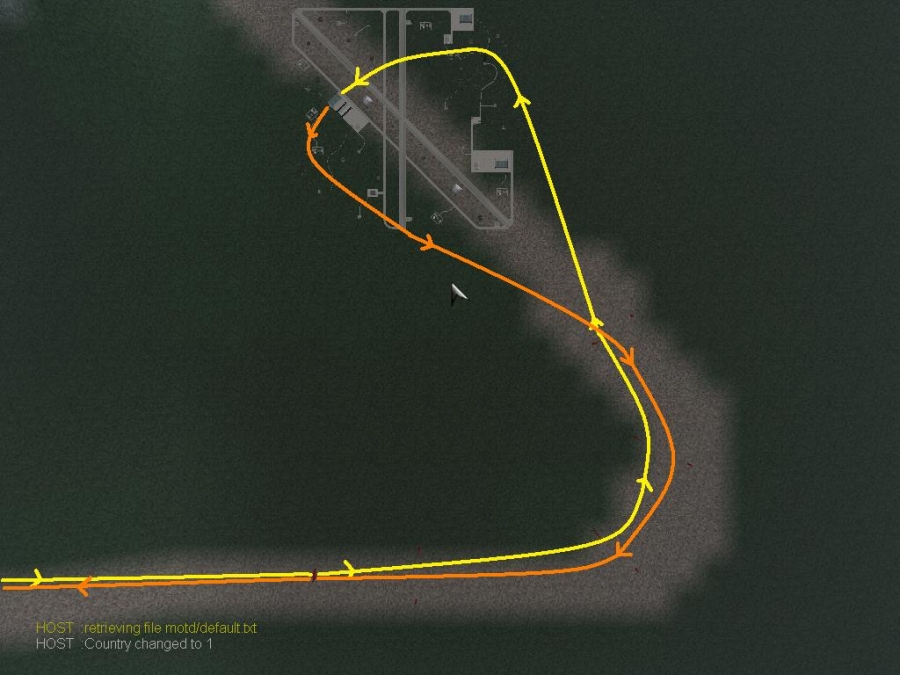
25.Continue down the hill to line up for a pass
  through the NE Bomber Hanger @ A25.
26.Left turn out of the hanger for a Left turn
  around the Radar Tower.
27.After the Radar Tower go through the SE Bomber
  Hanger.
28.Contine up the hill to Line up for a Right turn
  to go through the Yellow Gold Post.
29.Continue right sweeping turn staying between the
  Yellow Lamp Posts.
30.Slight right turn to line up for a pass through
  the Checkerboard Hanger and the Finish Line.
    (Troops may dropped after passing the 3rd White
    pylon on the way back to A25.)
    (No Height restrictions at (16) &(28))
- Details
- Written by: Spikes
- Category: Race Tracks
- Hits: 17
Season 32 Race 4 -Â "The CARGO 100"
10:00 Eastern 7:00 Pacific
Settings:
Aircraft: C-47AÂ
Terrian: Race 10
Hosting CM Beardawg
Track designed by: Beardawg
Field: A-25
Country: Bishop
Takeoff: Southwest
Fuel Burn: 1
Fuel Load: Pilots Choice (100% gets you through the
race)
Views:Â F1, F3,and CM eye
Start: Gullgutz start
Finish: NE Bomber Hanger
Laps: 1-Finish is first pass through NE Bomber Hanger@ A25
Heats: 3 Opt. 4th
1. Take off SW
2. Right turn around Radar Tower
3. Continue SE through SE Bomber Hanger
4. Climb the hill to the Blue pylon staying on
  Right side.
5. Left around 1st Blue pylon & continue to the Left
  side of the 2nd Blue pylon.
6. Right around 2nd Blue pylon & continue to the
  right side of 3rd Blue pylon.
7. Continue through the Red Goal Post
8. Continue a sweeping left turn staying between
  the Red Lamp Posts.
9. Exit the Red Lamps Post with a slight Right to
  the Radar Tower.
10.Left turn around Radar Tower
11.Through the NW Bomer Hanger at A26
12.Left turn back to the Red Lamp Post
13.Continue between the Red Lamp Post to the
  Red Goal Post.
14.Through the Red Goal Post climb the hill to the
  Left side of the 1st Blue pylon.
15.Right turn around 1st Blue pylon continue to
  the right side of the 2nd Blue pylon.
16.Left turn around 2nd Blue pylon & continue
  to the Left side of 3rd Blue pylon.
17.Continue down the hill to line up for a pass
  through the checkerboard hanger @ A25.
18.Left turn out of the hanger for a Left turn
  around the Radar Tower.
19.After the Radar Tower go through the SE Bomber
  Hanger.
20.Contine up the hill to Line up for a Right turn
  to go through the Yellow Gold Post.
21.Continue right sweeping turn staying between the
  Yellow Lamp Posts.
22.Slight right turn to line up for a pass through
  the NE Bomber Hanger and the Finish Line.
    (Cargo may dropped any time after gear up.)
    (No Height restrictions between (11&12) &
    (19&20))
- Details
- Written by: Brandon
- Category: Race Tracks
- Hits: 16
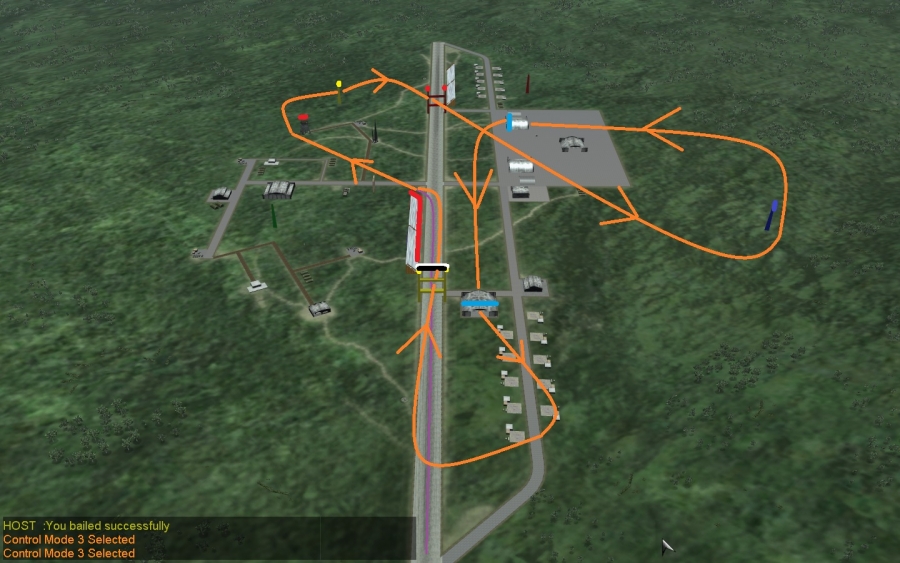
Tuesday 8 October, 2013
7:00 Pacific 10:00 Eastern
Â
Terrain:Â Race10
Arena:Â SEA1
Field: A-1
Country: Bish
Aircraft: FM-2
Aircraft pick by: Crow
Time: 2:00
Fuel Burn: .1
Views: F1, F3, CMEye
Start: GullGutz
Finish: 6th time through Yellow Goal Post
Laps:5
- Details
- Written by: Spikes
- Category: Race Tracks
- Hits: 14
Tuesday 1 October, 2013
7:00 Pacific 10:00 Eastern
Â
Country: Rook
Aircraft pick by: BearDawg
Time: 2:00Â
Fuel Burn: .5
Fuel Load: As always, Pilots Choice
Views: F1, F3, CMEye
Start: GullGutz
Finish: 5th time through the Small Pad Double Bomber Hangars
Laps:Â
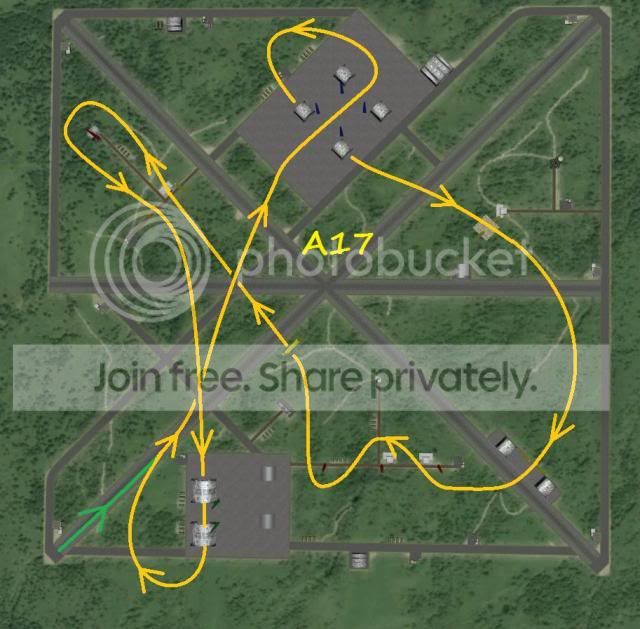
Course Description:
1) Take off North EastÂ
2) Fly to & through the Quad Blue Pylons from SW to NE.
8) Fly through the Yellow Pylon gate to enter & exit  the 180° left turn the around