Test site The live site is still ahevents.net — sign-ups and log uploads there are the real ones. Please poke at everything here: nothing is permanent, and if it gets into a mess we can roll it back. Problems to Steely07 on the Aces High BBS.
- Details
- Written by: Brandon
- Category: Race Tracks
- Hits: 14
Aces High Extreme Air Racing League
***Season 29 Race 10***
Impending DoomÂ Retro
Retro
Tuesday: February 5, 2013.
7PM pac, 10PM east
Sea #1
Registration is not required, but reading the MOTD is.
Hosting CM: BMathis
Track designed by: TracerX
Terrain: SMPizza
Start Field: A6 (Knight)
Time:Variable
VOX channel: 200
Plane: Ki-61
Plane Choice: 1MADDOG1
Fuel Burn: 2.0
Fuel: Your Choice
Takeoff: SW
F3 view enabled
Heats: 3
Laps per Heat: 4
GullGutz Start
Flying Finish Exiting Bomber Hanger on large pad.
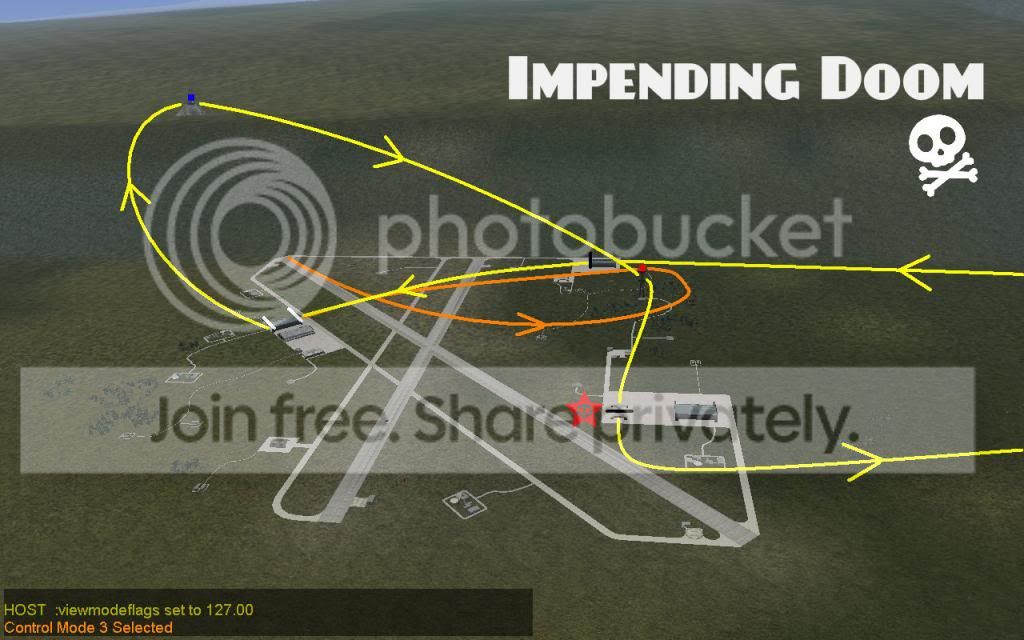
Course Description:
Take Off South West
Left Turn around A-6 Radar
Fly Through Finish Bomber Hanger on Pad
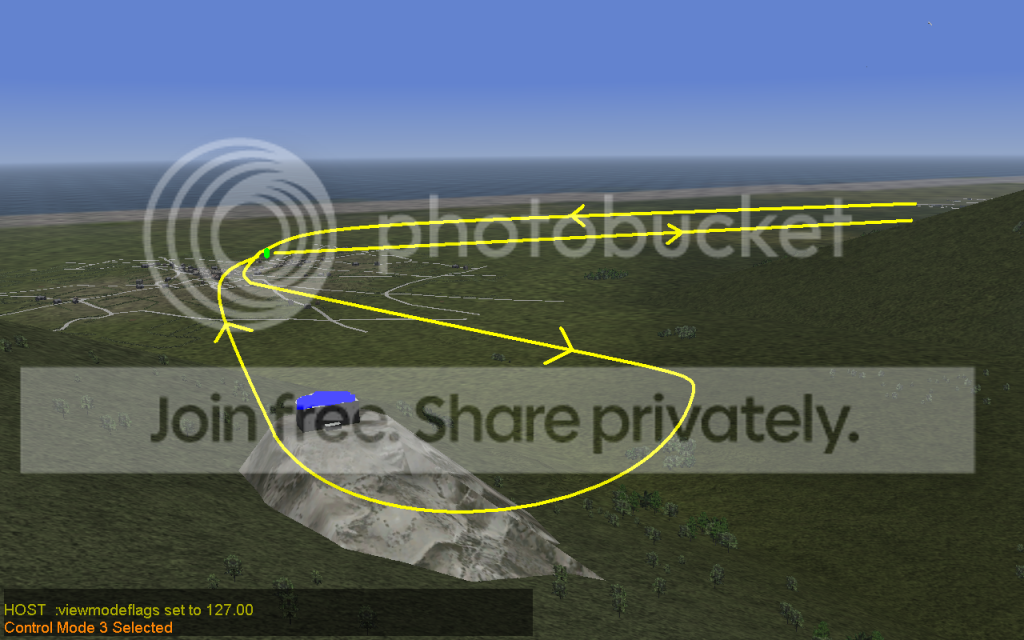
Right Turn to fly up to Shore Battery
Right turn around Shore Battery
Continue down the hill, and Right Around Radar Tower
Fly Through Small Fighter Hanger on padÂ
Left Turn to Town
Turn Left around Town Flag
Right Turn Around Shore Battery
Right Turn Around Town Flag, back to A-6
Fly Through Right pad Bomber Hanger at A-6
Fly Through Finish Bomber Hanger
4 Laps. No Yo-Yo's at Shore Batteries.
Practice that Fighter Hanger PassÂ
***Season 29 Race 10***
Impending DoomÂ
RetroTuesday: February 5, 2013.
7PM pac, 10PM east
Sea #1
Registration is not required, but reading the MOTD is.
Hosting CM: BMathis
Track designed by: TracerX
Terrain: SMPizza
Start Field: A6 (Knight)
Time:Variable
VOX channel: 200
Plane: Ki-61
Plane Choice: 1MADDOG1
Fuel Burn: 2.0
Fuel: Your Choice
Takeoff: SW
F3 view enabled
Heats: 3
Laps per Heat: 4
GullGutz Start
Flying Finish Exiting Bomber Hanger on large pad.
Course Description:
Take Off South West
Left Turn around A-6 Radar
Fly Through Finish Bomber Hanger on Pad
Right Turn to fly up to Shore Battery
Right turn around Shore Battery
Continue down the hill, and Right Around Radar Tower
Fly Through Small Fighter Hanger on padÂ
Left Turn to Town
Turn Left around Town Flag
Right Turn Around Shore Battery
Right Turn Around Town Flag, back to A-6
Fly Through Right pad Bomber Hanger at A-6
Fly Through Finish Bomber Hanger
4 Laps. No Yo-Yo's at Shore Batteries.
Practice that Fighter Hanger PassÂ
Â
Â
Â
- Details
- Written by: Spikes
- Category: Race Tracks
- Hits: 14
Â
Aces High Extreme Air Racing League
           Season 24 Race 6
Hay Harvest 400: Das Zweite (the 2nd)
Tuesday: January 29.
7PM pac, 10PM east
Sea #1
Registration is not required, but reading the MOTD is.
Settings:
Aircraft: Bf-110G-2.
Terrain: Race10
Hosting CM: spammer
Track designed by: spammer
Previous running’s: None
Field: A20
Country: Knight
Takeoff: SW
Fuel Burn: 1.0
Fuel load: Pilot's Choice (100% will get you through the race)
Views: F1, F3, CM eye (Gods Eye)
Start: GullGutz
Finish: Large Pad lone Bomber Hanger at A20
Laps: 4 (4 times through the Large, Pad lone Bomber Hanger at A20)
Heats: 3
Â
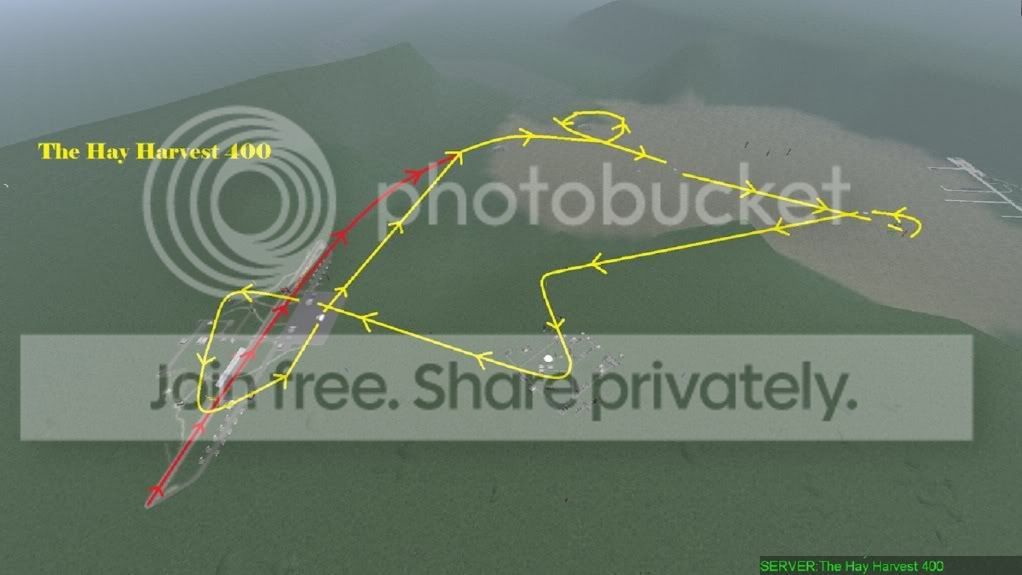
Course description:
Â
1.  Take off SW
2.  Fly down the hill to the Shore Batteries.
3.  Make a right turn around the first SB.
4.  Make a left turn (270 Degrees) around the second SB.
   (Flat turns at Shore Batteries)
5.  Fly through the Bomber Hanger in the field.
   (There are 2 BH's, fly through the one on the left)
6.  Fly through the Yellow than Red Goal Posts.
7.  Turn left 180 degrees and fly through the Bomber Hanger
   next to, and to the right of the 4 Goal Posts.
   (no height restrictions at the Goal Posts).
8.  Fly up to the town at A20 making a left turn around the Yellow Pylon.
9.  Make a right around the Green Pylon in the center of town and head to A20.
   (flat turns at town)
10. Fly through the large pad Bomber Hanger on the right side.
11. Make a left turn around the Water Tower and head to the yellow Goal Post
   on the runway.
12. Make a left turn around the Yellow Goal Post and fly through the lone Bomber
   Hanger on the large pad. This will complete the lap.
   (flat turns at A20)
   Â
 Repeat steps 2-12, three more times to complete the race.
- Details
- Written by: Spikes
- Category: Race Tracks
- Hits: 15
 Welcome all to Season 29 Race 7
Â
Hair Raising
Â
Race info:
Â
Previous runnings: Â none
Track design: Â BadBunny
Terrain: Â Race10
Host: Â JVNotch
Marshalling: Â BadBunny
Location: Â SEA 1
Country: Â Bishop
Start Field: Â A25
Plane Choice: Â Me-262A chosen by BadBunny
Fuel Burn: Â .01
Loadout: Â Pilots choice, but 100% will guarantee a finish
Takeoff: Â NE
Number of Laps: Â 4
Heats: Â 3(race) Â +1 "Thunderdome Heat"(will not count for race points, but fun)
Time: Â 6am
Â
Finish: Â Flying through the left side Big Pad Bomber Hangar at A25
Â
Views Enabled - F1(normal), F3(external), F5(CM eye)
Â
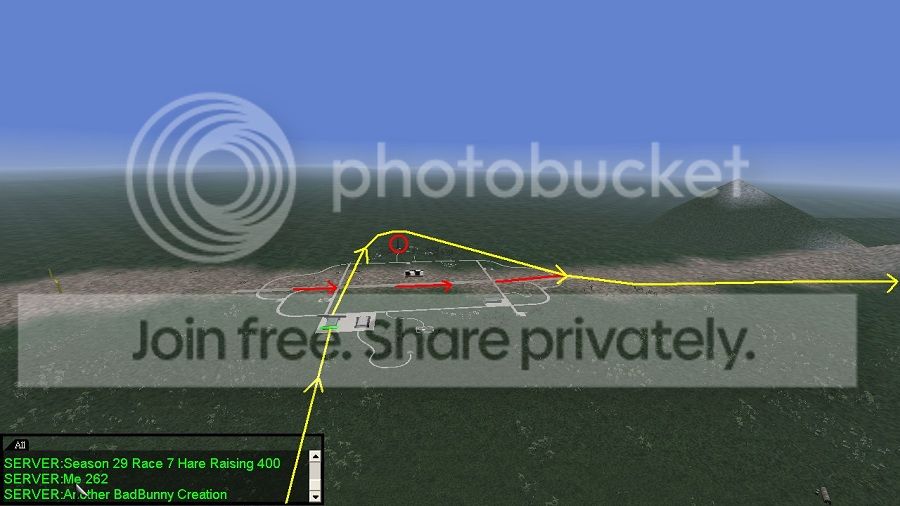
 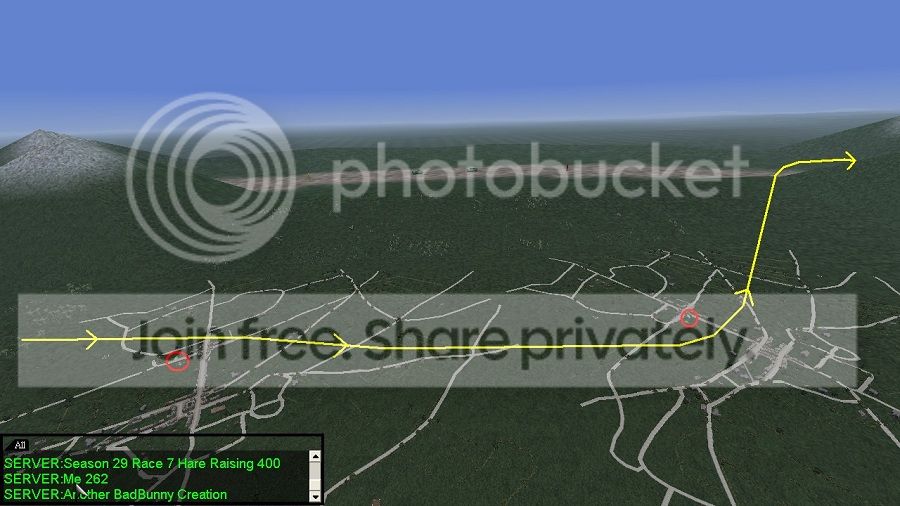
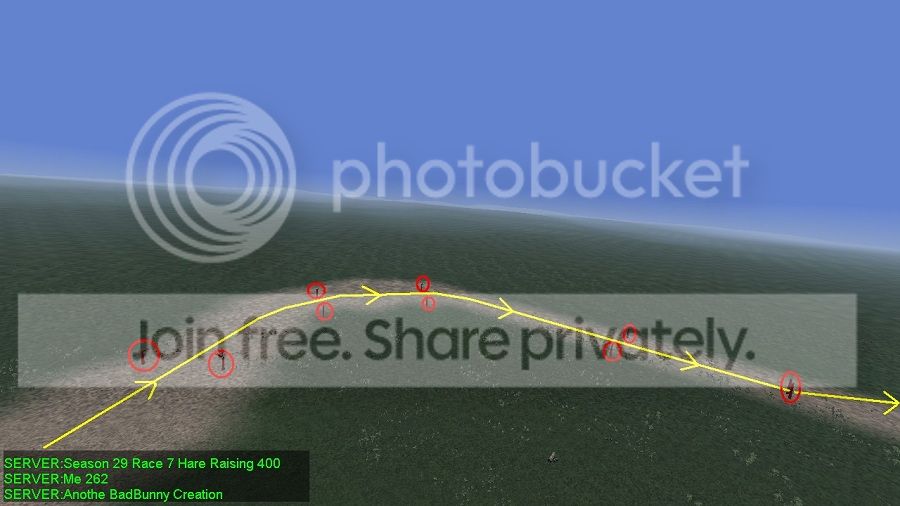
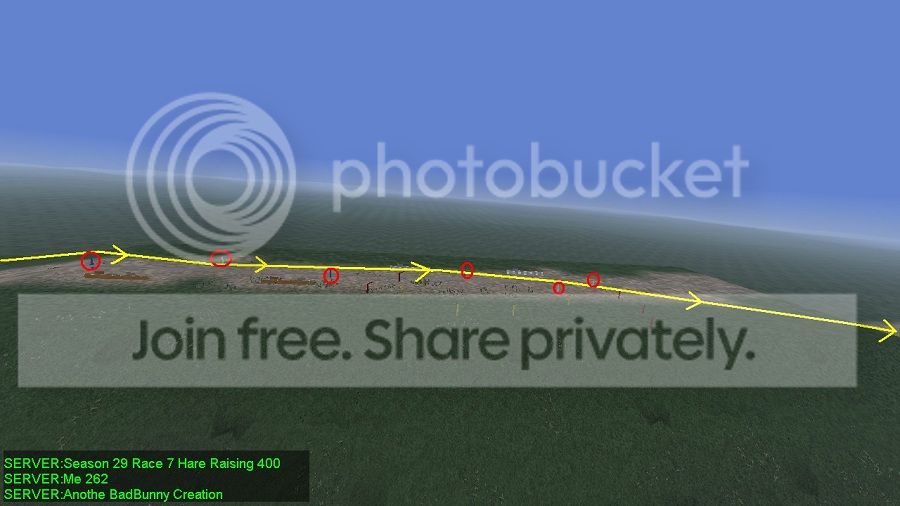
 1  Take off NE
2 Â Right around "Near" town Flag3 Â Left Around "Far" Town Flag
4 Â Pass through the Mountain Peaks like a gate
5 Â Pass through Both Grass Bomber Hangers in the center of the field
6 Â Continue through the four Red Lamp Post gates7 Â Pass through the Red Goal Post
8 Â Pass by the Blue Pylon on your Right
9 Â White pylon on your Left
10 Blue Pylon on your Right
11 Blue Pylon on your Left
12 Pass through the 2 White Pylons like a gate and return to A 25
13 Pass through the Left Side Big Pad Bomber Hanger (This is the Finish Hanger)
14 To rejoin course turn right around the Radar Tower and head to Town
Marker Clarification:
All markers are height restricted:
Must have fuselage below all posts
Entire plane must be below top of mountain peaks
Must have fuselage below all posts
Entire plane must be below top of mountain peaks
- Details
- Written by: Spikes
- Category: Race Tracks
- Hits: 16
  Aces High Xtreme Racing League is proud to Present
Â
The SASFRAS-athon 200
Â
Race info:
Â
Previous runings: noneÂ
Track design: JVNotch
Host: Â Bosco123Â
Co-Host: JVNotchÂ
Location: SEA #1Â
Country: RookÂ
Start field: A33 (Airfield 33)
 Plane choice: RV-8 selected by 1MADDOG1Â
Fuel burn: 1.0Â
Loadout: Pilots choice, 100% will guarantee a finishÂ
Takeoff: South EastÂ
Number of laps: 2
Time: Â 6:00 pm
Â
Views Enabled – F1 ( Normal ), F3 (external), F5 (CM Eye)
Â
Finish: Flying through the Yellow Goal Post at A33
Â
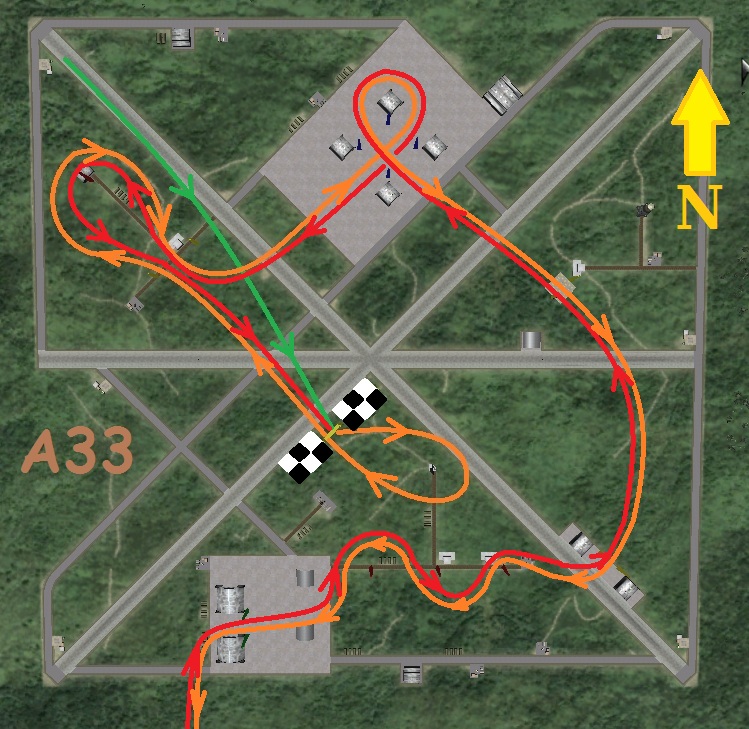
Â
Â
Â
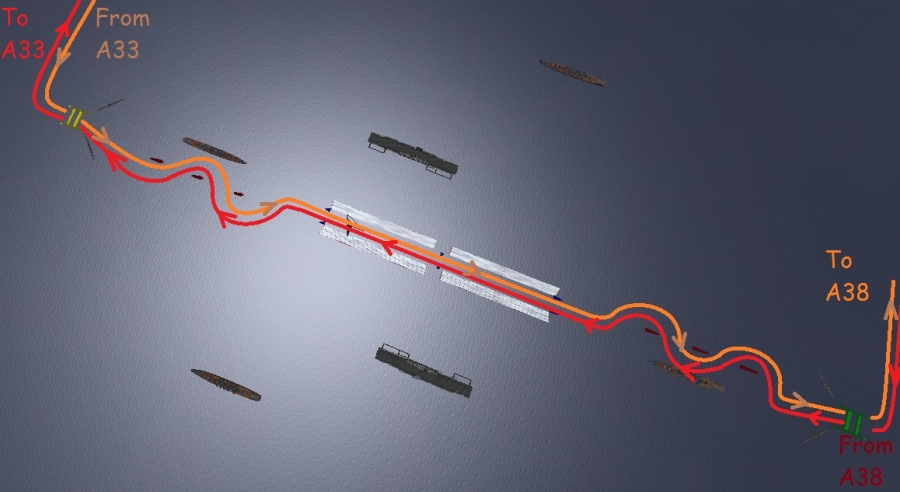
1. Â Take off SE & veer right
2. Â Pass through the middle or bottom of the Yellow Goal Post.
3.  Perform a 180° right turn around the Radar Tower to fly back through the middle or bottom of the Yellow Goal   post.
4. Â Fly to and between the two Yellow Pylons at the Vehicle Hangar.
5. Â Perform a 180° right turn around the Red Pylon at the Vehicle Hangar to exit the Yellow Pylon gate.
6. Â Execute a left turn to fly between the Blue Quad Pylons from SW to NE.
7.  After exiting the Blue Quad Pylons, perform a 270° left turn to fly back between the Blue Quad Blue Pylons   from NW to SE.
8. Â The next gate will be a small Yellow Pylon Pad Gate.
9.  Continue on to the Fighter Hangar Yellow Pylon Gate in a slight left turn to pass between them.
10. Slalom the Triple Red Pylons starting from the right side, turning left, then right, then left.
11. Fly between the Green Pylon Gate.
12. Turn left.
13. Navigate to the Yellow Goal Post of the Floating SASFRAS Grandstand Course S of A33.
14. Fly through the middle or bottom of the Yellow Goal Post.
15. Chicane through the Triple Red Pylons starting on the right side, turning left, then right, then left.
16. Fly between the three Blue Pylon Gates at the Grandstands.
17. Upon exiting the Grandstands, slalom the Triple Red Pylons starting on the left, turning right, then left & Â Â Â Â Â back right.
18. Fly through the middle or bottom of the Green Goal Post.
19. Turn left to fly to A38.
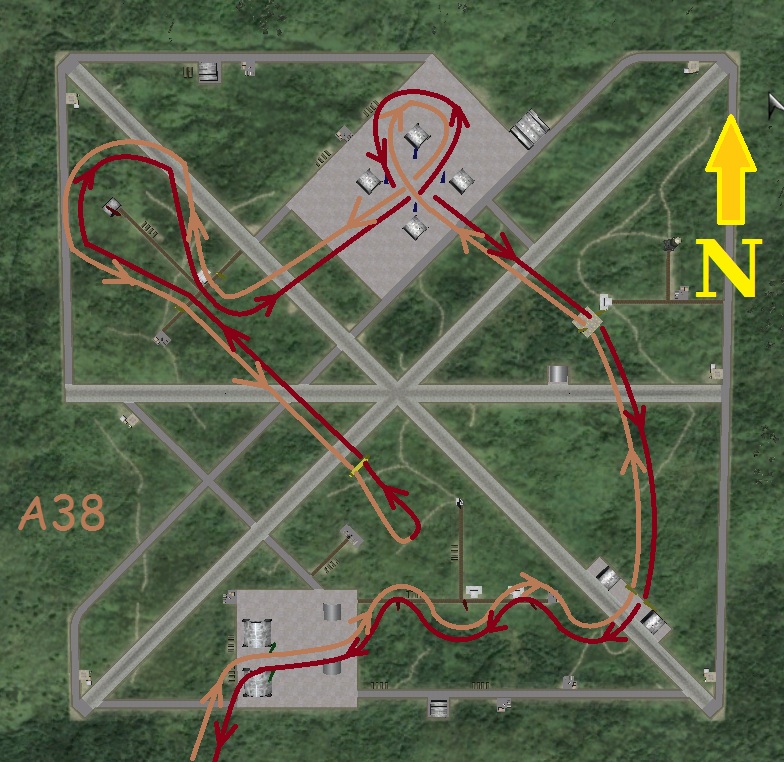
20. At A38, enter the course at the Green Pylon Gate.
21. Chicane the Triple Red Pylons starting on the left, turning right, then left, & then right.
22. Fly between the Fighter Hangar Yellow Pylon Gate.
23. Navigate to the small Yellow Pylon Pad Gate & fly between it.
24. Fly between the Blue Quad Pylons from SE to NW.
25. After exiting the Blue Quad Pylons, perform a 270° right turn to fly back through the Blue Quad Pylons from    NE to SW.
26. Fly to & through the Yellow Pylon Gate at the Vehicle Hangar.
27. From the right side of the Vehicle Hangar Red Pylon, execute a 180° left turn to exit through the Yellow       Pylon Gate.
28. Fly through the middle or bottom of the Yellow Goal Post.
29. Turn 180° (in any fashion) to fly back through the middle or bottom of the Yellow Goal Post.
30. Do the course in reverse order( from step #29 to #2)
31. The race will conclude at the end of the 2nd lap( that would be the 3rd time through the Yellow Goal Posts     from NW to SE)
This is a combination of 2 SASFRAS tracks, The Standard SASFRAS & the Floating Wrench. Alone they are very fun and challenging. You will notice there is not a single hangar or bridge pass. That is by design.Â
Height restrictions are all pylons. All turns are flat, save the 180° at the Yellow Goal Post of A38. You may use a Yo-Yo, Half Cuban Eight or a Split SÂ maneuver here.
Â
For those that have tried the SASFRAS, this will be a trip down memory lane. For those who have not, I think you will have a blast with this course & this little nimble bumble bee of a plane! Â Â
Good Luck & ~S~
- Details
- Written by: Spikes
- Category: Race Tracks
- Hits: 15
 Aces High Xtreme Racing League is proud to Present
Â
City Turn and Burn 500
Â
Race info:
Â
Previous runings: noneÂ
Track design: Bosco123(aka Skifurd)Â
Host: JVNotchÂ
Location: SEA #1Â
Country: BishopÂ
Start field: A29 (Airfield 29)
 Plane choice: Yak-9U selected by 1MADDOG1Â
Fuel burn: 1.0Â
Loadout: Pilots choice, 100% will guarantee a finishÂ
Takeoff: South EastÂ
Number of laps: 5
Â
Views Enabled – F1 ( Normal ), F3 (external), F5 (CM Eye)
Â
Finish: Flying through the grass bomber hangar that runs along the North West runway
Â
Â
Â
Track description:
Â
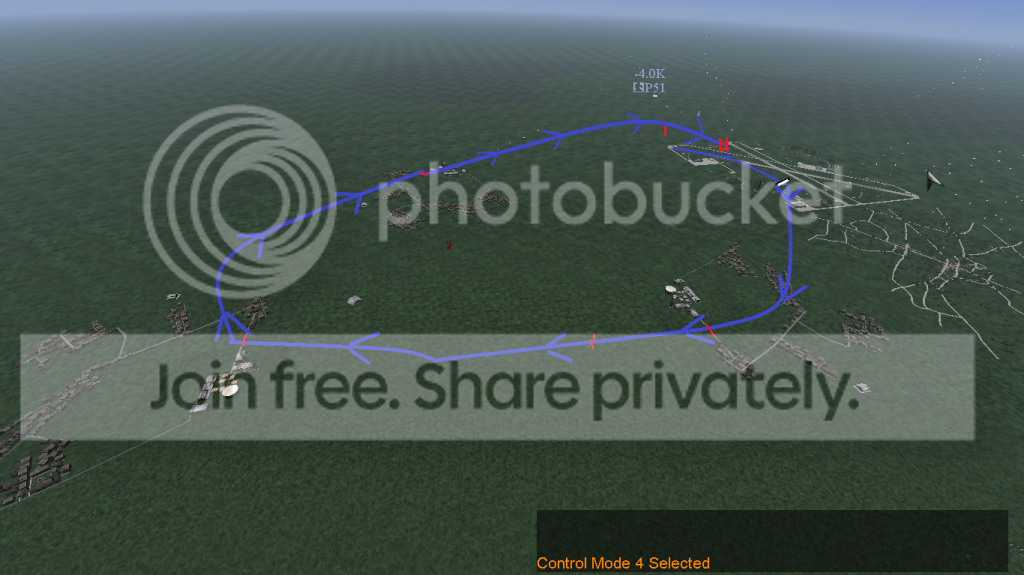
1. Â Take off South East and immediately turn right towards the grass bomber hangar, that runs along the North West runway.Â
Â
2. Â Pass through the bomber hangar and head for city #1 slightly to the right.
Â
3. Â Pass through the city bridge, and then split the blue pylons. Â Head for city #2 in front of you.
Â
4. Â Pass through city #2 bridge and make a right turn towards the next city(#3).Â
  (no alt. restrictions.)
Â
5. Â Pass through the city #3 bridge and turn right towards the red pylon labeled #1.
Â
6. Â Turn right around the red pylon, and head for the green goal post.Â
Â
7. Â Pass through the green goal post (center or bottom)Â
Â
8. Â Line back up for the grass bomber hangar running along the North West runway. Â This will complete the lap.
Â
9. Â Complete this track 4 more times to complete the heat. 6 total passes through Bomber Hangar.
Â
Â
This, I believe, is Bosco123's first track to be submitted & run by this league. I hope he gets a chance to make more. Thank you for making it & I hope everyone enjoys  :)